> ## Documentation Index
> Fetch the complete documentation index at: https://moengage-unity-sdk-initialization-split.mintlify.site/llms.txt
> Use this file to discover all available pages before exploring further.
# Configure Amazon SES Email Settings
> Step-by-step guide to configure Amazon SES as your email service provider in MoEngage, including production access, IAM setup, and SMTP config.
This article provides step-by-step instructions to configure email settings in Amazon SES.
# Introduction
Amazon Simple Email Service (Amazon SES) is a cloud-based email service provider that can integrate into any application for high volume email automation. Amazon SES lets you reach customers confidently without an on-premises Simple Mail Transfer Protocol (SMTP) email server using the Amazon SES API or SMTP interface.
Ensure that you have admin access to your Amazon SES account.
# Configure the Amazon SES account
Complete the following actions in your Amazon SES account before you configure email settings in MoEngage:
## Request Production Access for your Amazon SES Account
By default, Amazon SES operates in a sandbox environment. This means you can only send emails to verified email addresses and from verified identities. To send emails to all your recipients, you must request production access for your SES account.\
For more information, refer to [Request production access (Moving out of the Amazon SES sandbox)](https://docs.aws.amazon.com/ses/latest/dg/request-production-access.html).
## Validate your Domain in Amazon SES
You must validate the domain you plan to use for sending emails in Amazon SES. Ensure the domain is validated in the same AWS region where you configured your SES account for production. This step verifies that you own the domain and helps maintain your sender reputation.
For more information, refer to [Creating and verifying identities in Amazon SES](https://docs.aws.amazon.com/ses/latest/dg/creating-identities.html).
## Create SMTP Credentials in Amazon SES
Generate Simple Mail Transfer Protocol (SMTP) credentials in Amazon SES. Ensure you create these credentials in the same AWS region where you validated your domains and enabled production access.
For more information, refer to [Obtaining Amazon SES SMTP credentials](https://docs.aws.amazon.com/ses/latest/dg/smtp-credentials.html). Make sure to note these credentials in a secure location, as they will not be visible again after you close the window.
# Configure Email Settings
## Add Settings in MoEngage UI
1. Log in to your MoEngage workspace.
2. Navigate to **Settings** > Under **Channels** > **Email** > **Sender Configuration** tab> Click **Add Sender**. ** **
3. In the following **Add Sender** screen that appears, choose **Amazon SES** and add the following SMTP details as shown below.
**
3. In the following **Add Sender** screen that appears, choose **Amazon SES** and add the following SMTP details as shown below.
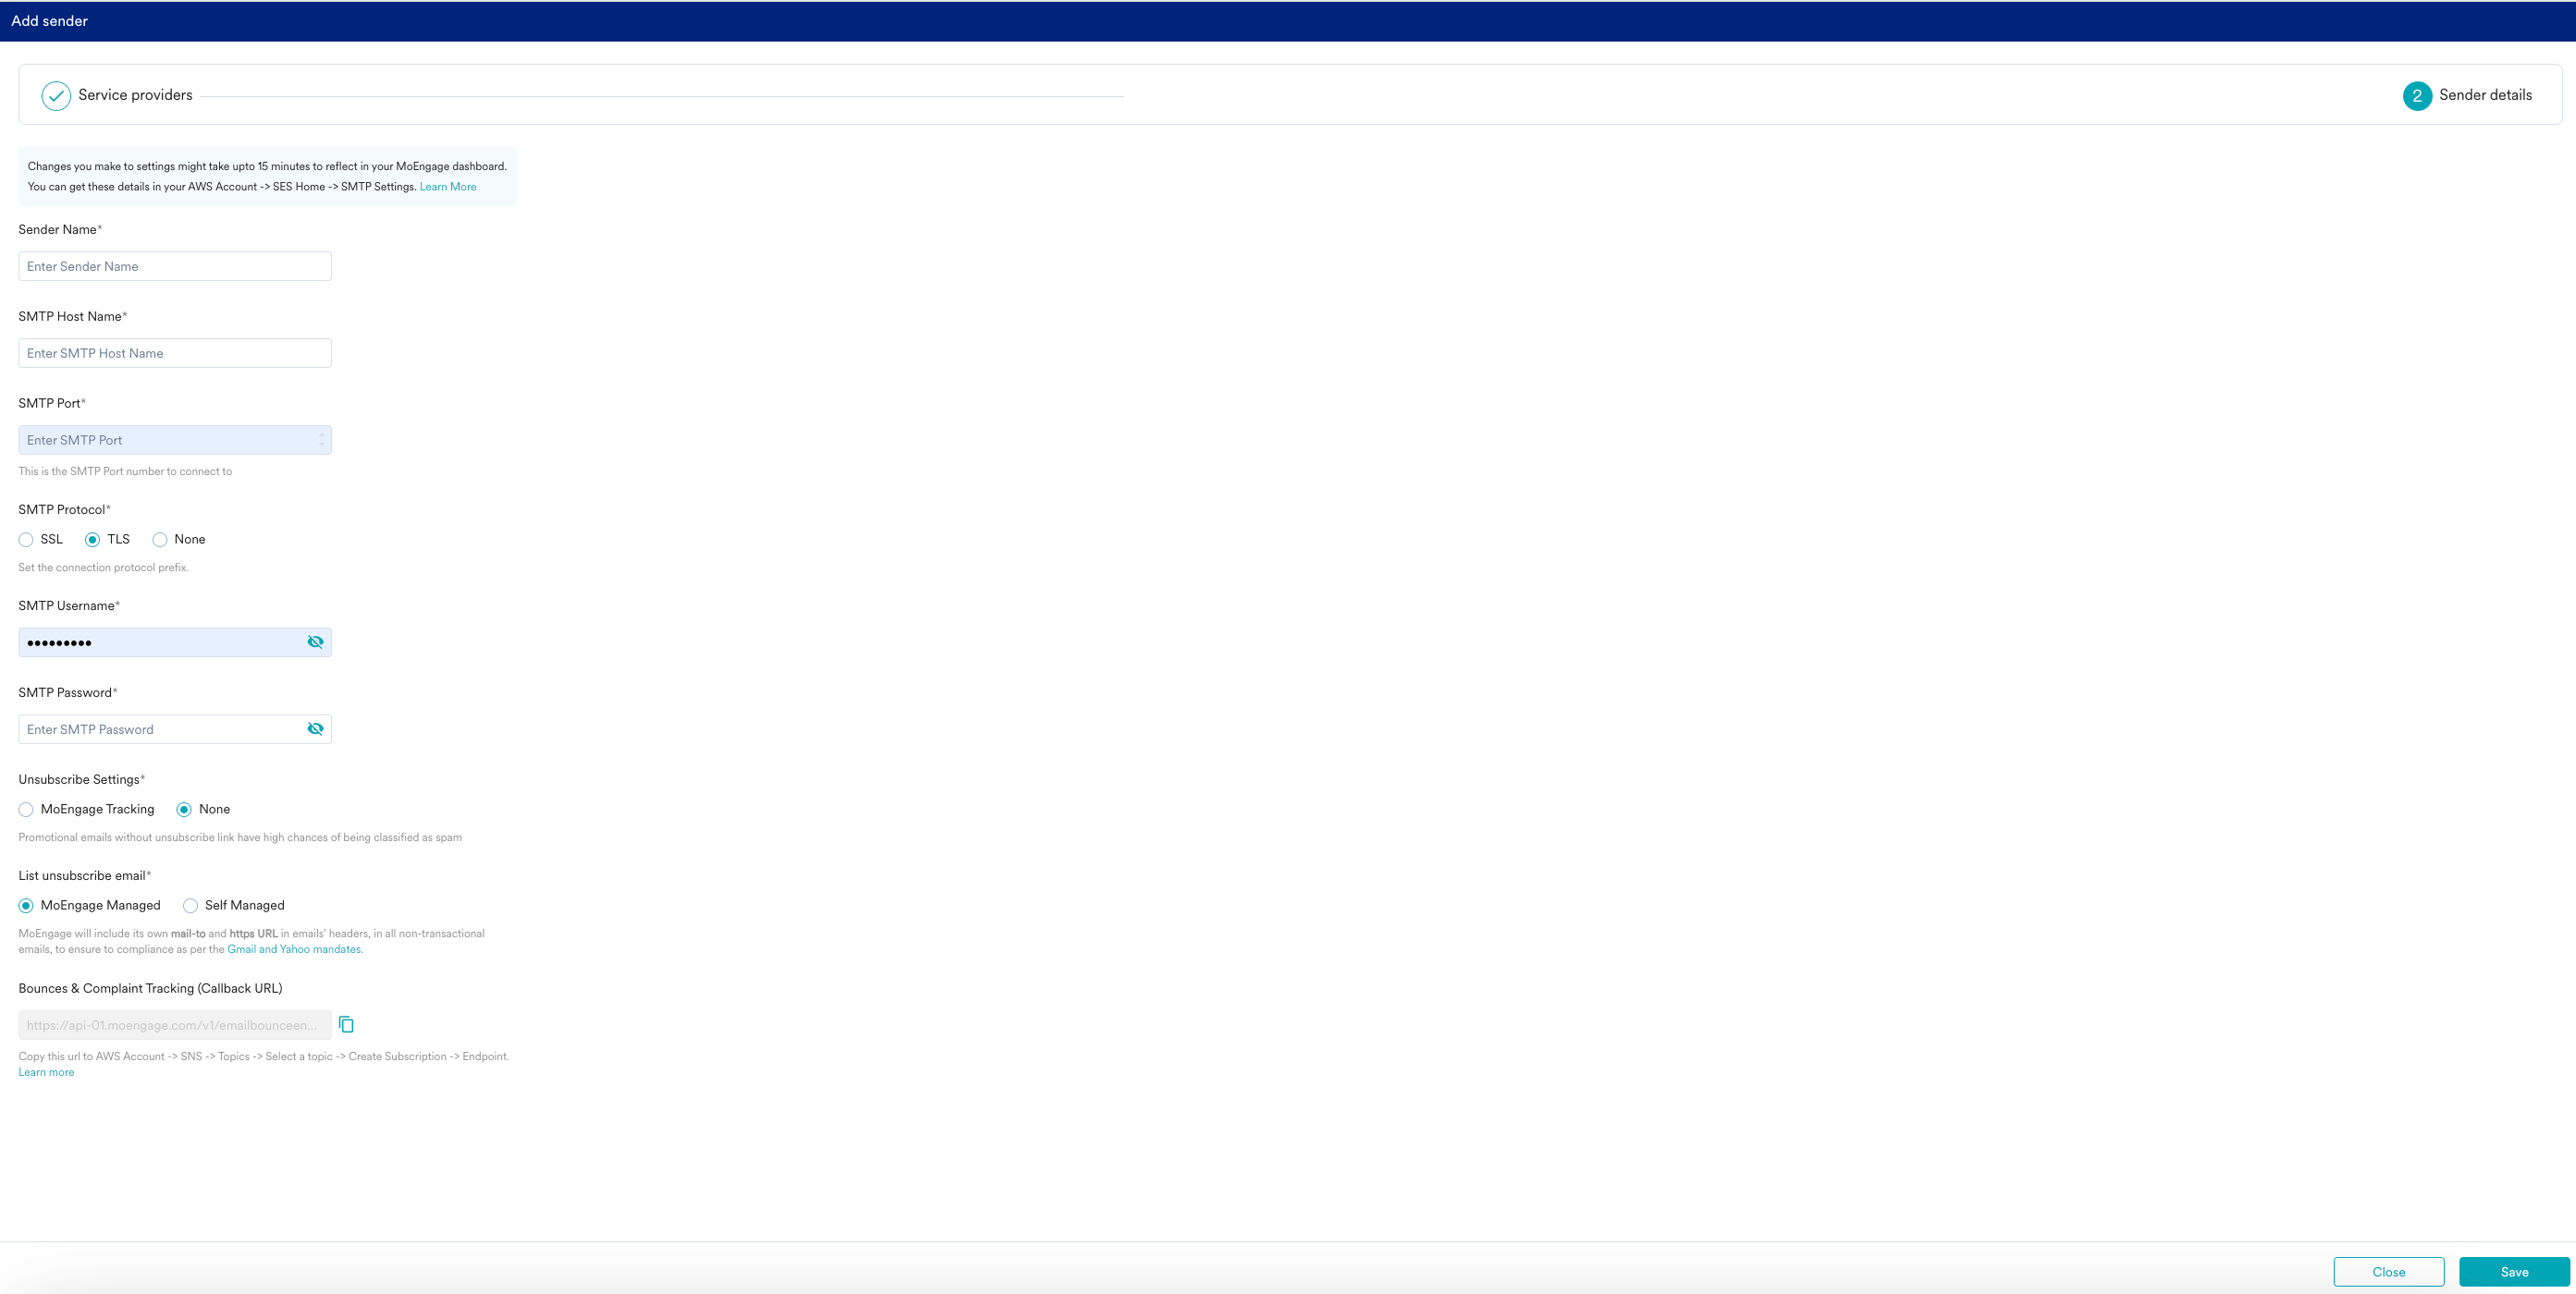 | Field | Description |
| -------------- | ---------------------------------------------------------------------------------------------------- |
| Sender Name | Enter a sender name. |
| SMTP Host Name | You can obtain this information from your Amazon SES account. |
| SMTP Port | Enter **587**. Port 587 is the recommended port to avoid rate limits from certain service providers. |
| SMTP Protocol | Select **TLS**. |
| SMTP Username | You can obtain this information from your Amazon SES account. |
| SMTP Password | You can obtain this information from your Amazon SES account. |
4. Configure **Unsubscribe Settings** based on your requirements. For more information, refer to [Handle Email Unsubscribes](/user-guide/campaigns-and-channels/email/getting-started-with-email/handle-unsubscribes-in-emails).
5. Configure the **List unsubscribe email** settings based on your requirements. For more information, refer to [List Unsubscribe Email](/user-guide/campaigns-and-channels/email/getting-started-with-email/list-unsubscribe-email).
6. You can use the **Bounce and Compliant Tracking** URL while configuring SNS settings in your Amazon SES account.
7. Click **Save**. The added connector is listed under the **Sender configuration** tab.
8. Navigate to the **General Settings** tab.
9. From the **Set a default sender** drop-down, select the sender you added.
10. From the **User Attribute that stores the user’s email address** drop-down, select "Email (Standard)".
11. In the **“From” email address(s)** field, add the from address. The domain (the part after @) must be a validated one on Amazon SES.
| Field | Description |
| -------------- | ---------------------------------------------------------------------------------------------------- |
| Sender Name | Enter a sender name. |
| SMTP Host Name | You can obtain this information from your Amazon SES account. |
| SMTP Port | Enter **587**. Port 587 is the recommended port to avoid rate limits from certain service providers. |
| SMTP Protocol | Select **TLS**. |
| SMTP Username | You can obtain this information from your Amazon SES account. |
| SMTP Password | You can obtain this information from your Amazon SES account. |
4. Configure **Unsubscribe Settings** based on your requirements. For more information, refer to [Handle Email Unsubscribes](/user-guide/campaigns-and-channels/email/getting-started-with-email/handle-unsubscribes-in-emails).
5. Configure the **List unsubscribe email** settings based on your requirements. For more information, refer to [List Unsubscribe Email](/user-guide/campaigns-and-channels/email/getting-started-with-email/list-unsubscribe-email).
6. You can use the **Bounce and Compliant Tracking** URL while configuring SNS settings in your Amazon SES account.
7. Click **Save**. The added connector is listed under the **Sender configuration** tab.
8. Navigate to the **General Settings** tab.
9. From the **Set a default sender** drop-down, select the sender you added.
10. From the **User Attribute that stores the user’s email address** drop-down, select "Email (Standard)".
11. In the **“From” email address(s)** field, add the from address. The domain (the part after @) must be a validated one on Amazon SES.
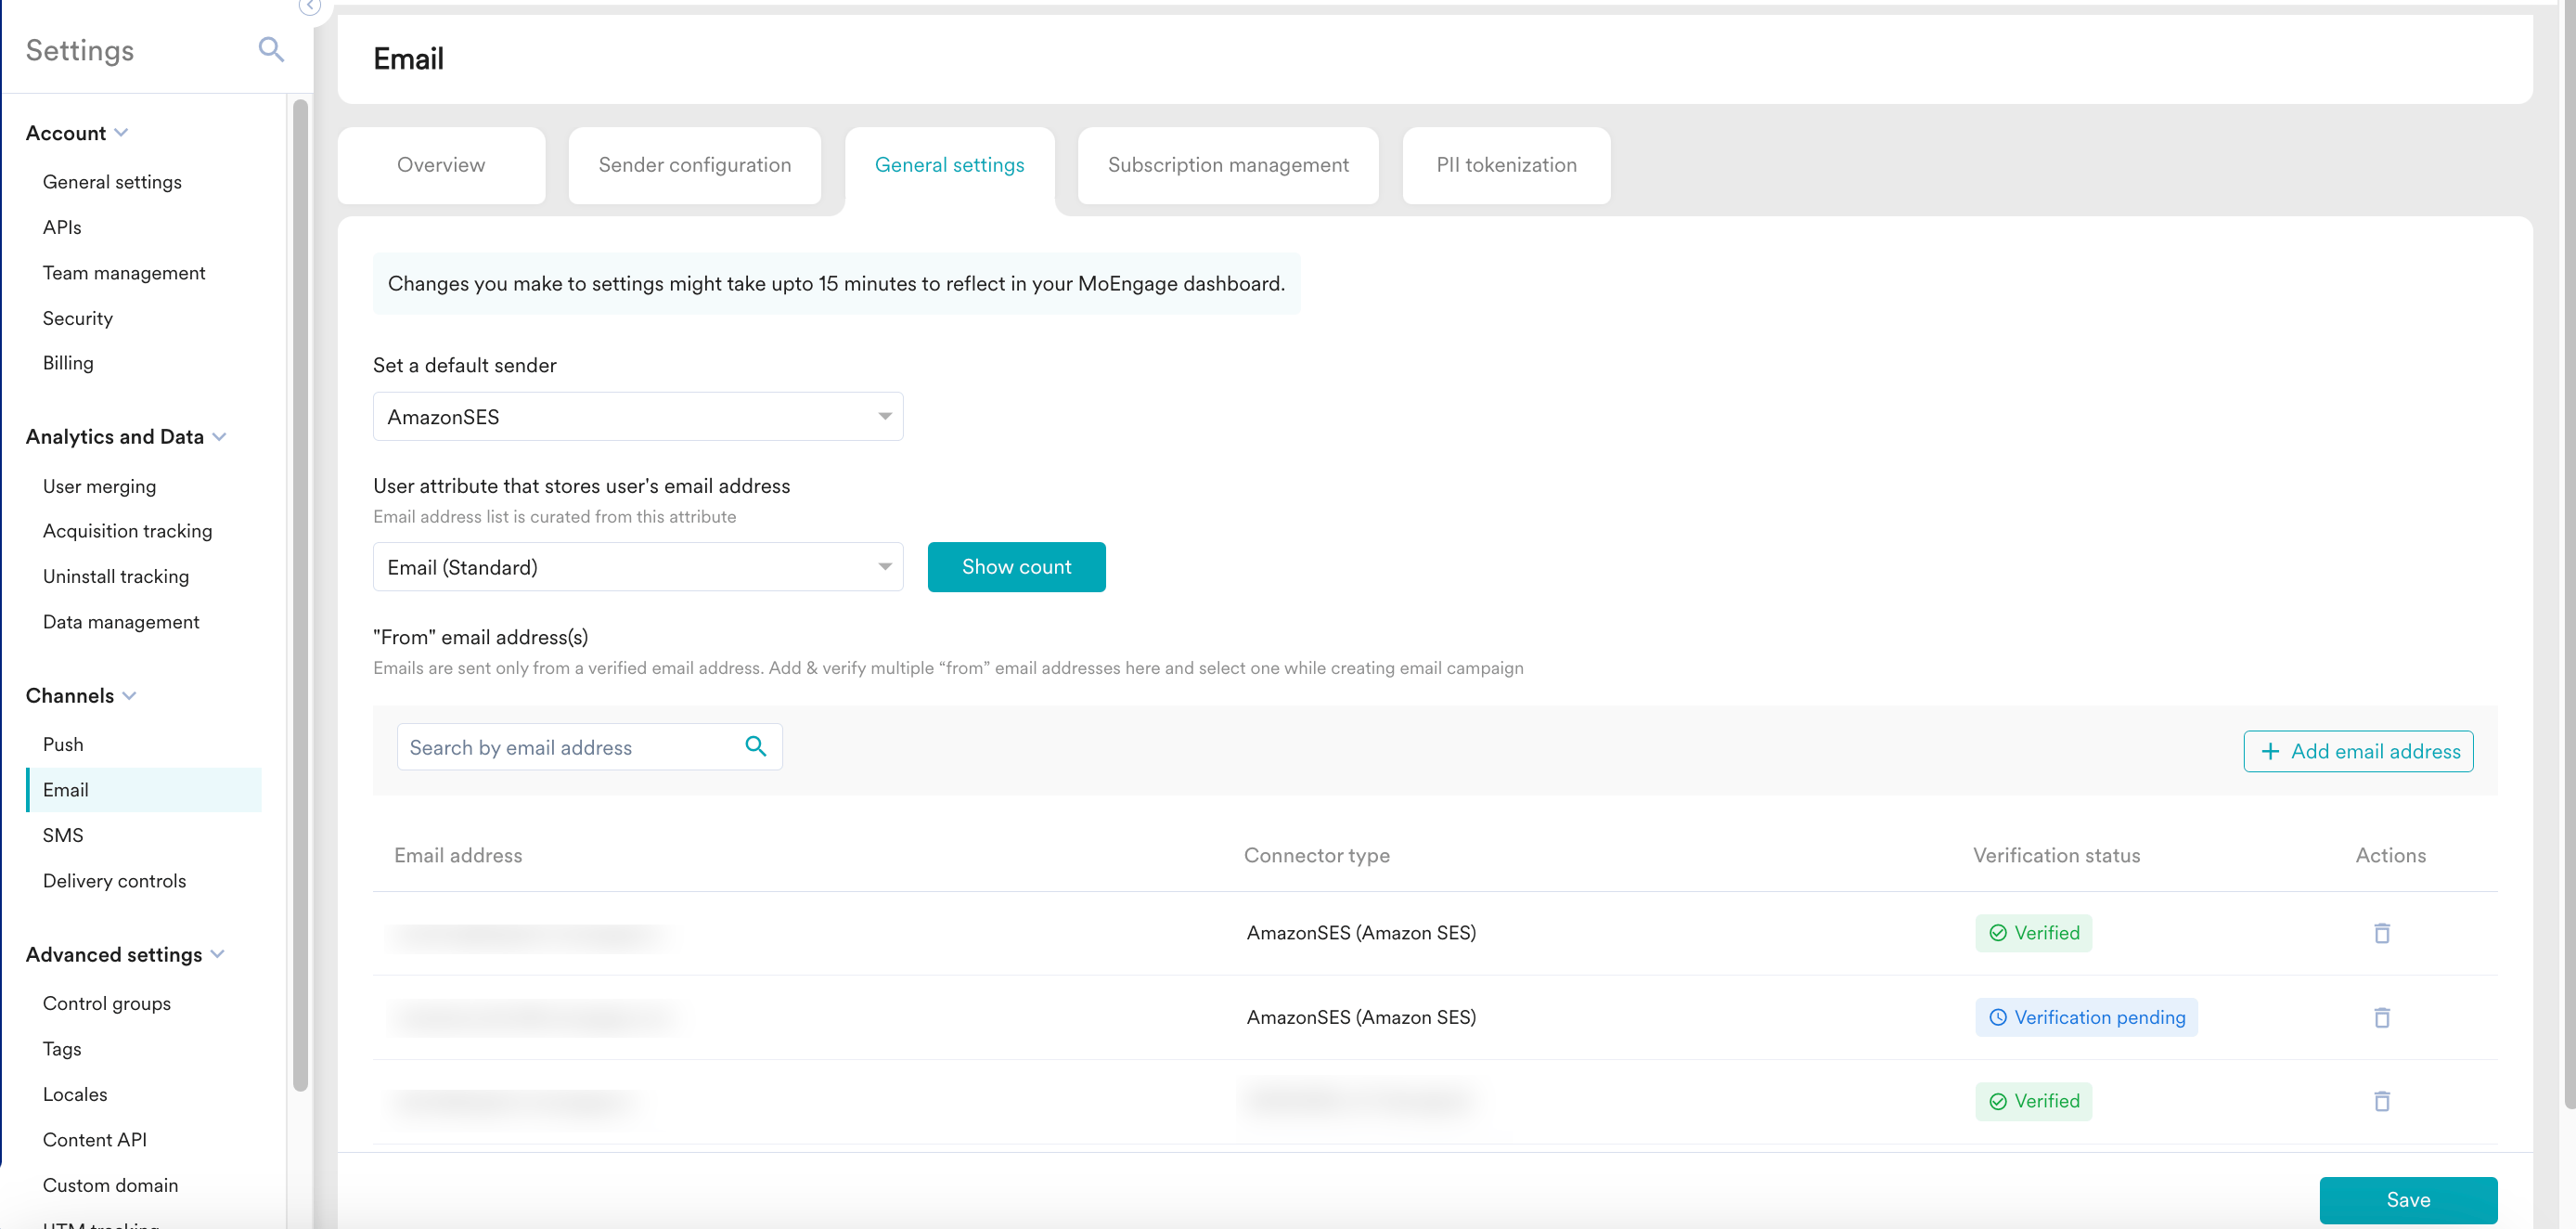 12. **Save** the settings. The “from address” mailbox added above will receive a verification email. Ask your IT team to get you access to that mailbox or ask them to click that verification link.
# Configure the Configuration Set in SES
Use Configuration sets to use separate IP pools. For more information, refer [here](https://docs.aws.amazon.com/ses/latest/dg/creating-configuration-sets.html).
# Configure SNS settings
Use SNS settings to configure the event webhook. To configure SNS settings, perform the steps below in your Amazon SES account. For more information, refer to [Configuring Amazon SNS notifications for Amazon SES](https://docs.aws.amazon.com/ses/latest/dg/configure-sns-notifications.html#configure-feedback-notifications-console).
1. In Amazon SES, navigate to **Topics**.
2. Select the Topic created under the configuration set.
12. **Save** the settings. The “from address” mailbox added above will receive a verification email. Ask your IT team to get you access to that mailbox or ask them to click that verification link.
# Configure the Configuration Set in SES
Use Configuration sets to use separate IP pools. For more information, refer [here](https://docs.aws.amazon.com/ses/latest/dg/creating-configuration-sets.html).
# Configure SNS settings
Use SNS settings to configure the event webhook. To configure SNS settings, perform the steps below in your Amazon SES account. For more information, refer to [Configuring Amazon SNS notifications for Amazon SES](https://docs.aws.amazon.com/ses/latest/dg/configure-sns-notifications.html#configure-feedback-notifications-console).
1. In Amazon SES, navigate to **Topics**.
2. Select the Topic created under the configuration set.
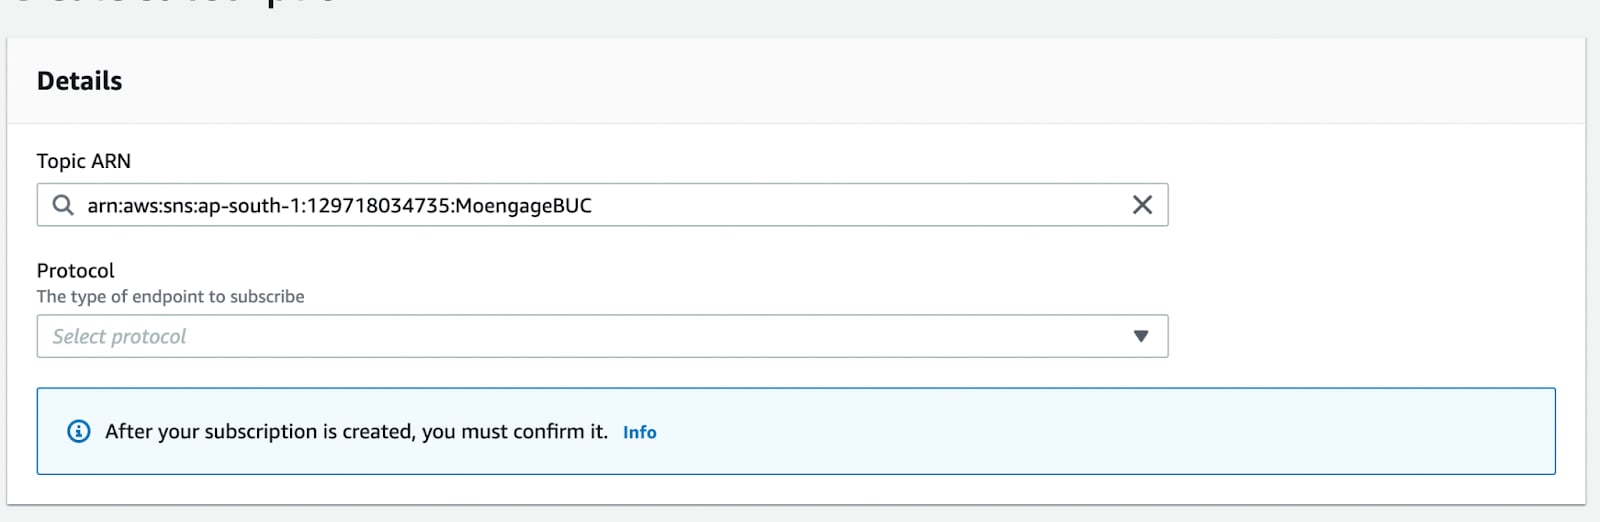
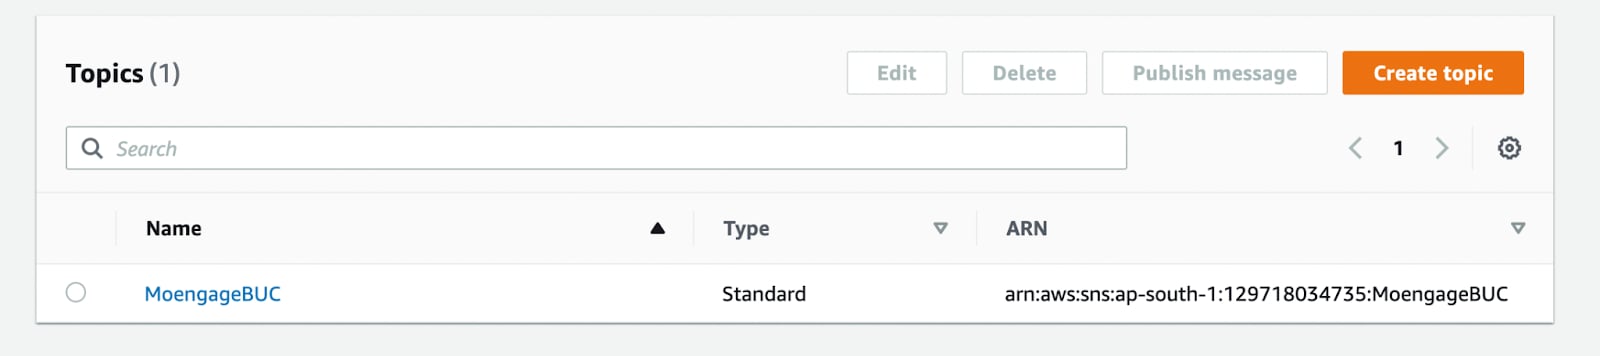 3. Click **Create Subscription**.
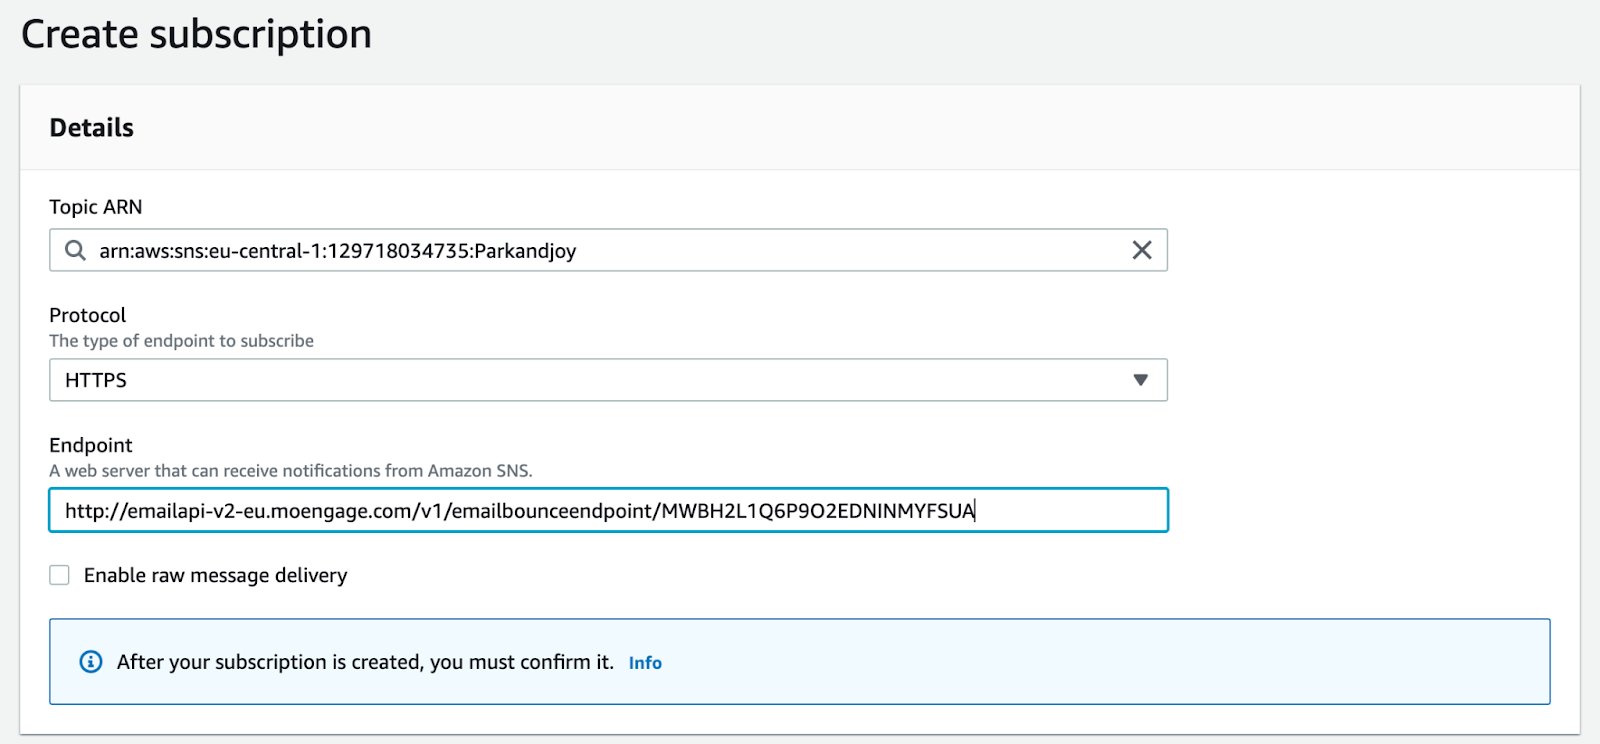
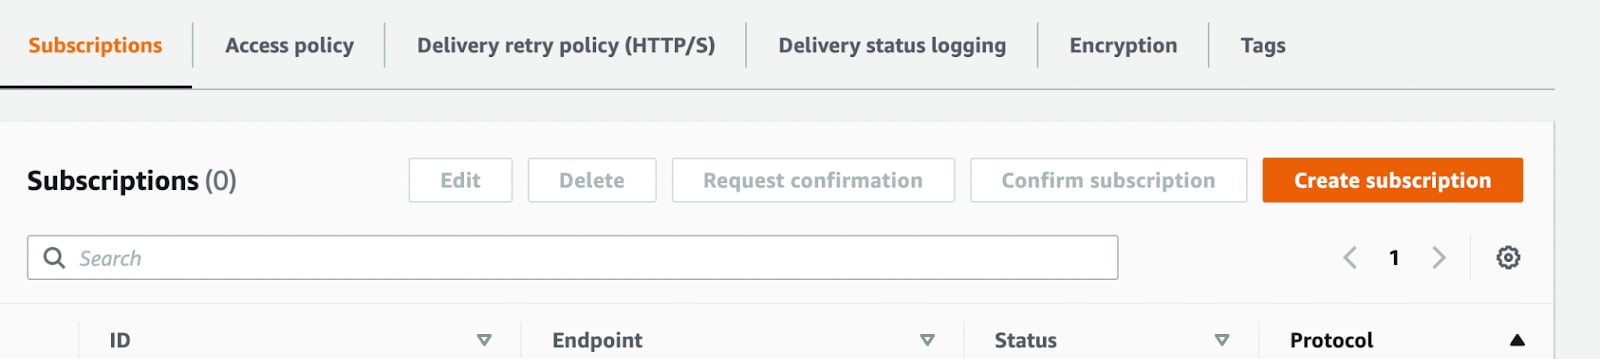 4. Choose the **Protocol** as **HTTPS**.
 5. In the **Endpoint URL** field, paste the **Bounce and Complaint Tracking URL** you obtained from the MoEngage email settings page.
6. Clear the **Enable raw message delivery** check box.
5. In the **Endpoint URL** field, paste the **Bounce and Complaint Tracking URL** you obtained from the MoEngage email settings page.
6. Clear the **Enable raw message delivery** check box.
 7. Click **Create subscription**.
8. Navigate to **Subscriptions** to view your new subscription.
7. Click **Create subscription**.
8. Navigate to **Subscriptions** to view your new subscription.
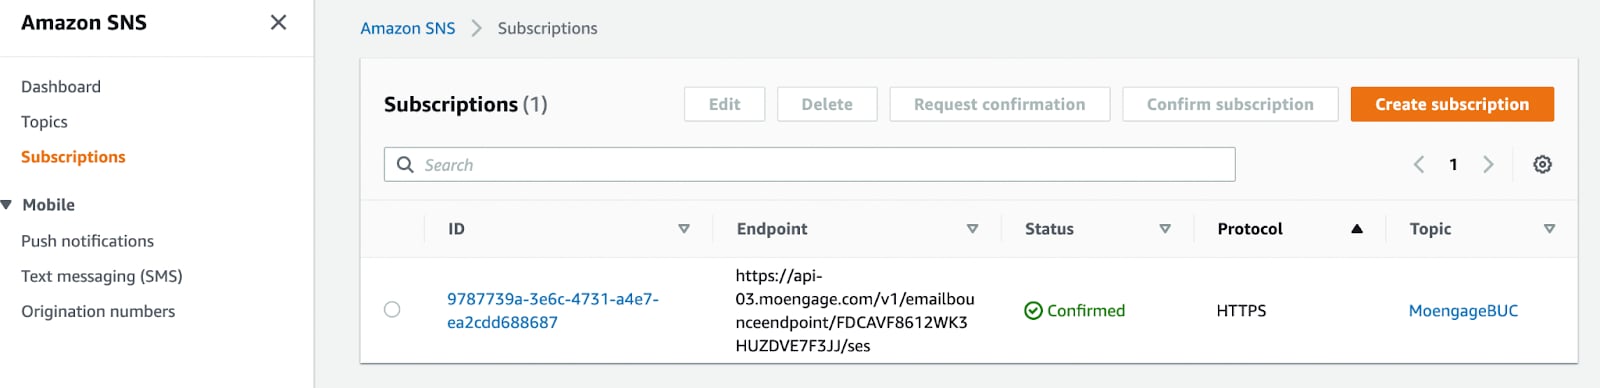 9. If the subscription status remains **Pending confirmation** after 1-2 hours, select the subscription and then click **Request confirmation**. Ensure the subscription status changes to **Confirmed** to complete this step.
  # Test Email Settings
To verify your Amazon SES integration, refer to [Test the Email Settings](/user-guide/campaigns-and-channels/email/getting-started-with-email/email-setup-and-content-validation).
# Next Steps
After your Amazon SES sender is configured, you can proceed to create and send your email campaigns in MoEngage. For more information, refer to [Create Email Campaign](/user-guide/campaigns-and-channels/email/create/create-an-email-campaign).
# Test Email Settings
To verify your Amazon SES integration, refer to [Test the Email Settings](/user-guide/campaigns-and-channels/email/getting-started-with-email/email-setup-and-content-validation).
# Next Steps
After your Amazon SES sender is configured, you can proceed to create and send your email campaigns in MoEngage. For more information, refer to [Create Email Campaign](/user-guide/campaigns-and-channels/email/create/create-an-email-campaign).