> ## Documentation Index
> Fetch the complete documentation index at: https://moengage-unity-sdk-initialization-split.mintlify.site/llms.txt
> Use this file to discover all available pages before exploring further.
# Handle Unsubscribes in Emails
> Learn how to manage email unsubscribes in MoEngage with global unsubscribe, list-unsubscribe, and subscription categories for compliance.
# Overview
Marketers using emails must provide an *Unsubscribe* link in their non-transactional communications to maintain a good domain reputation and comply with regulations. A user hence unsubscribing should be avoided from future communication of a similar nature.
MoEngage as a platform helps marketers adhere to the rule above by providing the following types of Subscription Management:
* [Global Unsubscribe](/user-guide/campaigns-and-channels/email/getting-started-with-email/handle-unsubscribes-in-emails#global-unsubscribe)
* [List-Unsubscribe](/user-guide/campaigns-and-channels/email/getting-started-with-email/handle-unsubscribes-in-emails#list-unsubscribe)
* [Subscription Categories](/user-guide/campaigns-and-channels/email/getting-started-with-email/handle-unsubscribes-in-emails#subscription-categories)
# Types of Subscription Management in MoEngage Emails
## Global Unsubscribe
Global unsubscribe allows users to unsubscribe from all non-transactional emails of your brand or business. When a user clicks this link, they can either be unsubscribed directly or be redirected to a landing page to get double confirmation before unsubscribing.
## List-Unsubscribe
List-unsubscribe is an ISP-provided way to unsubscribe with just one click. It goes into your email header, and your mailbox providers decide whether to show it to the recipients depending on the reputation, volume, and engagement with the sender. While this used to be a best practice that the clients could follow, since 2024, this is a mandatory compliance to be fulfilled according to [Google and Yahoo](https://www.moengage.com/blog/upcoming-gmail-yahoo-email-deliverability-changes/).
## Subscription Categories
Subscription Categories allows users to selectively unsubscribe from categories of your communications. Suppose you send emails to share newsletters, product updates, and promotional categories. You can use them to let users subscribe/unsubscribe selectively from the categories that they are interested/not interested in from a single page.
In short, while Subscription Categories are an optional way of managing subscriptions, the other two are mandated for all bulk email senders in email marketing. For more information on subscription categories, click [here](https://moengage-user-guide.mintlify.app/user-guide/campaigns-and-channels/email/getting-started-with-email/configure-subscription-categories#moengage-landing-page).
# MoEngage Managed vs. Custom or Self-Managed
Broadly, MoEngage offers marketers the following ways to set these up:
* **MoEngage Managed:** This option allows you to seamlessly use MoEngage capabilities to capture and update a user's subscription on MoEngage. If you have other systems (third-party tools or in-house systems), you can forward this information from MoEngage to those systems.
* **Self-Managed, Custom Managed, or None:** This option allows you to invoke your brand's handling of user subscription; it is generally used when brands want to manage user preferences on their side. In such cases, brands would need to capture users' subscriptions and update both their systems and MoEngage.
# How to Set Them Up?
## Global Unsubscribe
With all senders that MoEngage offers out-of-the-box or with whom MoEngage has a partnership or custom senders (that is, with Sendgrid, Amazon SES, Sparkpost, and Mandrill) that MoEngage customers have bought, MoEngage provides an option called *Unsubscribe Settings* as mentioned [here](/user-guide/campaigns-and-channels/email/getting-started-with-email/configure-email-channel). You can choose *MoEngage Tracking* here to get help from MoEngage to unsubscribe your users based on their request.
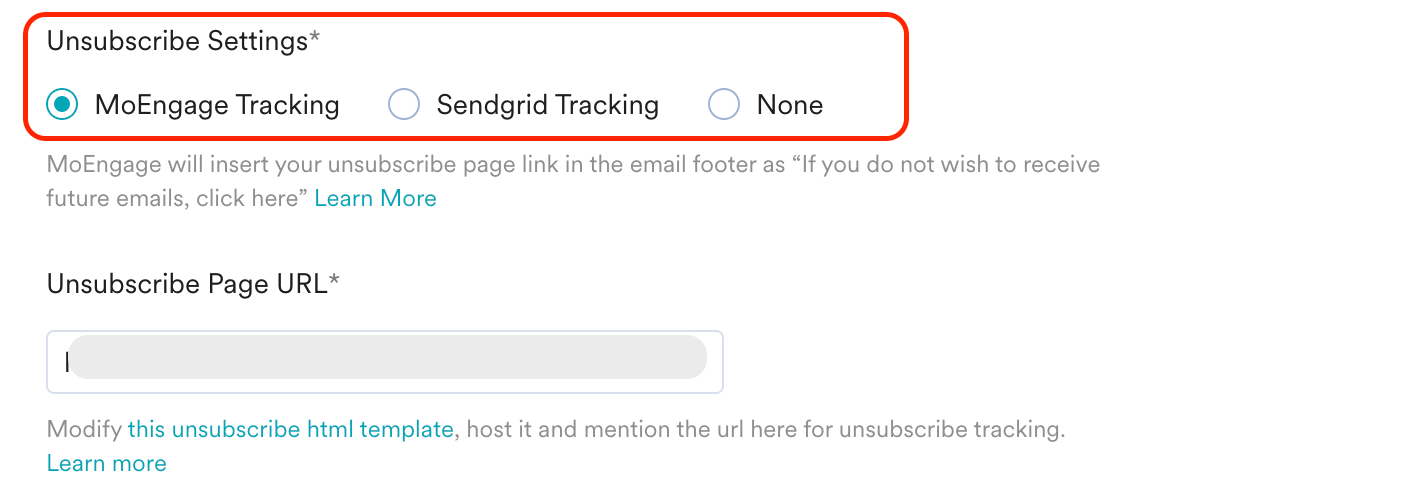 As mentioned in the option, this inserts the following text at the bottom of your email by default:
“If you do not wish to receive future emails, click here”
The ***click here*** will be hyperlinked to the URL provided in the *Unsubscribe Page URL*. This will directly unsubscribe the user and will have a call to action (CTA) to resubscribe them if they wish to.
If you want to add any further custom behavior, like a survey to understand why your users are unsubscribing, you can use a custom page of your choice by providing the link to the same in the *Unsubscribe Page URL*.
Only in the case of Sendgrid sender, there is a way to use their out-of-the-box offering to manage subscriptions at the global level. To configure the same, perform the steps mentioned [here.](https://www.twilio.com/docs/sendgrid/ui/sending-email/subscription-tracking#how-do-i-enable-subscription-tracking)
When this is configured, the sender (Sendgrid) will insert the following text at the bottom of your email by default:
“If you’d Like to stop receiving these emails click here”
The ***click here*** will be hyperlinked with the unsubscribe URL of SendGrid. When a user clicks the same, SendGrid automatically unsubscribes the user and updates MoEngage if the webhooks are correctly configured at SendGrid in real time.
In every connector, apart from the **MoEngage Tracking** option, **None** will be present. On selecting this, MoEngage hands over the responsibility of adding a link for the users to unsubscribe and the processing of the same to you. You must handle this with care and update the preference back at MoEngage.
## List-Unsubscribe
Regardless of the sender you are using, we provide an option called *One-click Unsubscribe* as mentioned [here](/user-guide/campaigns-and-channels/email/getting-started-with-email/list-unsubscribe-email). You can choose **MoEngage Managed** here to get help from MoEngage to be compliant and provide a one-click way for your users to unsubscribe.
Regardless of the sender, apart from the **MoEngage Managed** option, self-managed will be present. On selecting this, MoEngage adds the provided URL and the email ID in the Email headers and hands over the responsibility of processing the requests raised by the users to you. You must handle this with care and update the preference back at MoEngage. For more information, click [here](/user-guide/campaigns-and-channels/email/getting-started-with-email/list-unsubscribe-email).
## Subscription Categories
To configure the subscription categories in MoEngage, perform the following steps:
1. On the left navigation menu in the MoEngage dashboard, go to **Settings** > **Channel** > **Email**.
2. In the Email page, select the **Subscription management** tab, and then select the **Subscription categories** tab.
3. Click **Configure subscription categories**.\
You can use the out-of-the-box landing page provided by MoEngage to configure your subscription categories or bring your custom landing page to define the same. For more information, click [here](/user-guide/campaigns-and-channels/email/getting-started-with-email/configure-subscription-categories).
If you are using custom landing pages, perform the necessary steps to pass the preference change back to MoEngage using the API [here](https://www.moengage.com/docs/api/subscription-preferences/update-subscription-preferences) so that in the future, if users are targeted in the wrong email, MoEngage can take necessary action.
# Create Emails in MoEngage with the Types of Subscription Offered
## Global Unsubscribe
As mentioned above, in the case of MoEngage-Tracking or Sendgrid Tracking, a default text is always added to the bottom of the email. However, you can customize the position of the same.
* Perform the following steps to insert the unsubscribe link configured in sender settings that tracks unsubscribes through MoEngage in the drag and drop editor:
1. Select the text in which you want to insert the unsubscribe link.
2. In the text editor, click **Special links** > **Frequently used** > **MoE Tracking Unsubscribe Link**.
As mentioned in the option, this inserts the following text at the bottom of your email by default:
“If you do not wish to receive future emails, click here”
The ***click here*** will be hyperlinked to the URL provided in the *Unsubscribe Page URL*. This will directly unsubscribe the user and will have a call to action (CTA) to resubscribe them if they wish to.
If you want to add any further custom behavior, like a survey to understand why your users are unsubscribing, you can use a custom page of your choice by providing the link to the same in the *Unsubscribe Page URL*.
Only in the case of Sendgrid sender, there is a way to use their out-of-the-box offering to manage subscriptions at the global level. To configure the same, perform the steps mentioned [here.](https://www.twilio.com/docs/sendgrid/ui/sending-email/subscription-tracking#how-do-i-enable-subscription-tracking)
When this is configured, the sender (Sendgrid) will insert the following text at the bottom of your email by default:
“If you’d Like to stop receiving these emails click here”
The ***click here*** will be hyperlinked with the unsubscribe URL of SendGrid. When a user clicks the same, SendGrid automatically unsubscribes the user and updates MoEngage if the webhooks are correctly configured at SendGrid in real time.
In every connector, apart from the **MoEngage Tracking** option, **None** will be present. On selecting this, MoEngage hands over the responsibility of adding a link for the users to unsubscribe and the processing of the same to you. You must handle this with care and update the preference back at MoEngage.
## List-Unsubscribe
Regardless of the sender you are using, we provide an option called *One-click Unsubscribe* as mentioned [here](/user-guide/campaigns-and-channels/email/getting-started-with-email/list-unsubscribe-email). You can choose **MoEngage Managed** here to get help from MoEngage to be compliant and provide a one-click way for your users to unsubscribe.
Regardless of the sender, apart from the **MoEngage Managed** option, self-managed will be present. On selecting this, MoEngage adds the provided URL and the email ID in the Email headers and hands over the responsibility of processing the requests raised by the users to you. You must handle this with care and update the preference back at MoEngage. For more information, click [here](/user-guide/campaigns-and-channels/email/getting-started-with-email/list-unsubscribe-email).
## Subscription Categories
To configure the subscription categories in MoEngage, perform the following steps:
1. On the left navigation menu in the MoEngage dashboard, go to **Settings** > **Channel** > **Email**.
2. In the Email page, select the **Subscription management** tab, and then select the **Subscription categories** tab.
3. Click **Configure subscription categories**.\
You can use the out-of-the-box landing page provided by MoEngage to configure your subscription categories or bring your custom landing page to define the same. For more information, click [here](/user-guide/campaigns-and-channels/email/getting-started-with-email/configure-subscription-categories).
If you are using custom landing pages, perform the necessary steps to pass the preference change back to MoEngage using the API [here](https://www.moengage.com/docs/api/subscription-preferences/update-subscription-preferences) so that in the future, if users are targeted in the wrong email, MoEngage can take necessary action.
# Create Emails in MoEngage with the Types of Subscription Offered
## Global Unsubscribe
As mentioned above, in the case of MoEngage-Tracking or Sendgrid Tracking, a default text is always added to the bottom of the email. However, you can customize the position of the same.
* Perform the following steps to insert the unsubscribe link configured in sender settings that tracks unsubscribes through MoEngage in the drag and drop editor:
1. Select the text in which you want to insert the unsubscribe link.
2. In the text editor, click **Special links** > **Frequently used** > **MoE Tracking Unsubscribe Link**.
 * **Perform the following steps to insert a custom unsubscribe link while using drag and drop editor:**
1. Drag and drop an HTML block from the editor to the required position.
2. Add the following HTML code:
```html wrap theme={null}
Unsubscribe here
```
Here, `https://www.abc.com/unsubscribe` is where you must add the unsubscribe URL you want to use.
- For this to work correctly, the href attribute should always be linked to the protocol (HTTP or HTTPS).
- You can replace the *Unsubscribe here* text with the required text in any supported language.
**Custom HTML Editor**
Use the following HTML code to position your unsubscribe text and link in a custom manner:
```html wrap theme={null}
Unsubscribe here
```
* You can always add further HTML attributes and CSS values to beautify the same further.
* Also, if you want only the Text to be different and not the link, follow the same code with one minor change:
* href should have the value provided in the settings itself.
**MoEngage-Managed Sendgrid Account**
If you are in Sendgrid Tracking, you can use a replacement text after defining the same in your Sendgrid dashboard. If you are using the MoEngage-managed Sendgrid account, the replacement text is *\[unsubscribe\_here]*.
**Custom-Managed Sendgrid Account**
If you have brought your Sendgrid account, you can configure a replacement tag. To do so:
1. Go to **Sendgrid** > **Settings** > **Tracking** > **Suppression Tracking**.
2. Add your preferred replacement tag.
Now you can add the same by inserting a link in your email, wherever you want and entering the replacement tag as the value.
* Beware of the replacement tag that you define, as Sendgrid replaces the tag with the link wherever it finds the same.
* The replacement tag is case-sensitive.
As mentioned above, the creator or marketer must add the unsubscribe link and one can do the same by inserting links wherever they want in their email.
## List-Unsubscribe
Regardless of the type of approach (MoEngage-Managed or Self-Managed), MoEngage will always add the required inputs to the email header automatically in all non-transactional emails. So you need not do any customization or provide manual inputs while creating the campaign.
## Subscription Categories
### Default Link position
Regardless of the type of landing page used, MoEngage positions the link at the bottom of the email by default, using the following text:
*Update your email preferences here to choose the category of emails you wish to receive.*
The *here* in the text above is hyperlinked with the landing page link in the email sent.
### Customize the Link Position
You can always customize the position of the landing page link using the following steps:
Perform the following steps to insert the landing page link of subscription categories in the drag and drop editor:
1. Select the text in which you want to insert the landing page link.
2. In the text editor, click **Special links** > **Frequently used** > **Preference Management**.
* **Perform the following steps to insert a custom unsubscribe link while using drag and drop editor:**
1. Drag and drop an HTML block from the editor to the required position.
2. Add the following HTML code:
```html wrap theme={null}
Unsubscribe here
```
Here, `https://www.abc.com/unsubscribe` is where you must add the unsubscribe URL you want to use.
- For this to work correctly, the href attribute should always be linked to the protocol (HTTP or HTTPS).
- You can replace the *Unsubscribe here* text with the required text in any supported language.
**Custom HTML Editor**
Use the following HTML code to position your unsubscribe text and link in a custom manner:
```html wrap theme={null}
Unsubscribe here
```
* You can always add further HTML attributes and CSS values to beautify the same further.
* Also, if you want only the Text to be different and not the link, follow the same code with one minor change:
* href should have the value provided in the settings itself.
**MoEngage-Managed Sendgrid Account**
If you are in Sendgrid Tracking, you can use a replacement text after defining the same in your Sendgrid dashboard. If you are using the MoEngage-managed Sendgrid account, the replacement text is *\[unsubscribe\_here]*.
**Custom-Managed Sendgrid Account**
If you have brought your Sendgrid account, you can configure a replacement tag. To do so:
1. Go to **Sendgrid** > **Settings** > **Tracking** > **Suppression Tracking**.
2. Add your preferred replacement tag.
Now you can add the same by inserting a link in your email, wherever you want and entering the replacement tag as the value.
* Beware of the replacement tag that you define, as Sendgrid replaces the tag with the link wherever it finds the same.
* The replacement tag is case-sensitive.
As mentioned above, the creator or marketer must add the unsubscribe link and one can do the same by inserting links wherever they want in their email.
## List-Unsubscribe
Regardless of the type of approach (MoEngage-Managed or Self-Managed), MoEngage will always add the required inputs to the email header automatically in all non-transactional emails. So you need not do any customization or provide manual inputs while creating the campaign.
## Subscription Categories
### Default Link position
Regardless of the type of landing page used, MoEngage positions the link at the bottom of the email by default, using the following text:
*Update your email preferences here to choose the category of emails you wish to receive.*
The *here* in the text above is hyperlinked with the landing page link in the email sent.
### Customize the Link Position
You can always customize the position of the landing page link using the following steps:
Perform the following steps to insert the landing page link of subscription categories in the drag and drop editor:
1. Select the text in which you want to insert the landing page link.
2. In the text editor, click **Special links** > **Frequently used** > **Preference Management**.
 Use the following HTML code to position your unsubscribe text and link in a custom manner:
```html wrap theme={null}
Manage your preference here
```
Here, the *X* in the URL refers to the MoEngage Data Center (DC). MoEngage hosts each customer in a different DC. You can find your DC number (value of *X*) and replace the value of *X* in the URL by referring to the DC and API endpoint mapping [here](/user-guide/data/key-concepts/data-centers-in-moengage).
### Show the Subscription Categories Link and Not the Global Unsubscribe Link
By default, MoEngage will always add both the links of Global Unsubscribe and Manage Preference link to the bottom of the email. You can always use the defined HTML code above to custom position both links.
However, if you want to hide the Global unsubscribe link and show only the link to the categories, you can achieve this by the following method:
1. Drag and drop an HTML block from the editor to the required position.
2. Add the following HTML code:
```html wrap theme={null}
```
Here, the *X* in the URL refers to the MoEngage Data Center (DC). MoEngage hosts each customer in a different DC. You can find your DC number (value of X) and replace the value of 'X' in the URL by referring to the DC and API endpoint mapping [here](/user-guide/data/key-concepts/data-centers-in-moengage).
Use the following HTML code to position your unsubscribe text and link in a custom manner:
```html wrap theme={null}
```
Here, the *X* in the URL refers to the MoEngage Data Center (DC). MoEngage hosts each customer in a different DC. You can find your DC number (value of X) and replace the value of 'X' in the URL by referring to the DC and API endpoint mapping [here](/user-guide/data/key-concepts/data-centers-in-moengage).
# Analyze Unsubscribes
## Global Unsubscribe or List-Unsubscribe
Whenever a user unsubscribes through the link added in the email (Global Unsubscribe link) or the option provided by the ISP (List-Unsubscribe option), MoEngage triggers the *Email Unsubscribed* event if you are not on *None* tracking for Unsubscribe or if you configure List unsubscribe handling in the right manner as mentioned [here](/user-guide/campaigns-and-channels/email/getting-started-with-email/list-unsubscribe-email#how-to-configure-this-in-moengage).
## Subscription Categories
Whenever a user changes their preferences through an email sent through MoEngage, the MoEngage system triggers the *Email Subscription Category Updated* event with information around the Campaign, Email Subject, Unsubscribed Categories, and so on.
You can analyze the users who are unsubscribing or changing their preferences through the events above. You can also use these events to find and target the users to change their subscription.
This is applicable for MoEngage-managed landing pages and for workspaces that use custom landing pages but do pass the information back to MoEngage as mentioned [here](https://www.moengage.com/docs/api/subscription-preferences/update-subscription-preferences).
# Update Subscription Status
## Update Unsubscribes from MoEngage to Third-Party Systems
### Unsubscribe at the Overall Level
Regardless of whether the unsubscription happened through the *List-Unsubscribe* or *Global Unsubscribe* link, you can perform the following steps to pass the status:
1. Create an event-triggered connector campaign, which is triggered when the *Email Unsubscribed* event occurs and makes an API call to the third party system’s end-point. For more information on creating a Connector Campaign, refer [here](/user-guide/campaigns-and-channels/connectors/create/create-a-connector-campaign). OR
2. You can use MoEngage Streams to pass the *Email Unsubscribed* event to your system. For more information on MoEngage Streams, click [here](https://www.moengage.com/docs/api/data/moengage-streams).
### Change Preferences
Perform the following steps to pass the new preference values:
1. Create an event-triggered connector campaign, which is triggered when the *Email Subscription Category Updated* event occurs and makes an API call to the third party system’s end-point to convey the categories the user unsubscribed from. For more information on creating a Connector Campaign, refer [here](/user-guide/campaigns-and-channels/connectors/create/create-a-connector-campaign). OR
2. You can use MoEngage Streams to pass the *Email Subscription Category Updated* event to your system. For more information on MoEngage Streams, click [here](https://www.moengage.com/docs/api/data/moengage-streams).
## Update Unsubscribes from Third-Party Systems to MoEngage
### Unsubscribe at the Overall Level
If you want to unsubscribe a user because they unsubscribed anywhere else (other than MoEngage-based emails), you can use MoEngage Data API to update the same. To achieve this, perform the following steps:
1. Invoke our Data API as mentioned [here](https://www.moengage.com/docs/api/user/track-user).
2. Set `moe_unsubscribe` as true.
3. Finalize the values to be passed for other attributes based on your use case or setup (this is optional).
If you want to unsubscribe a user because they unsubscribed anywhere else (other than MoEngage-based emails), you can use MoEngage [User import](/user-guide/data/imports/file-based-imports/import-user-data-using-csv) to update the same. To achieve this, perform the following steps:
1. Have a CSV file handy with the User Identifier used in MoEngage to identify users and their Unsubscription status as two different columns.
2. On the left navigation menu in the MoEngage dashboard, click **Segment**, and then click **User Imports**.
3. In the User Imports page, click **Import users**.
Use the following HTML code to position your unsubscribe text and link in a custom manner:
```html wrap theme={null}
Manage your preference here
```
Here, the *X* in the URL refers to the MoEngage Data Center (DC). MoEngage hosts each customer in a different DC. You can find your DC number (value of *X*) and replace the value of *X* in the URL by referring to the DC and API endpoint mapping [here](/user-guide/data/key-concepts/data-centers-in-moengage).
### Show the Subscription Categories Link and Not the Global Unsubscribe Link
By default, MoEngage will always add both the links of Global Unsubscribe and Manage Preference link to the bottom of the email. You can always use the defined HTML code above to custom position both links.
However, if you want to hide the Global unsubscribe link and show only the link to the categories, you can achieve this by the following method:
1. Drag and drop an HTML block from the editor to the required position.
2. Add the following HTML code:
```html wrap theme={null}
```
Here, the *X* in the URL refers to the MoEngage Data Center (DC). MoEngage hosts each customer in a different DC. You can find your DC number (value of X) and replace the value of 'X' in the URL by referring to the DC and API endpoint mapping [here](/user-guide/data/key-concepts/data-centers-in-moengage).
Use the following HTML code to position your unsubscribe text and link in a custom manner:
```html wrap theme={null}
```
Here, the *X* in the URL refers to the MoEngage Data Center (DC). MoEngage hosts each customer in a different DC. You can find your DC number (value of X) and replace the value of 'X' in the URL by referring to the DC and API endpoint mapping [here](/user-guide/data/key-concepts/data-centers-in-moengage).
# Analyze Unsubscribes
## Global Unsubscribe or List-Unsubscribe
Whenever a user unsubscribes through the link added in the email (Global Unsubscribe link) or the option provided by the ISP (List-Unsubscribe option), MoEngage triggers the *Email Unsubscribed* event if you are not on *None* tracking for Unsubscribe or if you configure List unsubscribe handling in the right manner as mentioned [here](/user-guide/campaigns-and-channels/email/getting-started-with-email/list-unsubscribe-email#how-to-configure-this-in-moengage).
## Subscription Categories
Whenever a user changes their preferences through an email sent through MoEngage, the MoEngage system triggers the *Email Subscription Category Updated* event with information around the Campaign, Email Subject, Unsubscribed Categories, and so on.
You can analyze the users who are unsubscribing or changing their preferences through the events above. You can also use these events to find and target the users to change their subscription.
This is applicable for MoEngage-managed landing pages and for workspaces that use custom landing pages but do pass the information back to MoEngage as mentioned [here](https://www.moengage.com/docs/api/subscription-preferences/update-subscription-preferences).
# Update Subscription Status
## Update Unsubscribes from MoEngage to Third-Party Systems
### Unsubscribe at the Overall Level
Regardless of whether the unsubscription happened through the *List-Unsubscribe* or *Global Unsubscribe* link, you can perform the following steps to pass the status:
1. Create an event-triggered connector campaign, which is triggered when the *Email Unsubscribed* event occurs and makes an API call to the third party system’s end-point. For more information on creating a Connector Campaign, refer [here](/user-guide/campaigns-and-channels/connectors/create/create-a-connector-campaign). OR
2. You can use MoEngage Streams to pass the *Email Unsubscribed* event to your system. For more information on MoEngage Streams, click [here](https://www.moengage.com/docs/api/data/moengage-streams).
### Change Preferences
Perform the following steps to pass the new preference values:
1. Create an event-triggered connector campaign, which is triggered when the *Email Subscription Category Updated* event occurs and makes an API call to the third party system’s end-point to convey the categories the user unsubscribed from. For more information on creating a Connector Campaign, refer [here](/user-guide/campaigns-and-channels/connectors/create/create-a-connector-campaign). OR
2. You can use MoEngage Streams to pass the *Email Subscription Category Updated* event to your system. For more information on MoEngage Streams, click [here](https://www.moengage.com/docs/api/data/moengage-streams).
## Update Unsubscribes from Third-Party Systems to MoEngage
### Unsubscribe at the Overall Level
If you want to unsubscribe a user because they unsubscribed anywhere else (other than MoEngage-based emails), you can use MoEngage Data API to update the same. To achieve this, perform the following steps:
1. Invoke our Data API as mentioned [here](https://www.moengage.com/docs/api/user/track-user).
2. Set `moe_unsubscribe` as true.
3. Finalize the values to be passed for other attributes based on your use case or setup (this is optional).
If you want to unsubscribe a user because they unsubscribed anywhere else (other than MoEngage-based emails), you can use MoEngage [User import](/user-guide/data/imports/file-based-imports/import-user-data-using-csv) to update the same. To achieve this, perform the following steps:
1. Have a CSV file handy with the User Identifier used in MoEngage to identify users and their Unsubscription status as two different columns.
2. On the left navigation menu in the MoEngage dashboard, click **Segment**, and then click **User Imports**.
3. In the User Imports page, click **Import users**. 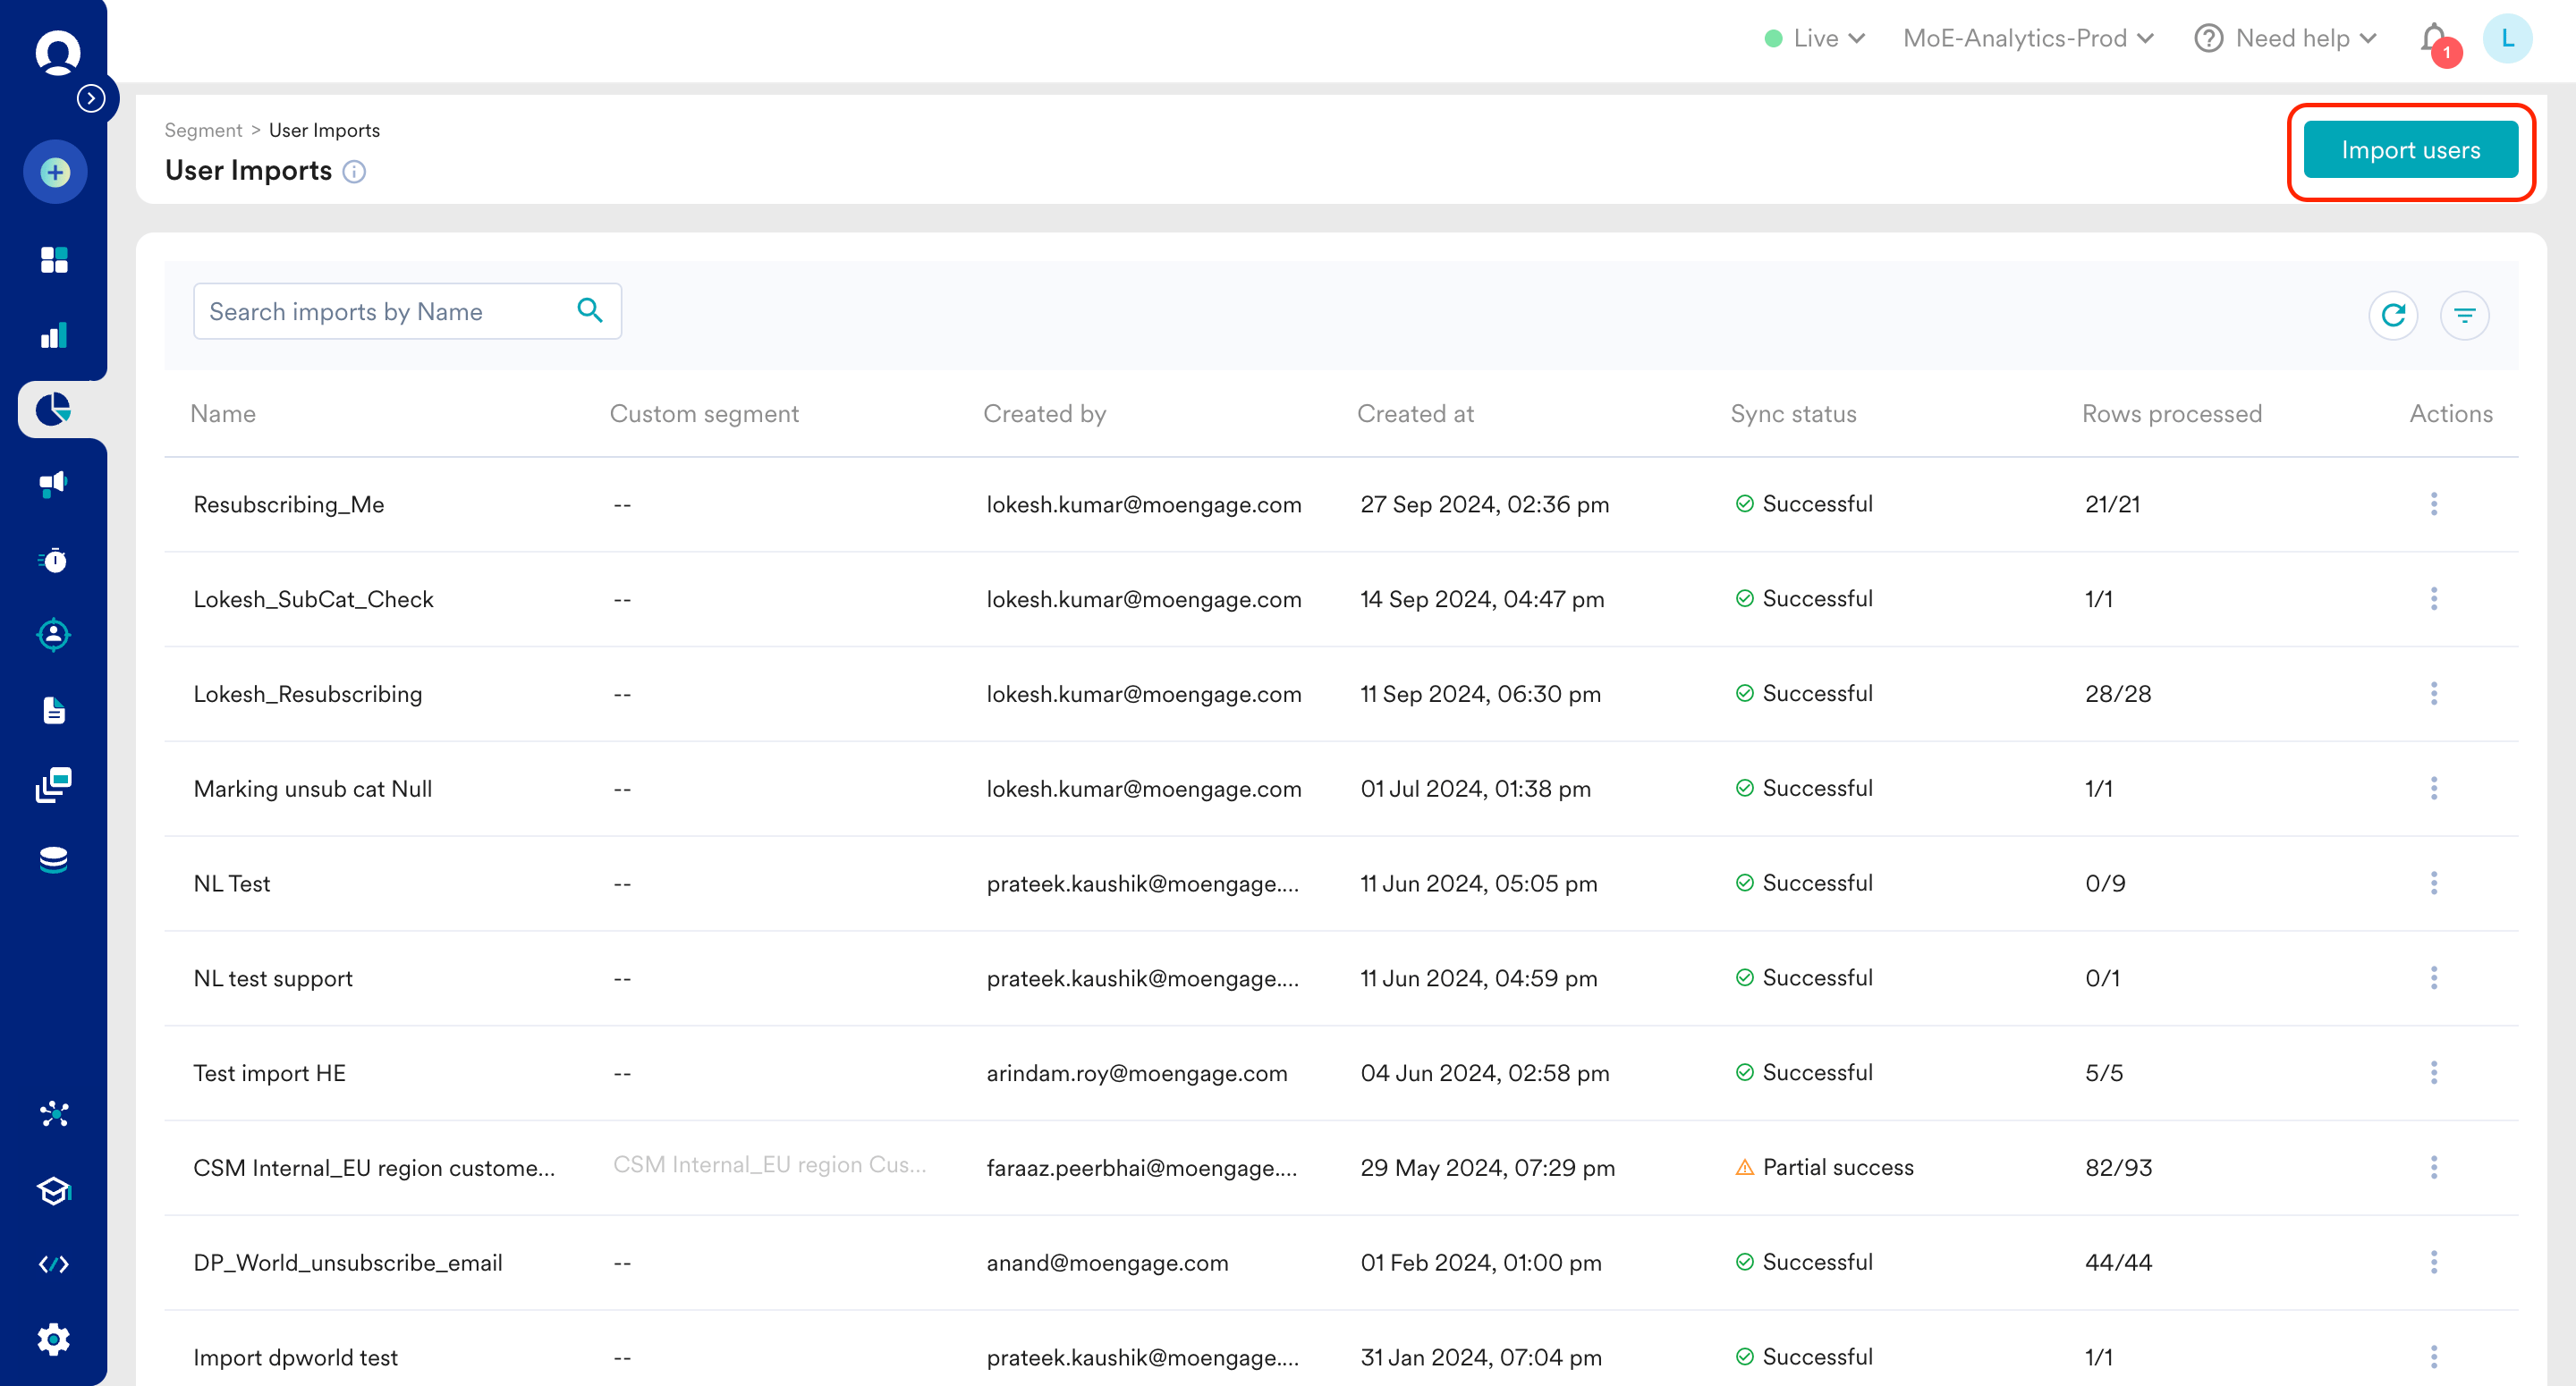 4. Then do the following:
1. In the **Import name** box, enter a unique name to the import.
2. Under **Select user type**, select **Registered users**.
3. Under **Select file**, click **upload from the computer** to upload the CSV file.
4. Under **File preview**, click **Preview** **file**.
5. Click **Next**.
4. Then do the following:
1. In the **Import name** box, enter a unique name to the import.
2. Under **Select user type**, select **Registered users**.
3. Under **Select file**, click **upload from the computer** to upload the CSV file.
4. Under **File preview**, click **Preview** **file**.
5. Click **Next**. 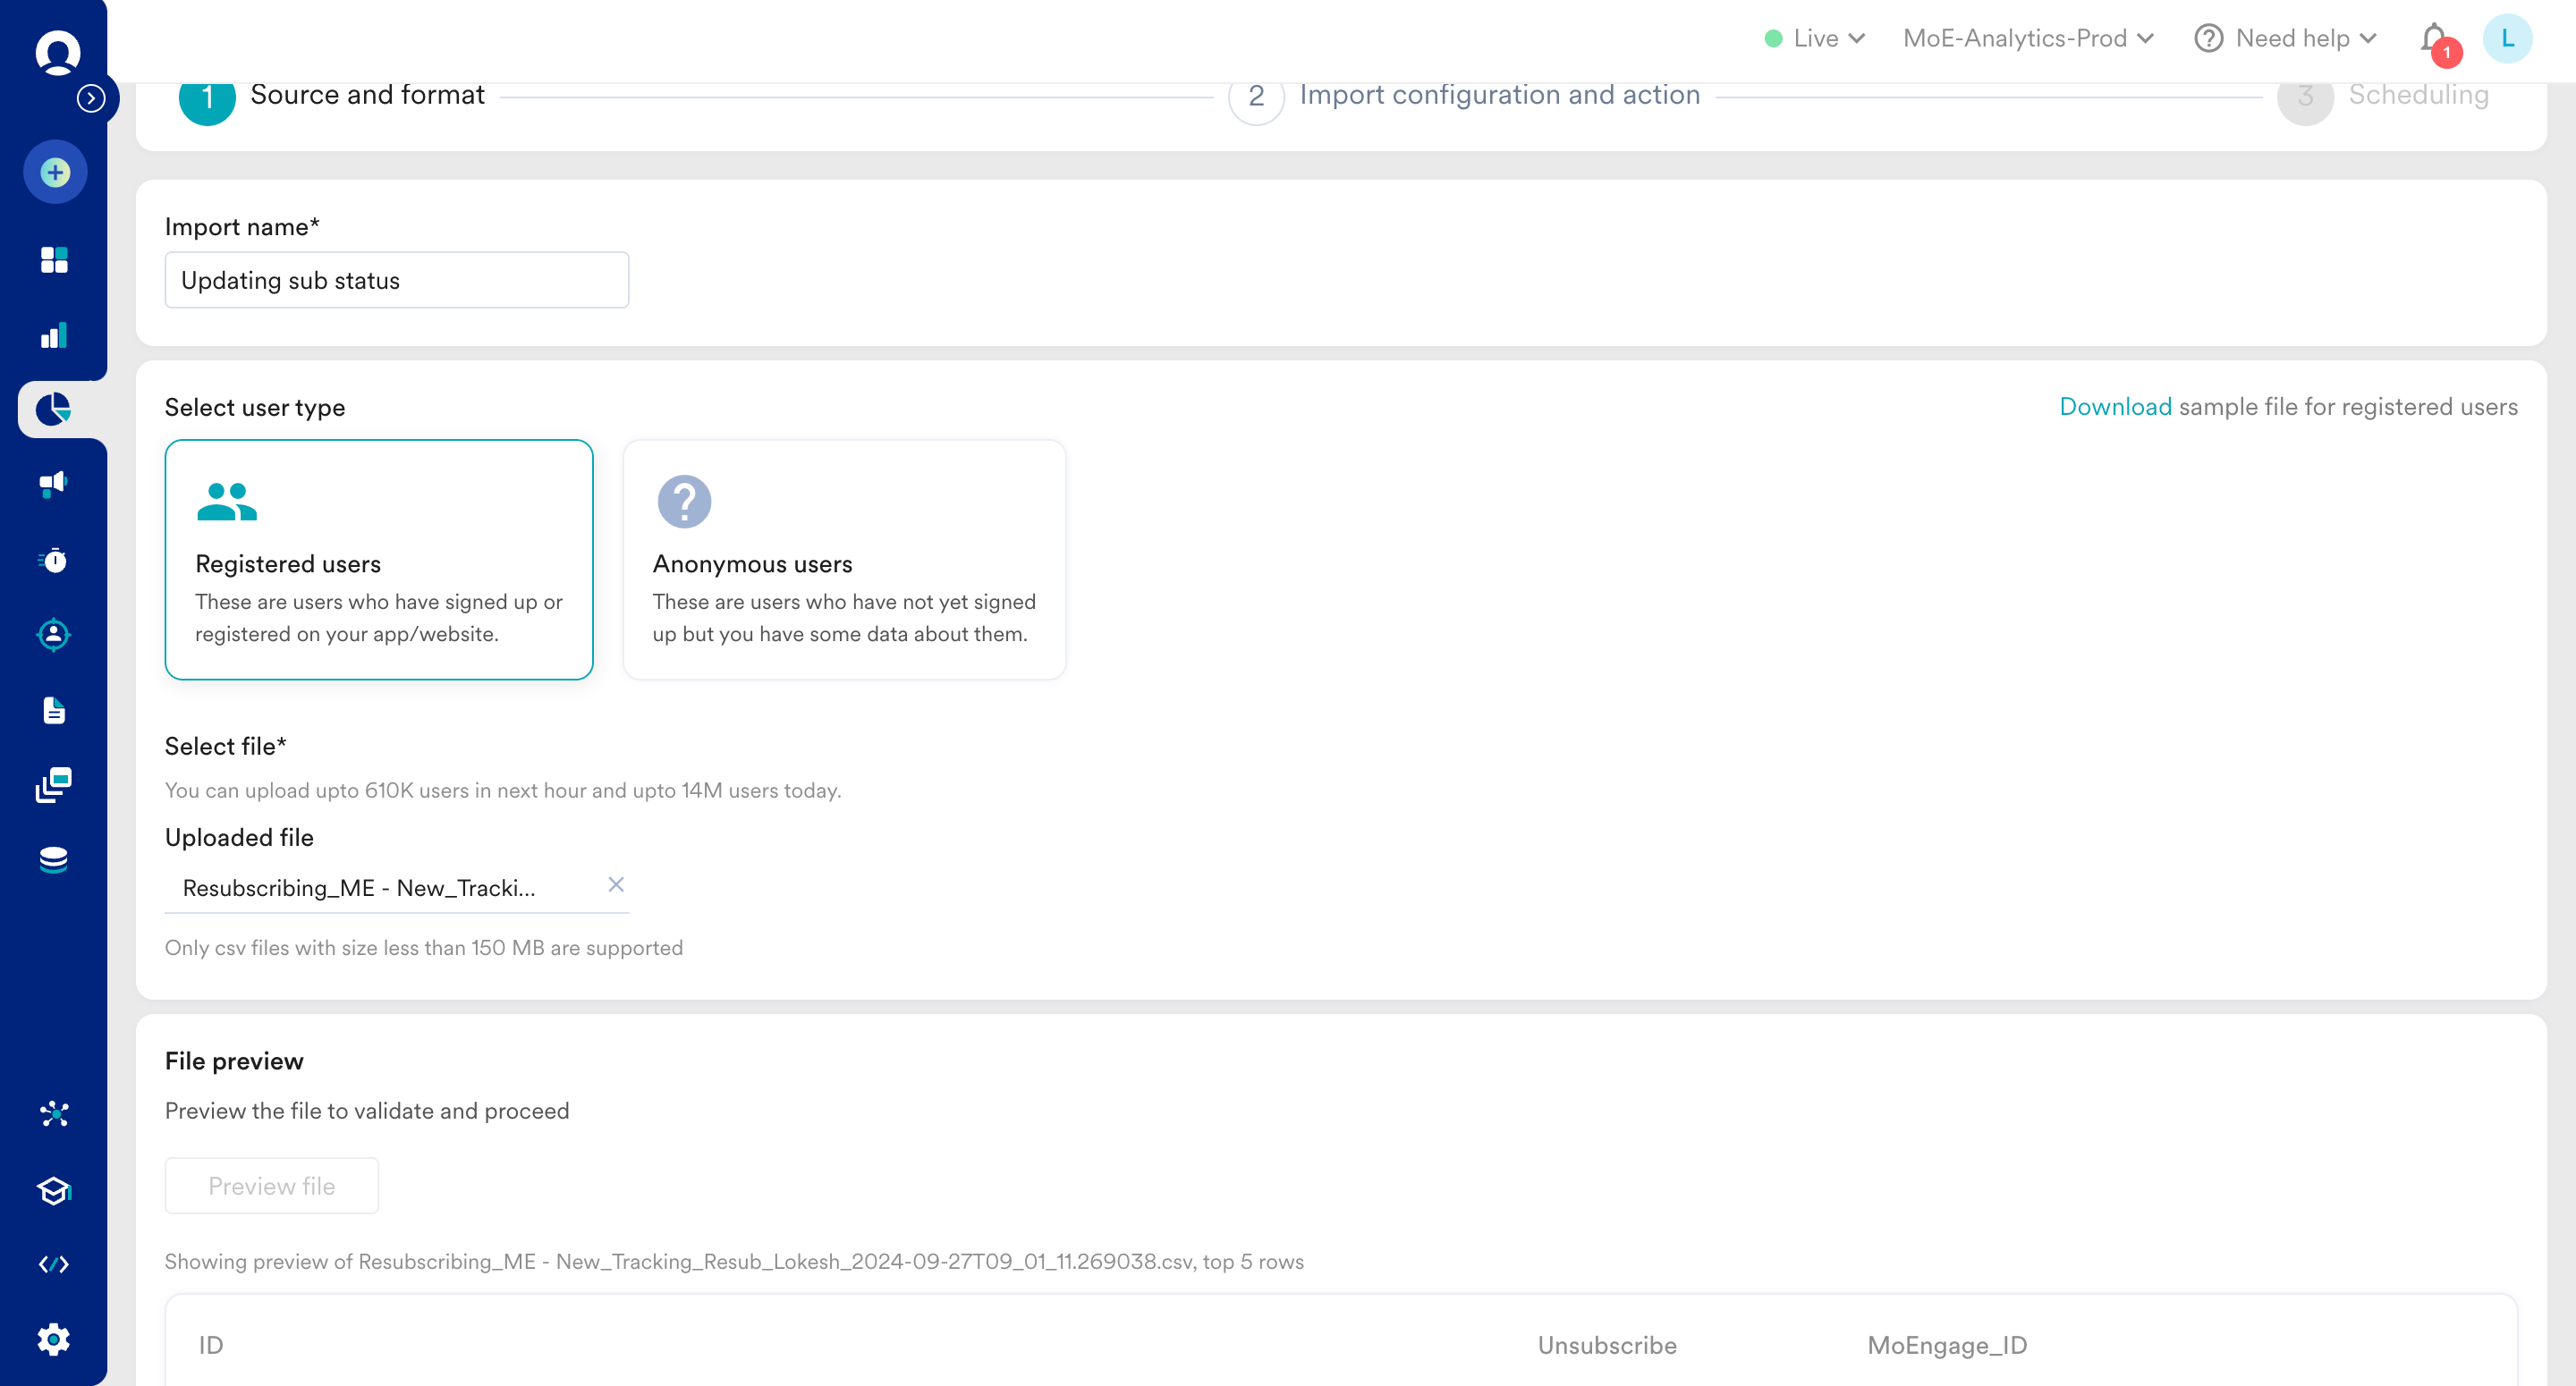 6. Check if the **User Identifier** field is mapped correctly. If not, select the column name that has the user identifier.
 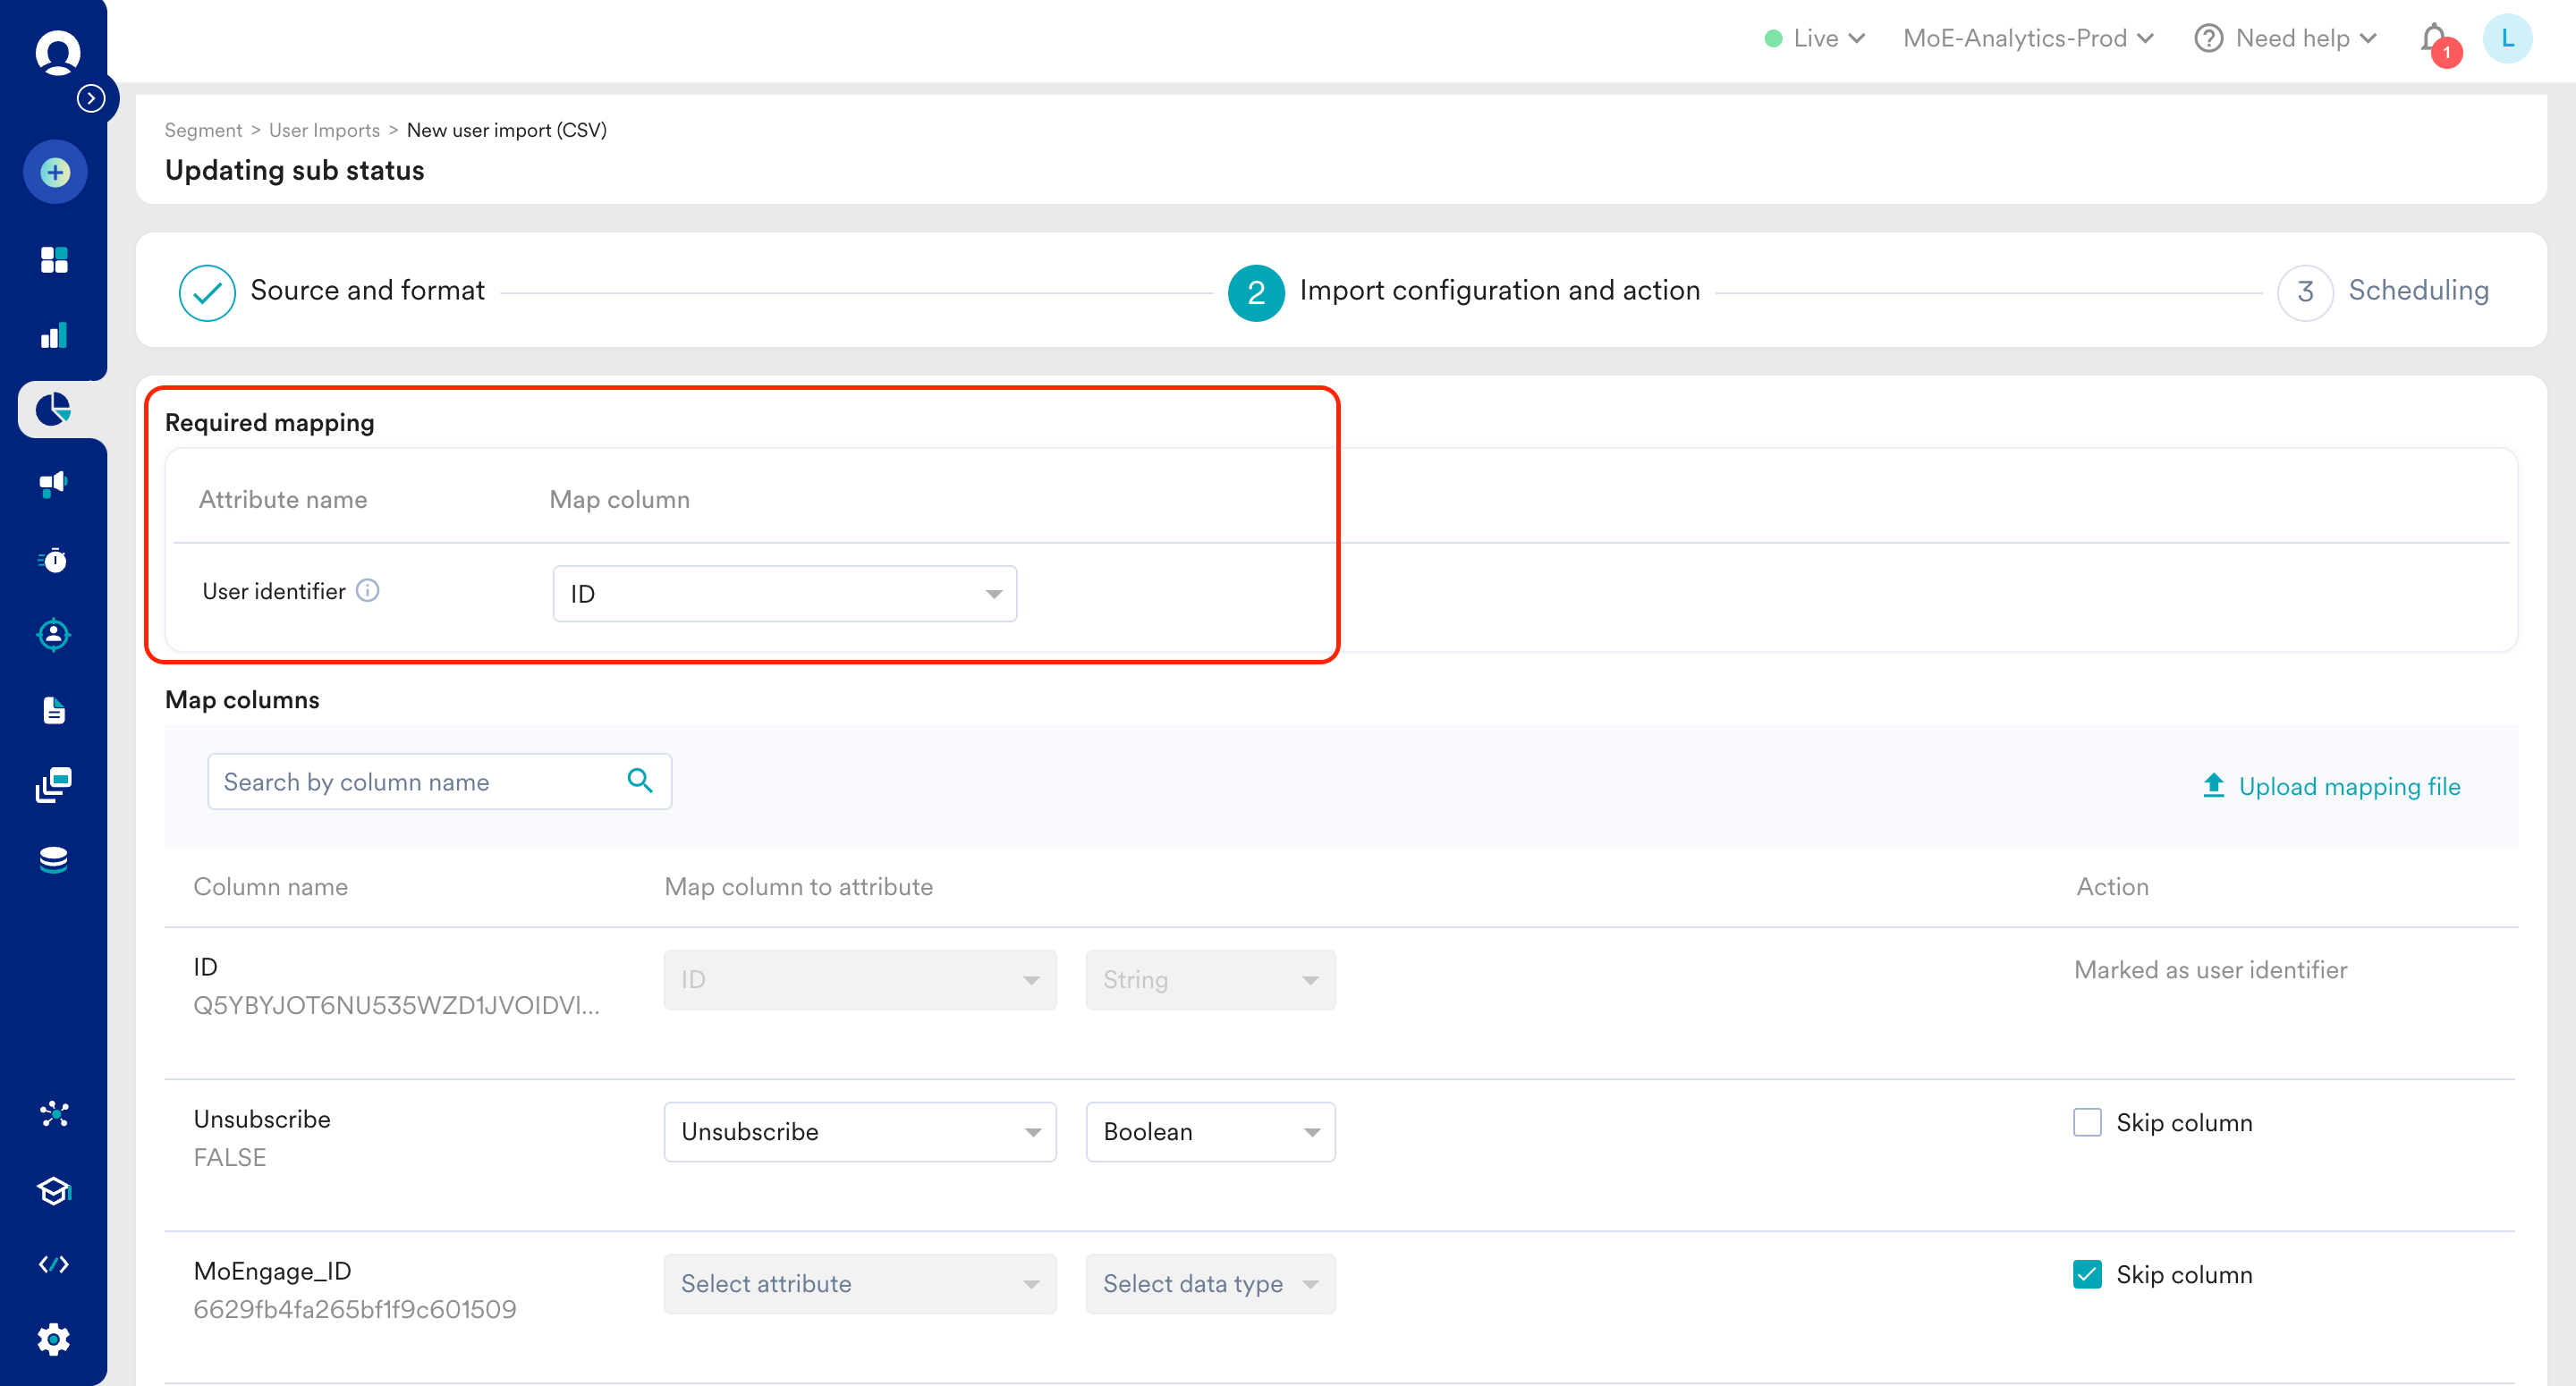 7. Map the column with unsubscribe status to the *Unsubscribe* user attribute.
 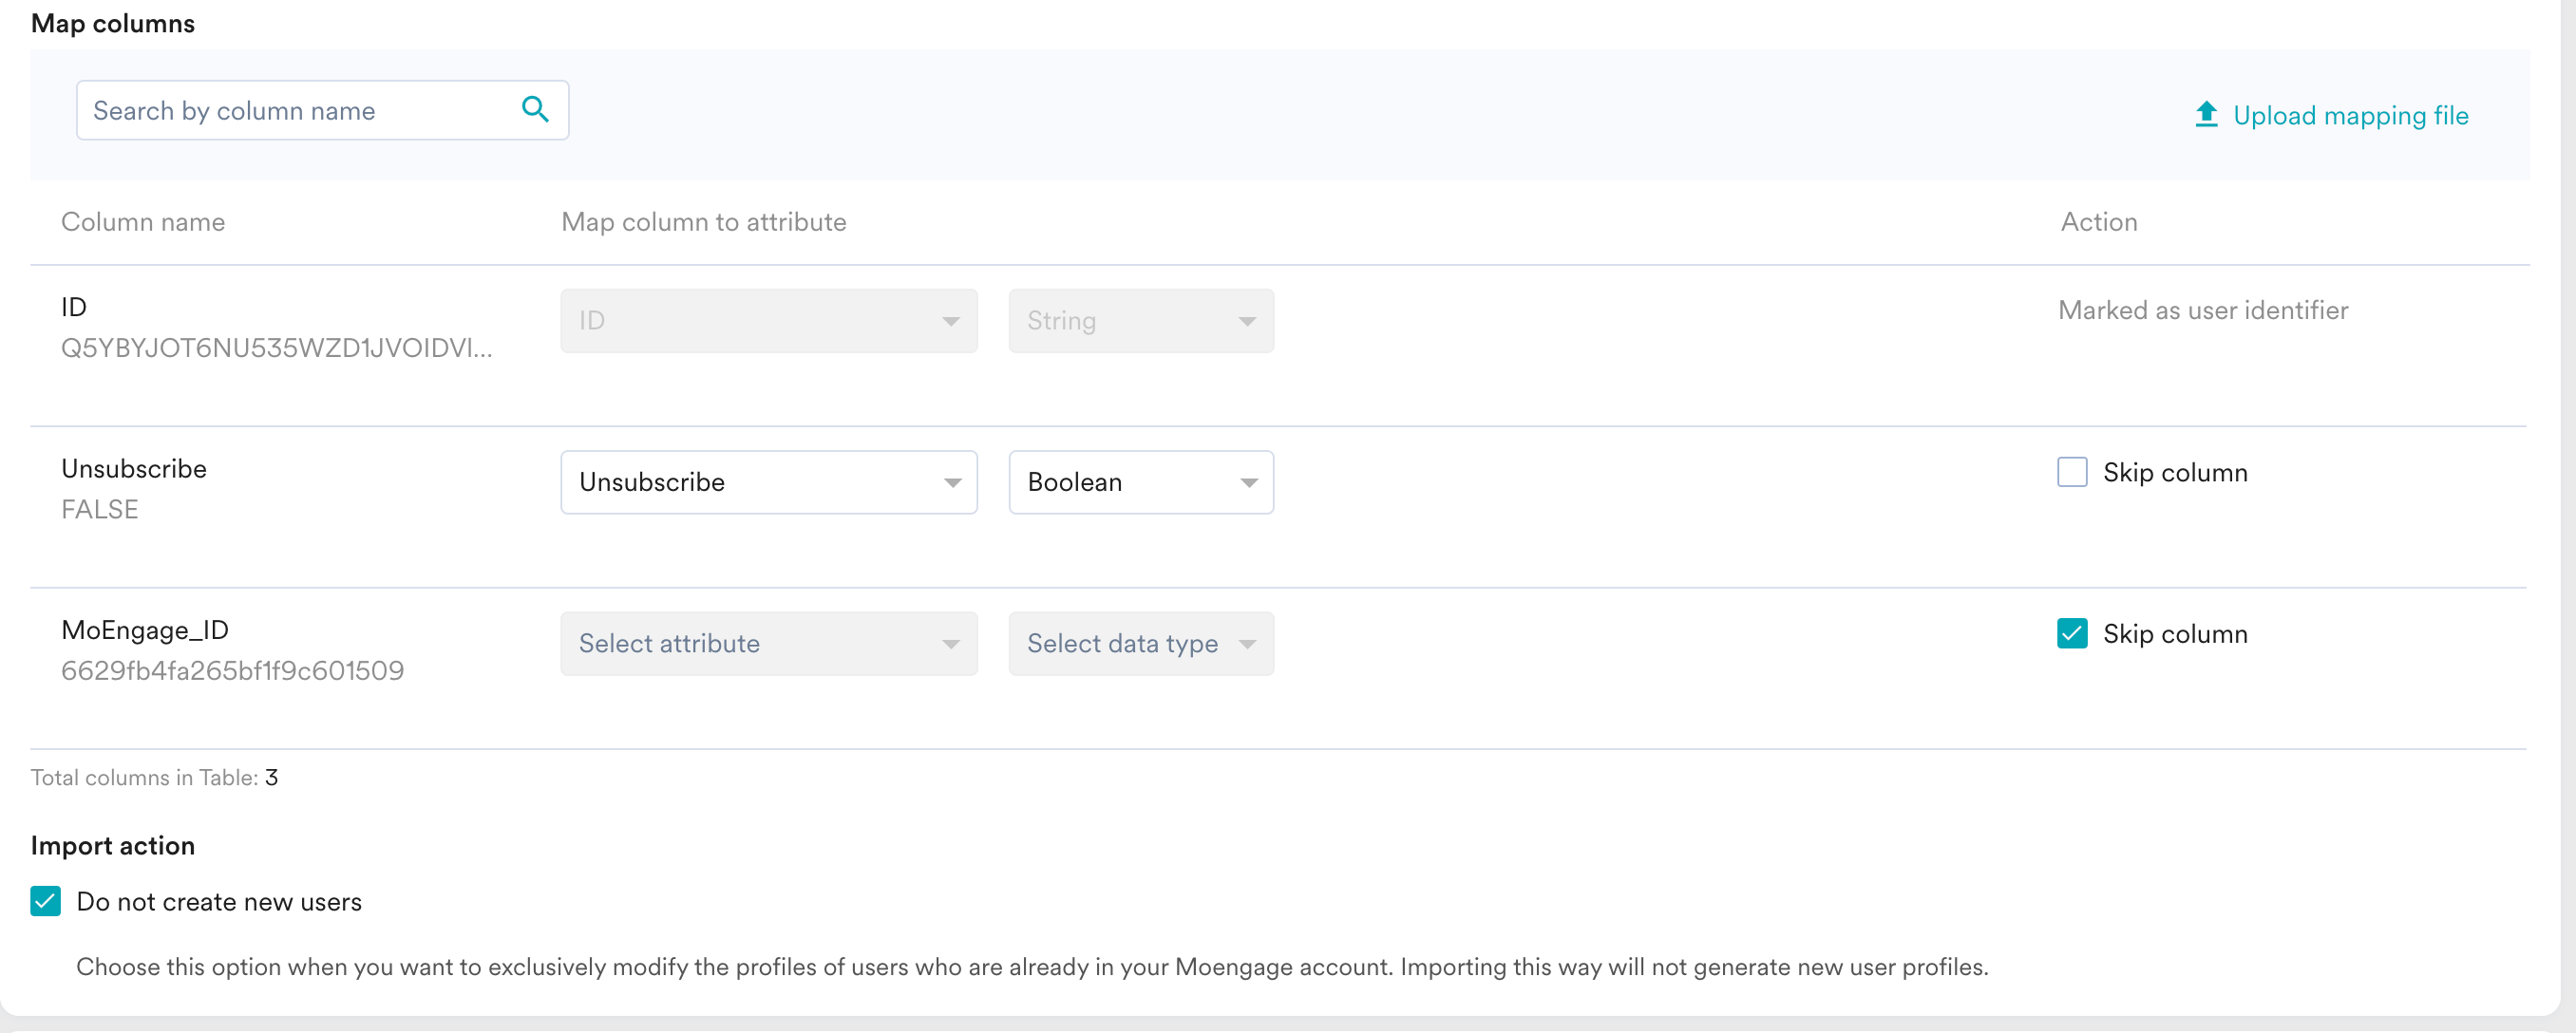 8. Click **Next** and then click **Schedule Import**.
  After the file is processed, the status will be emailed to you. You can see the same on the User imports page.
5. After the unsubscribe values are updated, MoEngage will drop these users as part of any future campaigns.
If you are using the Self-Managed List Unsubscribe method and want to pass the information of unsubscription back to MoEngage, refer [here](/user-guide/campaigns-and-channels/email/getting-started-with-email/list-unsubscribe-email).
### Change Preferences
#### Update Preferences due to a campaign sent from MoEngage using the Custom Landing page:
If you are using custom landing page and would want to update the preference of the user back in MoEngage, perform the following steps:
1. Parse through the URL to find the user\_id & cid parameter.
2. Invoke the API mentioned [here](https://www.moengage.com/docs/api/subscription-preferences/update-subscription-preferences).
3. Pass the stored user\_id & cid as parameters while executing the API.
For example, if the link to the custom landing page was [*https://www.abc.com/managepreference*](https://www.abc.com/managepreference), when the user clicks the same from the email, the link will be like below:
```text wrap theme={null}
https://www.abc.com/managepreference?/?user\_id=7XvJW2dj3iS.rYAt4pg5ASBQtaqAMFDw9e89vZCXx\_RFfN3eL0wBG008oI6cpncOQV6ESg&cid=5FGZGcA8FRv3Id89JCCczQjwxq6ApEyAarYDje2mzfRQ\_WG7VyyFEc0w4L3MA.31a7wzR64fi7lfq8Km0AaeO4paGVul.4HxixDYnoUp21xyUjGtfvnrHSR2G1reTpYPHHU.r3Ac9vE&app\_key=UY\_GHXBXyaHbiYnCoNOu7eS.u5yIrrN3noTBNZX5mNSL4KN5C5PZ3zcXBKCCxl9w3m0ukw
```
Here, you can parse and find user\_id which in this case will be
```text wrap theme={null}
7XvJW2dj3iS.rYAt4pg5ASBQtaqAMFDw9e89vZCXx_RFfN3eL0wBG008oI6cpncOQV6ESg
```
and cid will be
```text wrap theme={null}
5FGZGcA8FRv3Id89JCCczQjwxq6ApEyAarYDje2mzfRQ_WG7VyyFEc0w4L3MA.31a7wzR64fi7lfq8Km0AaeO4paGVul.4HxixDYnoUp21xyUjGtfvnrHSR2G1reTpYPHHU.r3Ac9vE
```
and pass the same while triggering the API.
When updating the preference of users via API, if MoEngage receives any value for a category that is archived or disabled in MoEngage, we will not update the preference for that category. Neither will we raise the event if the change was only for the archived / disabled categories.
#### Updating Preferences from third-party systems to MoEngage:
To update the preference of the user from a third-party system to MoEngage, perform the following steps:
1. Invoke [our API](https://www.moengage.com/docs/api/subscription-preferences/update-subscription-preferences) that updates Subscription Categories.
2. Pass the status of categories that you want to change for a user in the ***data*** key of the API body
3. Finalize the values to be passed for other attributes based on your use case or setup (this is optional).
When updating the preference of users via API, if MoEngage receives any value for a category that is archived or disabled in MoEngage, we will not update the preference for that category.
Perform the following steps to upload the Subscription Categories through CSV upload for your users.
1. On the left navigation menu in the MoEngage dashboard, click **Segment**, and then click **User Imports**.
2. In the User Imports page, click **Import users** on the upper-right corner.
After the file is processed, the status will be emailed to you. You can see the same on the User imports page.
5. After the unsubscribe values are updated, MoEngage will drop these users as part of any future campaigns.
If you are using the Self-Managed List Unsubscribe method and want to pass the information of unsubscription back to MoEngage, refer [here](/user-guide/campaigns-and-channels/email/getting-started-with-email/list-unsubscribe-email).
### Change Preferences
#### Update Preferences due to a campaign sent from MoEngage using the Custom Landing page:
If you are using custom landing page and would want to update the preference of the user back in MoEngage, perform the following steps:
1. Parse through the URL to find the user\_id & cid parameter.
2. Invoke the API mentioned [here](https://www.moengage.com/docs/api/subscription-preferences/update-subscription-preferences).
3. Pass the stored user\_id & cid as parameters while executing the API.
For example, if the link to the custom landing page was [*https://www.abc.com/managepreference*](https://www.abc.com/managepreference), when the user clicks the same from the email, the link will be like below:
```text wrap theme={null}
https://www.abc.com/managepreference?/?user\_id=7XvJW2dj3iS.rYAt4pg5ASBQtaqAMFDw9e89vZCXx\_RFfN3eL0wBG008oI6cpncOQV6ESg&cid=5FGZGcA8FRv3Id89JCCczQjwxq6ApEyAarYDje2mzfRQ\_WG7VyyFEc0w4L3MA.31a7wzR64fi7lfq8Km0AaeO4paGVul.4HxixDYnoUp21xyUjGtfvnrHSR2G1reTpYPHHU.r3Ac9vE&app\_key=UY\_GHXBXyaHbiYnCoNOu7eS.u5yIrrN3noTBNZX5mNSL4KN5C5PZ3zcXBKCCxl9w3m0ukw
```
Here, you can parse and find user\_id which in this case will be
```text wrap theme={null}
7XvJW2dj3iS.rYAt4pg5ASBQtaqAMFDw9e89vZCXx_RFfN3eL0wBG008oI6cpncOQV6ESg
```
and cid will be
```text wrap theme={null}
5FGZGcA8FRv3Id89JCCczQjwxq6ApEyAarYDje2mzfRQ_WG7VyyFEc0w4L3MA.31a7wzR64fi7lfq8Km0AaeO4paGVul.4HxixDYnoUp21xyUjGtfvnrHSR2G1reTpYPHHU.r3Ac9vE
```
and pass the same while triggering the API.
When updating the preference of users via API, if MoEngage receives any value for a category that is archived or disabled in MoEngage, we will not update the preference for that category. Neither will we raise the event if the change was only for the archived / disabled categories.
#### Updating Preferences from third-party systems to MoEngage:
To update the preference of the user from a third-party system to MoEngage, perform the following steps:
1. Invoke [our API](https://www.moengage.com/docs/api/subscription-preferences/update-subscription-preferences) that updates Subscription Categories.
2. Pass the status of categories that you want to change for a user in the ***data*** key of the API body
3. Finalize the values to be passed for other attributes based on your use case or setup (this is optional).
When updating the preference of users via API, if MoEngage receives any value for a category that is archived or disabled in MoEngage, we will not update the preference for that category.
Perform the following steps to upload the Subscription Categories through CSV upload for your users.
1. On the left navigation menu in the MoEngage dashboard, click **Segment**, and then click **User Imports**.
2. In the User Imports page, click **Import users** on the upper-right corner. 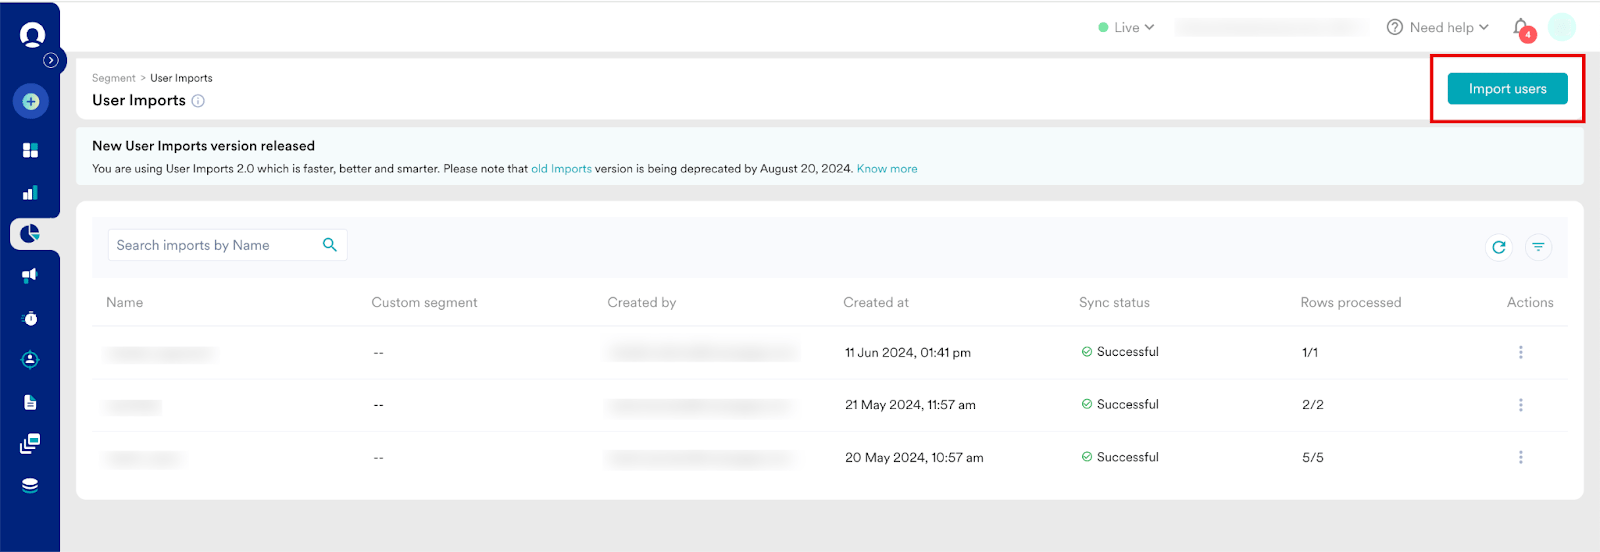 3. In the **Import name** box, enter a unique name to the import.
4. Under **Select user type**, select **Registered users**.
5. Under **Select file**, click **upload from the computer** to upload the CSV file. Make sure to follow the points below while uploading the CSV file. In the CSV file to be uploaded:
1. One column should be reserved for IDs. These are the customer IDs that you use to identify your customers uniquely. For example, they can be the email IDs of your customers.
2. Maintain another column for the array of subscription categories from which your customers should be unsubscribed. Follow the format below to pass the unsubscribed categories: *\["abc"|"xyz"|"def"]*; where *abc*,*xyz*, and *def* are unsubscribed categories. For example, as a marketer, you need a customer named *John* with email id: [*john@gmail.com*](mailto:john@gmail.com), to be unsubscribed from *unsubscategory1* and *unsubscategory2*. Then the CSV file to be uploaded should have the following format:\
[*john@gmail.com*](mailto:john@gmail.com)*, \["unsubscategory1"|"unsubscategory2"]*, in which the email id should be added in one column and \["unsubscategory1"|"unsubscategory2"] should be in the other column.
3. In the **Import name** box, enter a unique name to the import.
4. Under **Select user type**, select **Registered users**.
5. Under **Select file**, click **upload from the computer** to upload the CSV file. Make sure to follow the points below while uploading the CSV file. In the CSV file to be uploaded:
1. One column should be reserved for IDs. These are the customer IDs that you use to identify your customers uniquely. For example, they can be the email IDs of your customers.
2. Maintain another column for the array of subscription categories from which your customers should be unsubscribed. Follow the format below to pass the unsubscribed categories: *\["abc"|"xyz"|"def"]*; where *abc*,*xyz*, and *def* are unsubscribed categories. For example, as a marketer, you need a customer named *John* with email id: [*john@gmail.com*](mailto:john@gmail.com), to be unsubscribed from *unsubscategory1* and *unsubscategory2*. Then the CSV file to be uploaded should have the following format:\
[*john@gmail.com*](mailto:john@gmail.com)*, \["unsubscategory1"|"unsubscategory2"]*, in which the email id should be added in one column and \["unsubscategory1"|"unsubscategory2"] should be in the other column. 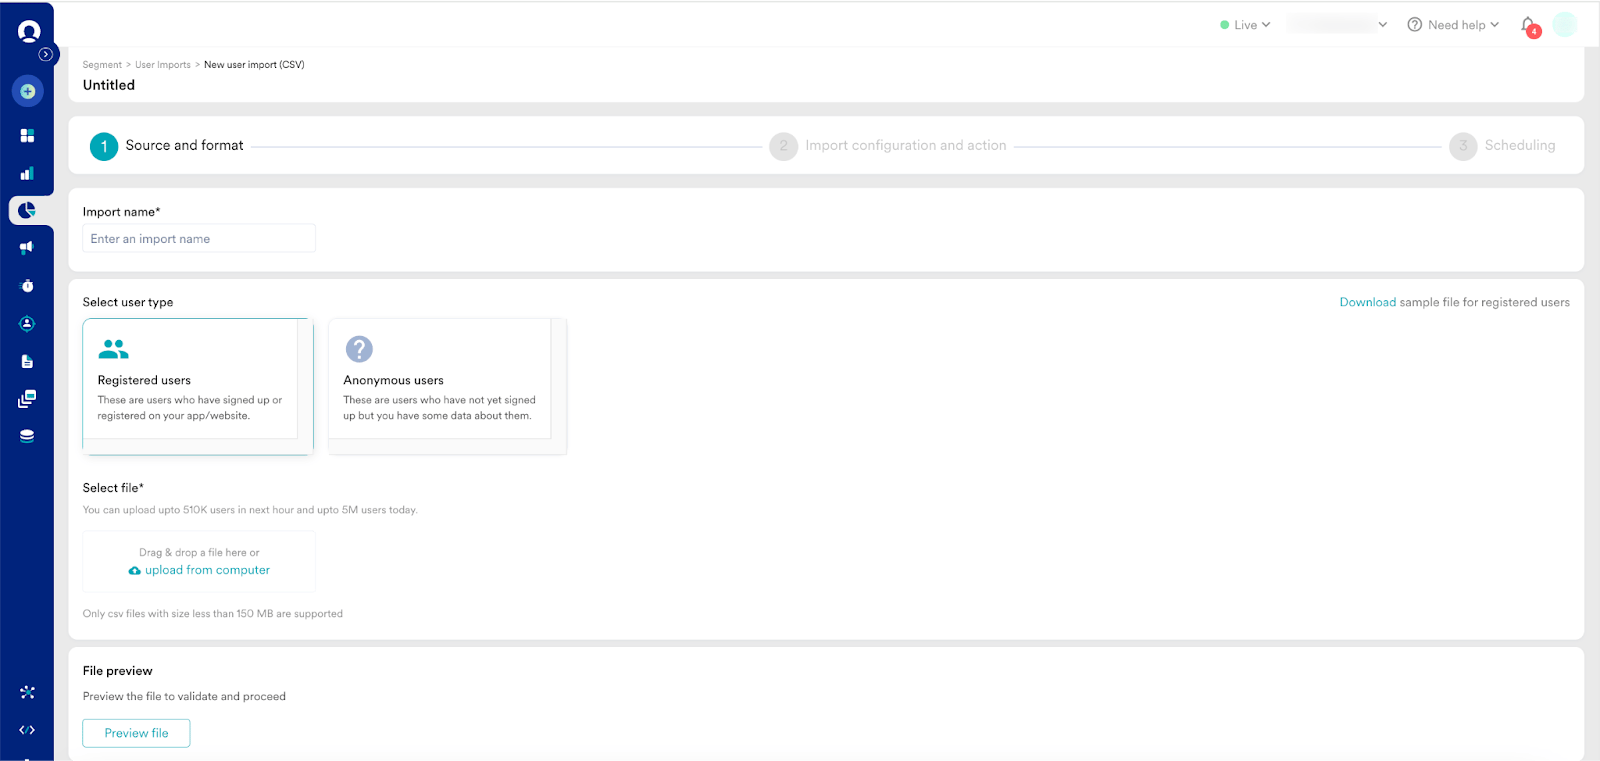 6. Under **File preview**, click **Preview** **file** to preview the uploaded file.
7. Click **Next**.
6. Under **File preview**, click **Preview** **file** to preview the uploaded file.
7. Click **Next**. 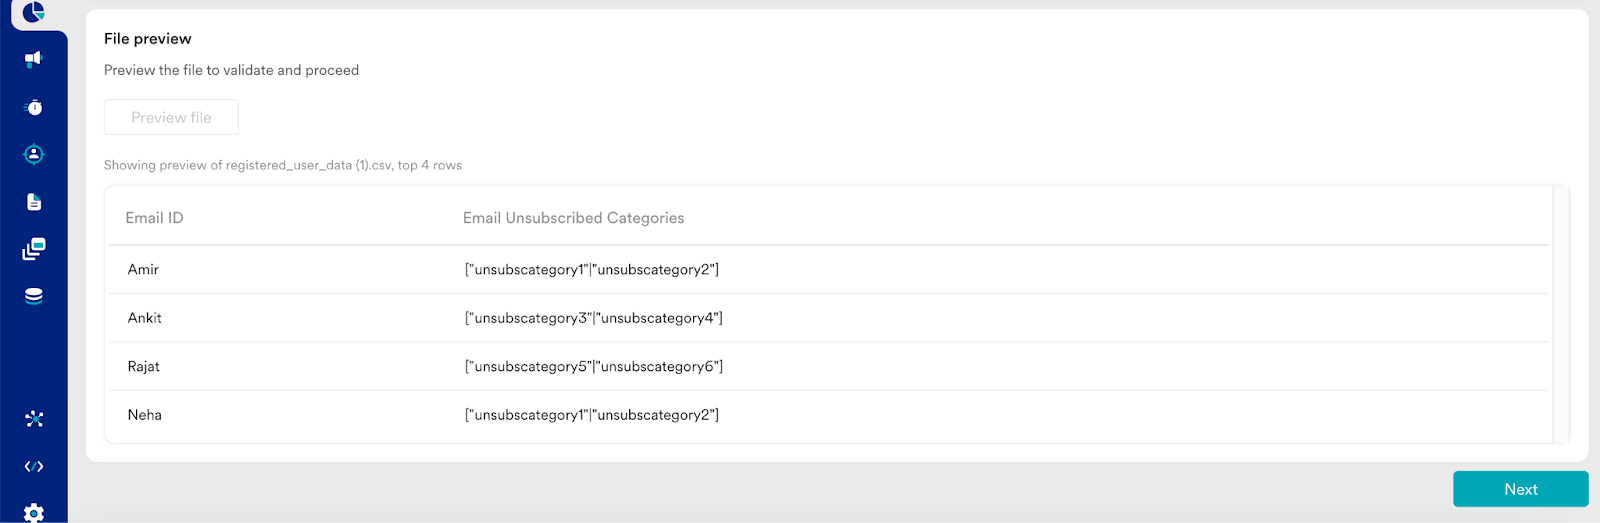 8. In the following screen, all values will be preloaded under the **Required mapping** section based on the CSV file. You can also change the values if required.
9. Under **Map columns**, map your **Identifier** column (in this example, the Email ID) to *ID* and **Email Unsubscribed Categories** column to the *Email Unsubscribe Categories* attribute. The categories are preloaded in the *Array String* format.
8. In the following screen, all values will be preloaded under the **Required mapping** section based on the CSV file. You can also change the values if required.
9. Under **Map columns**, map your **Identifier** column (in this example, the Email ID) to *ID* and **Email Unsubscribed Categories** column to the *Email Unsubscribe Categories* attribute. The categories are preloaded in the *Array String* format. 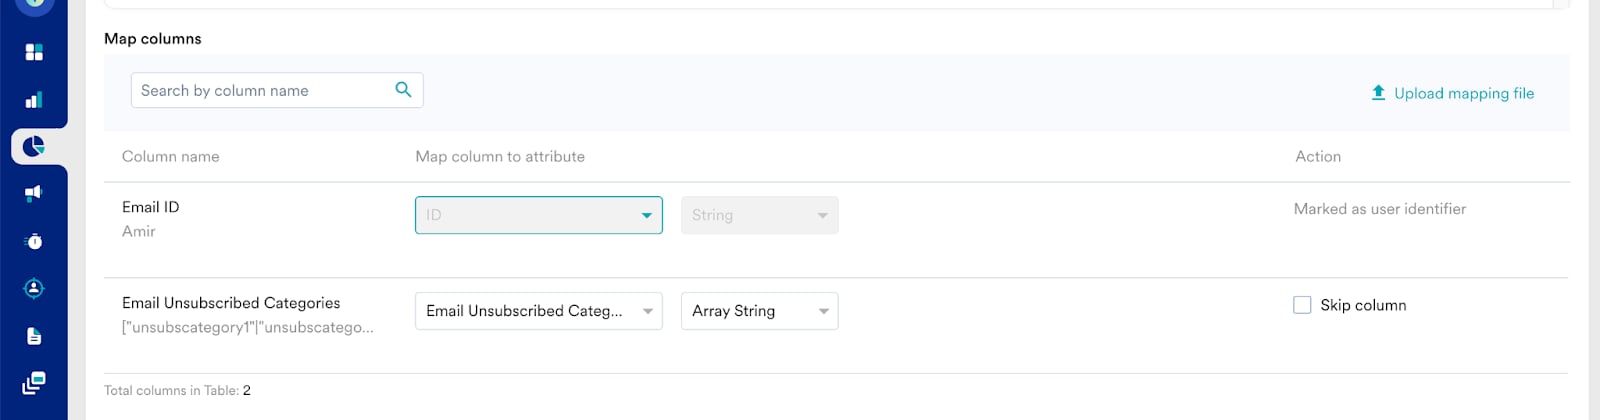 10. Select the **Do not create new users** option if you want to exclusively modify the profiles of users who are already in your MoEngage account.
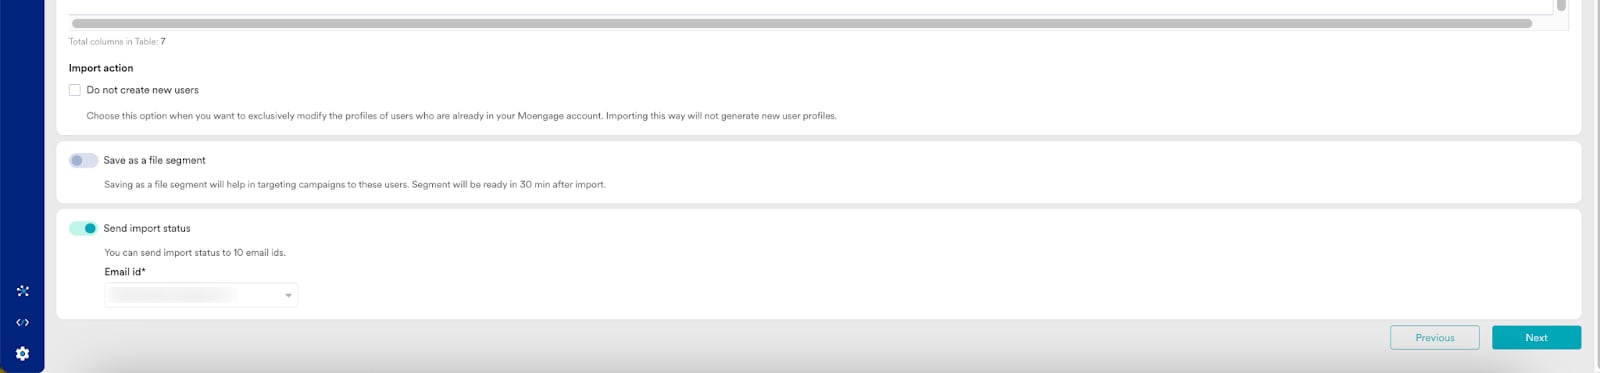
11. Turn the **Save as a file segment** toggle on if you want the users in the uploaded CSV file to be saved as a segment.
12. Turn the **Send import status** toggle on and select an email ID to send import status to that ID and then click **Next**.
10. Select the **Do not create new users** option if you want to exclusively modify the profiles of users who are already in your MoEngage account.
11. Turn the **Save as a file segment** toggle on if you want the users in the uploaded CSV file to be saved as a segment.
12. Turn the **Send import status** toggle on and select an email ID to send import status to that ID and then click **Next**.
 13. In the following screen, select the import frequency and then click **Schedule import**.
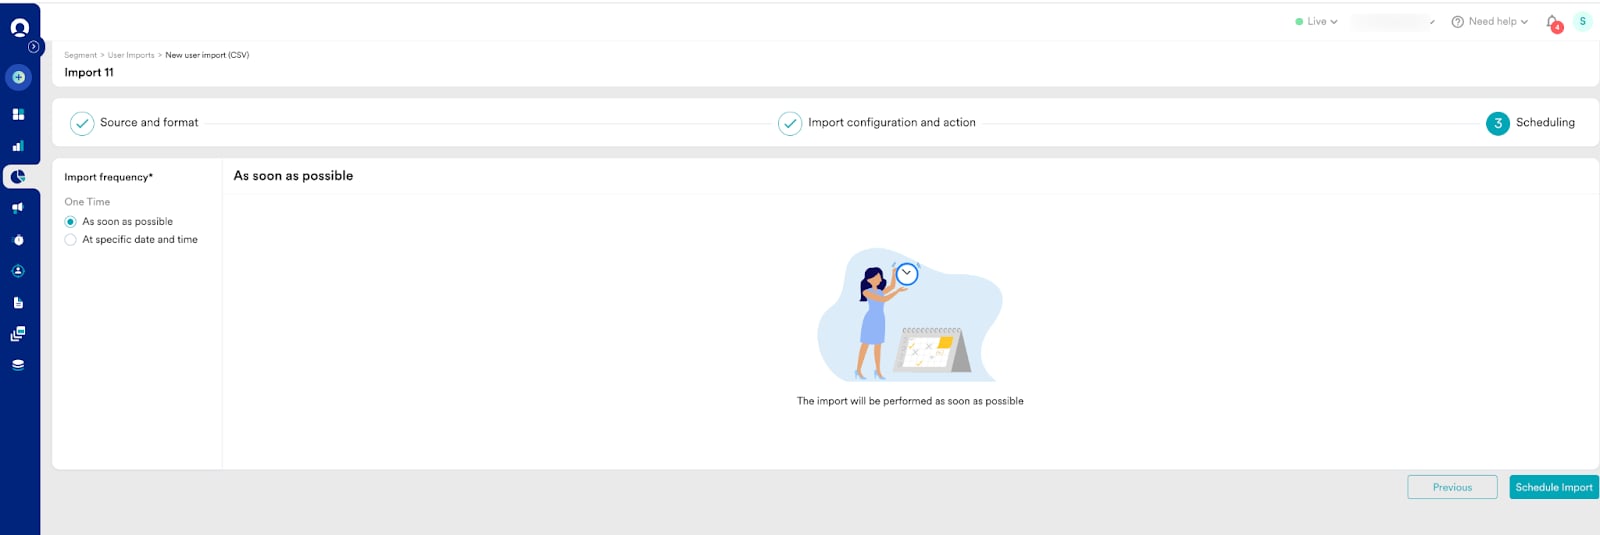 14. The user imports get listed under the User Imports page with a *Successful* sync status against it.
After these values are updated, MoEngage will drop these users as part of any future campaigns targeting the same subscription category.
## Resubscribe Users in MoEngage and in Senders
You may want to resubscribe a user who has previously unsubscribed on the MoEngage platform and on the Sendgrid platform simultaneously. The MoEngage Resubscribe API resets the unsubscribe flag to “false” for users on MoEngage and makes a call to SendGrid to remove the email addresses (associated with the unsubscribed users) from their suppression list.
To achieve the same, perform the following steps:
1. Collate the list of Email IDs to be resubscribed.
2. Invoke the MoEngage Resubscribe API as mentioned [here](https://www.moengage.com/docs/api/resubscribe/bulk-resubscribe-users).
3. Set *update\_esp=true* and pass the list of email IDs in the *recipients key* as an *array*.
# Frequently Asked Questions
Yes, it is possible to customize the landing page the user lands on after clicking the unsubscribe link. This option is available in **Sender Configuration**. When a user clicks the unsubscribe link, they are unsubscribed and then taken to this landing page to learn the reason for their unsubscription.
This interaction includes the following steps:
* MoEngage invokes a content API to pass the token saved in MoEngage in place of the email ID.
* As a response, the client system returns the email ID.
* MoEngage generates a payload and sends the request to the sender.
* The email ID is encrypted and stored to log this sent request. Note that the raw email ID is never stored in MoEngage.
14. The user imports get listed under the User Imports page with a *Successful* sync status against it.
After these values are updated, MoEngage will drop these users as part of any future campaigns targeting the same subscription category.
## Resubscribe Users in MoEngage and in Senders
You may want to resubscribe a user who has previously unsubscribed on the MoEngage platform and on the Sendgrid platform simultaneously. The MoEngage Resubscribe API resets the unsubscribe flag to “false” for users on MoEngage and makes a call to SendGrid to remove the email addresses (associated with the unsubscribed users) from their suppression list.
To achieve the same, perform the following steps:
1. Collate the list of Email IDs to be resubscribed.
2. Invoke the MoEngage Resubscribe API as mentioned [here](https://www.moengage.com/docs/api/resubscribe/bulk-resubscribe-users).
3. Set *update\_esp=true* and pass the list of email IDs in the *recipients key* as an *array*.
# Frequently Asked Questions
Yes, it is possible to customize the landing page the user lands on after clicking the unsubscribe link. This option is available in **Sender Configuration**. When a user clicks the unsubscribe link, they are unsubscribed and then taken to this landing page to learn the reason for their unsubscription.
This interaction includes the following steps:
* MoEngage invokes a content API to pass the token saved in MoEngage in place of the email ID.
* As a response, the client system returns the email ID.
* MoEngage generates a payload and sends the request to the sender.
* The email ID is encrypted and stored to log this sent request. Note that the raw email ID is never stored in MoEngage.