> ## Documentation Index
> Fetch the complete documentation index at: https://moengage-unity-sdk-initialization-split.mintlify.site/llms.txt
> Use this file to discover all available pages before exploring further.
# Understanding Facebook setup for Custom Audience integration
> Set up your Meta app and ad account to create Facebook custom audience campaigns in MoEngage. Learn the required permissions and configuration steps.
To create Facebook Audience campaigns in MoEngage, you need to connect your MoEngage account with your Meta app and Meta ad account. This setup allows you to sync user audiences from MoEngage directly to Facebook, enabling targeted advertising based on your user segments.
This article explains how to set up or use an existing Meta app and a Meta ad account. Before you begin, understand the necessary permissions for Meta apps.
**Required Meta App Permissions**
The MoEngage integration with Facebook Custom Audiences requires your Meta app to have **STANDARD access** for the **Ads Management** and **Ads Read** permissions. Without these permissions, MoEngage cannot add or remove users from your Facebook Custom Audiences.
Here's how permissions apply based on your Meta app type:
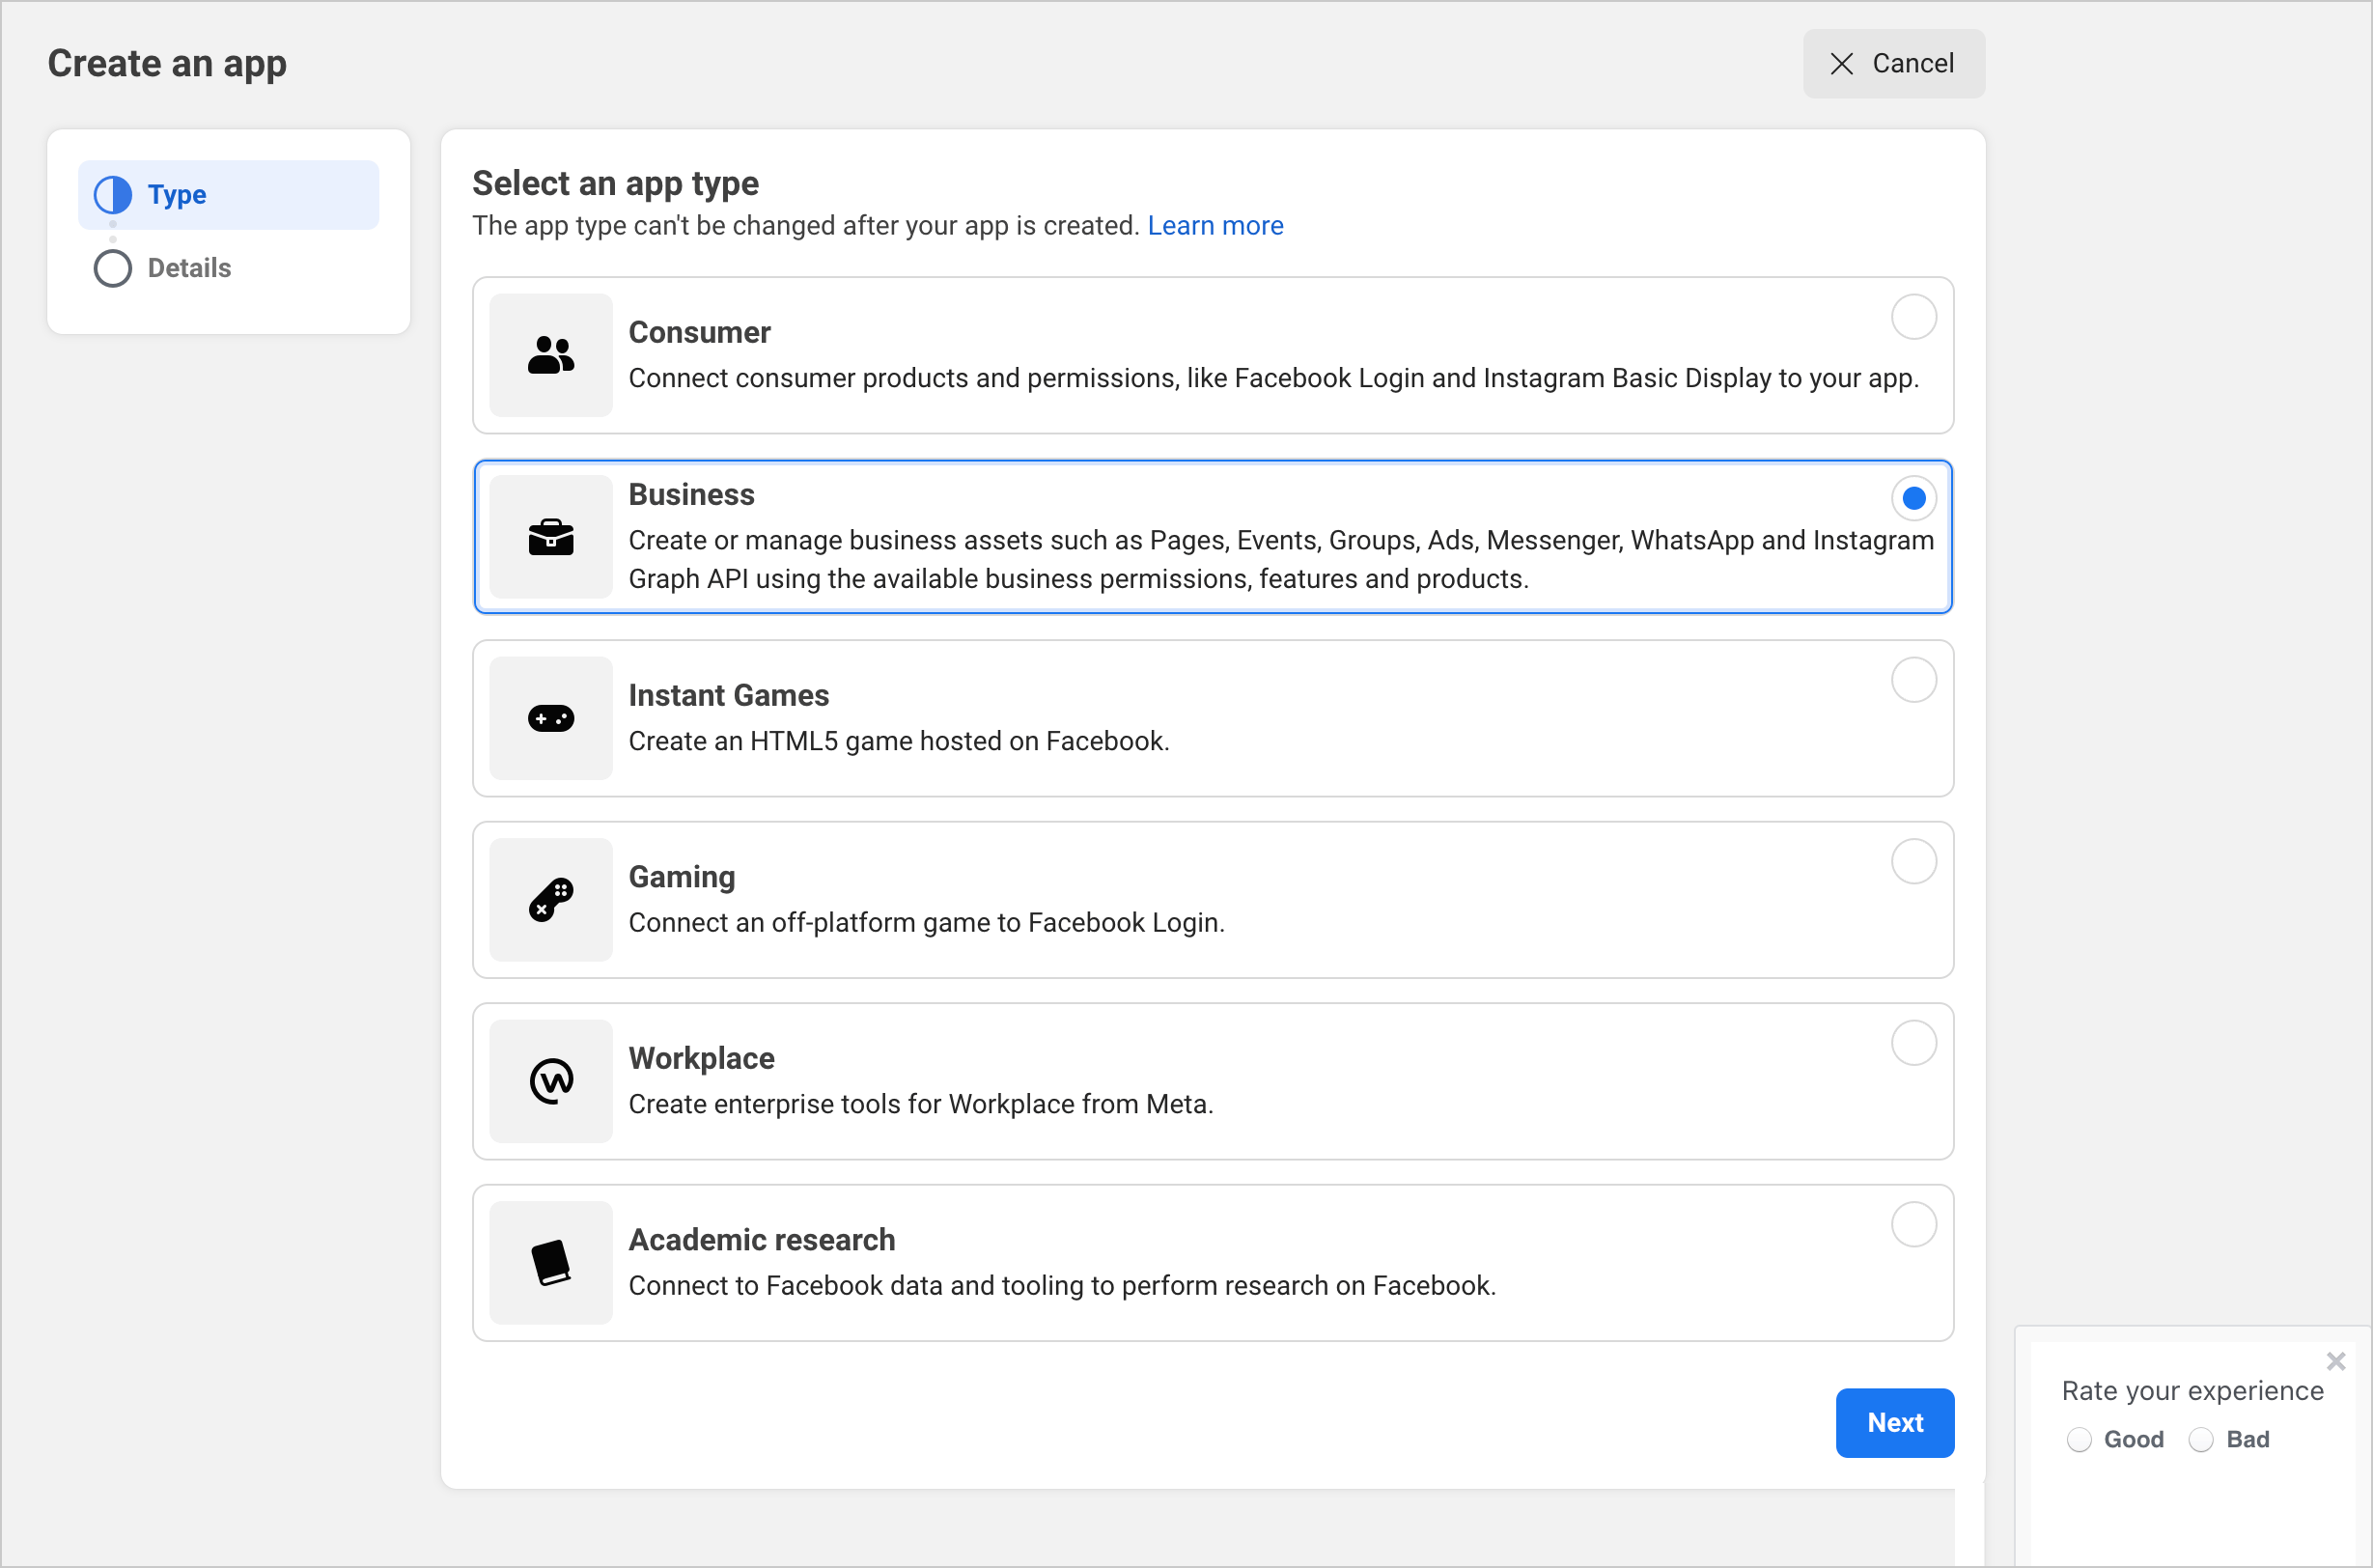
* If you create a new **Business** app, it automatically has **STANDARD access** for **Ads Management** and **Ads Read** permissions. This app type also does not have a development or live mode, simplifying setup.
* If you are using an older **Business** app that still has a Live mode, you must complete an [App Review](https://developers.facebook.com/docs/app-review/introduction) process to gain **Ads Management** and **Ads Read** permissions in Live mode. To avoid this, create a new **Business** app.
* If you create an app of type **Gaming**, **Consumer**, or **None**, you must undergo the [App Review](https://developers.facebook.com/docs/app-review/introduction) process to get **Ads Management** and **Ads Read** permissions when your app moves to Live mode.
For more details on Meta App types, refer to the [Meta documentation](https://developers.facebook.com/docs/development/create-an-app/app-dashboard/app-types/).
## Set up your Meta app
### Create a new Meta app
1. Go to the [Meta Business Settings](https://business.facebook.com/settings) page.
2. In the left menu, click **Accounts**, and then click **Apps**.
3. On the right side, on the **Apps** pane, click the **Add** drop-down menu.
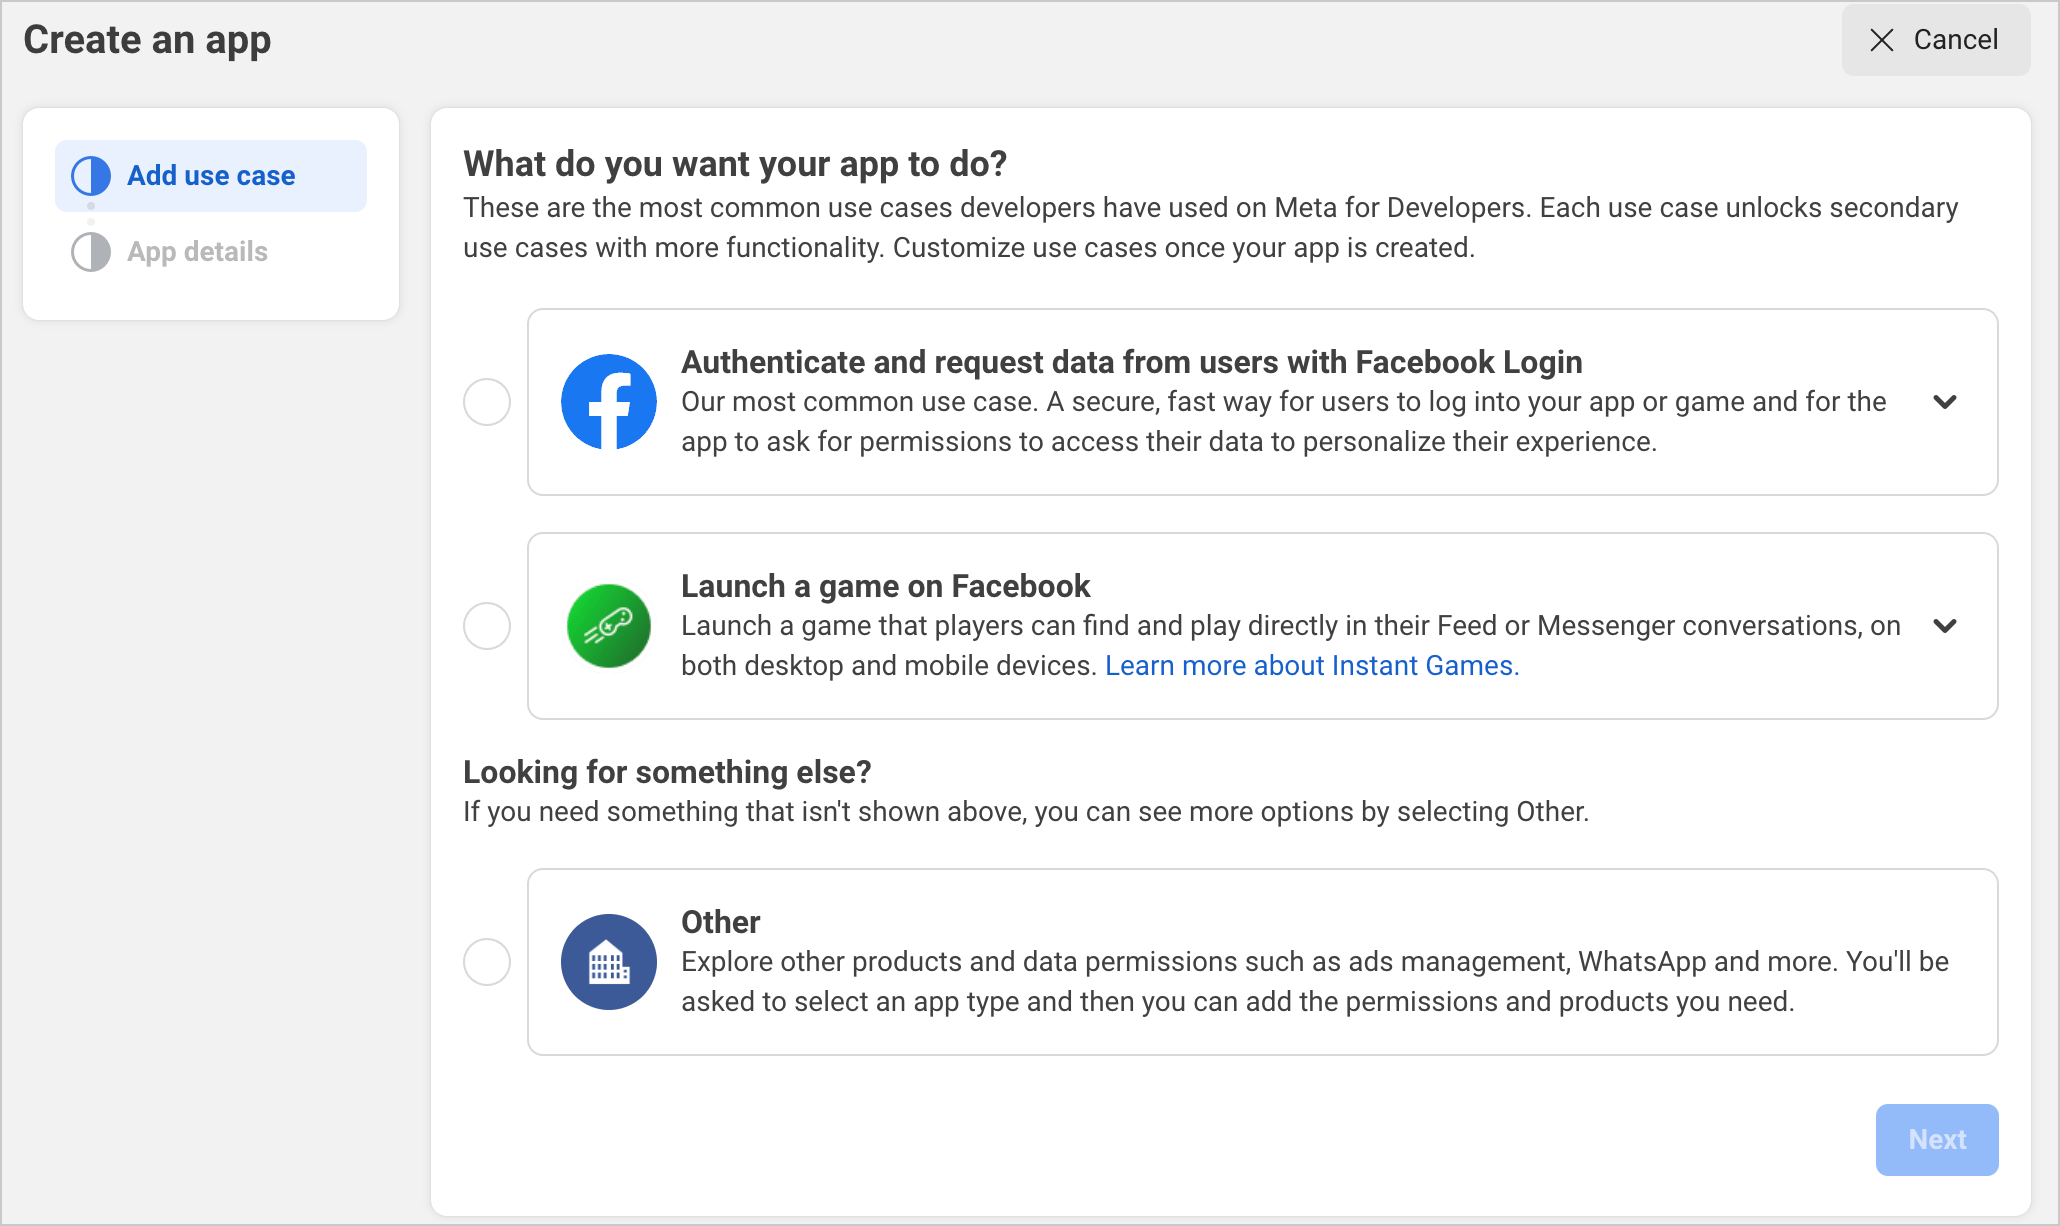
4. Click **Create a New App ID**. 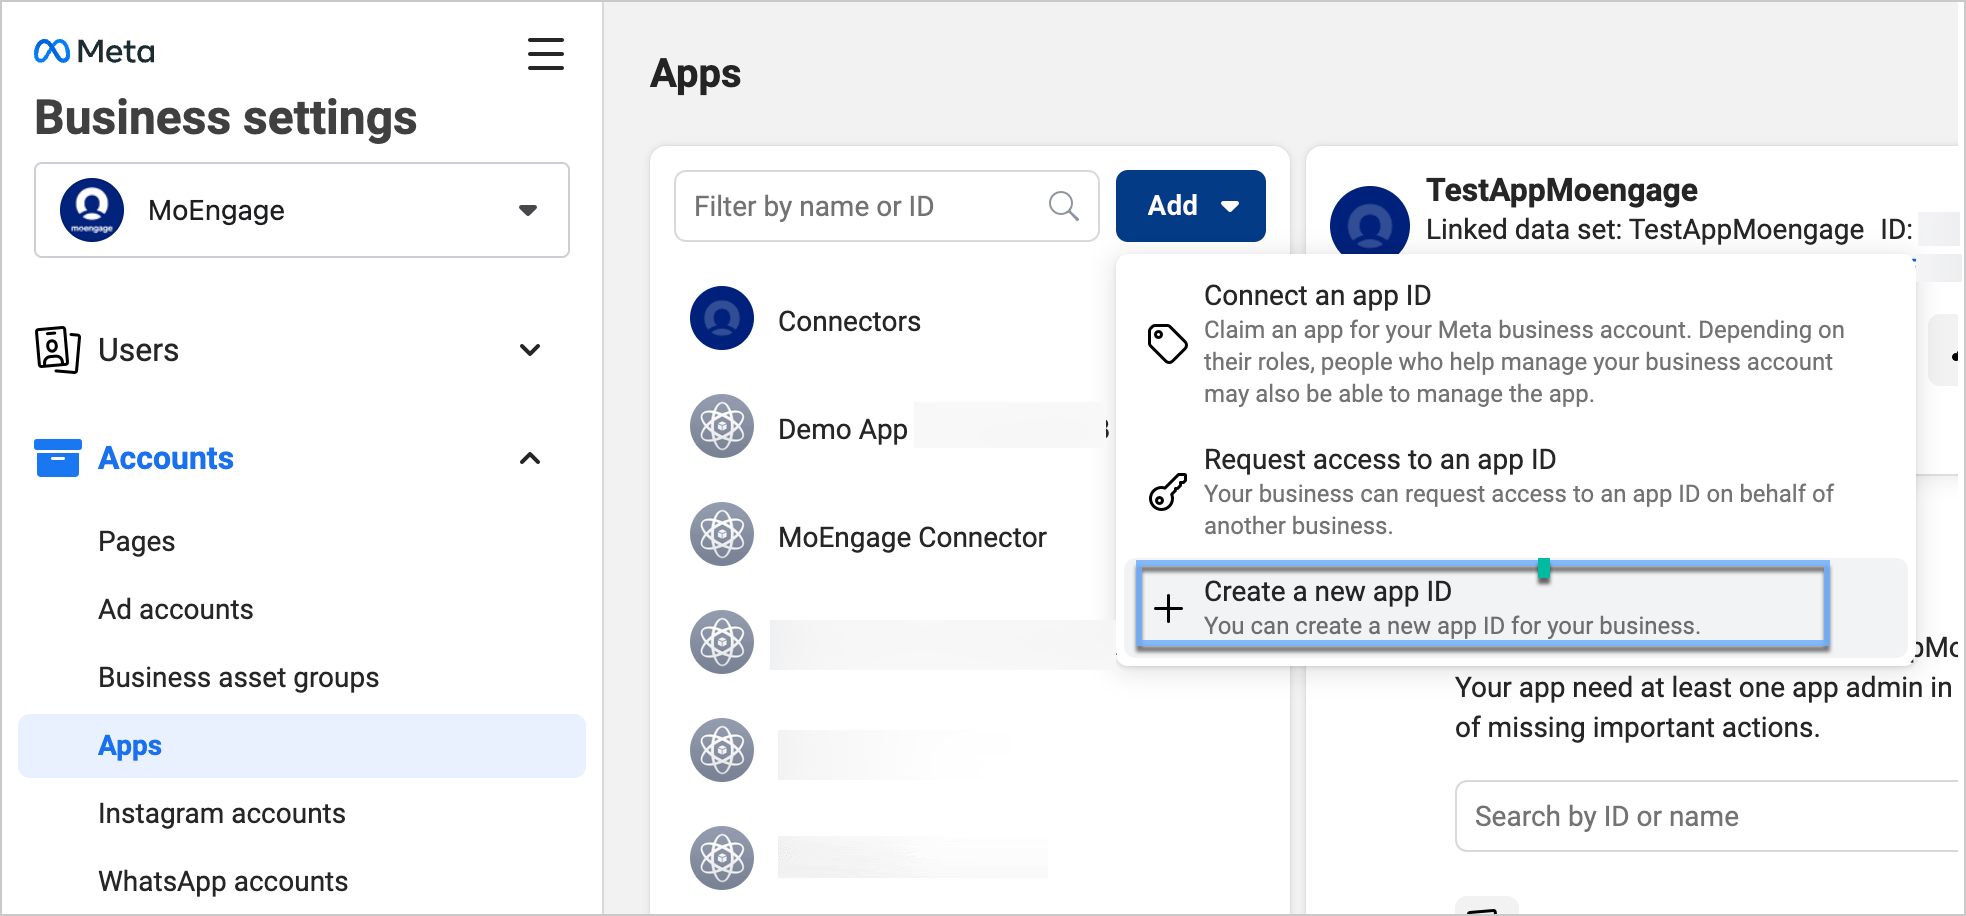 5. On the next screen, select a use case for the app, and then click **Next**.
  6. Select an app type that describes the purpose of the app, and then click **Next**.
  7. On the **Create an App** screen, enter the following details:
| Field | Description |
| :------------------------------ | :-------------------------------------------------------------------------------------------------------------------------------------------------------------------------------------------------------------------------------- |
| **Add an App Name** | This is the app name that appears on your My Apps page and is associated with your app ID. You can change this name later in **Settings**. |
| **App Contact Email** | This is the email address Meta uses to contact you about your app. Provide an address that you check regularly, as Meta may send information about policies, app restrictions, or recovery if your app is deleted or compromised. |
| **Business Account** (Optional) | Connecting a Business Account to your app is required only for certain products and permissions. You are prompted to connect a Business Account when you request access to those products and permissions. |
8. After filling in the details, click **Create App**.
7. On the **Create an App** screen, enter the following details:
| Field | Description |
| :------------------------------ | :-------------------------------------------------------------------------------------------------------------------------------------------------------------------------------------------------------------------------------- |
| **Add an App Name** | This is the app name that appears on your My Apps page and is associated with your app ID. You can change this name later in **Settings**. |
| **App Contact Email** | This is the email address Meta uses to contact you about your app. Provide an address that you check regularly, as Meta may send information about policies, app restrictions, or recovery if your app is deleted or compromised. |
| **Business Account** (Optional) | Connecting a Business Account to your app is required only for certain products and permissions. You are prompted to connect a Business Account when you request access to those products and permissions. |
8. After filling in the details, click **Create App**. 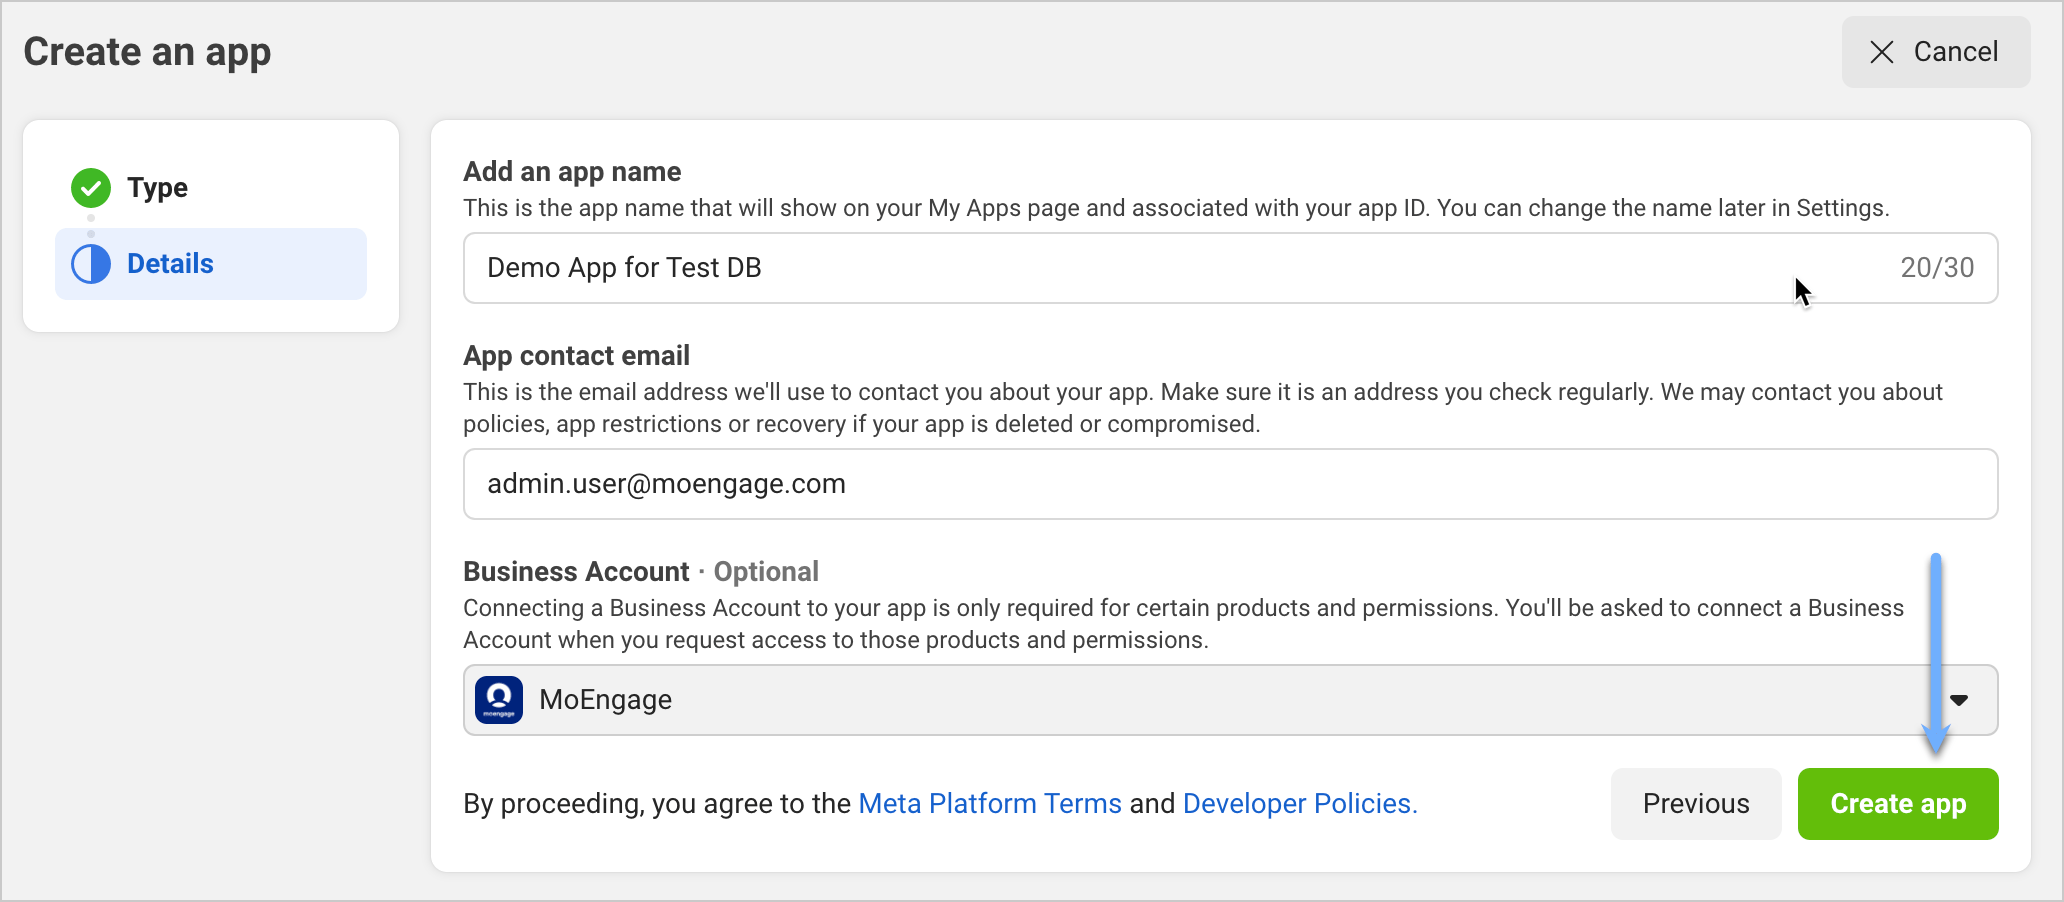 9. The App dashboard opens. You can now add products to your app.
 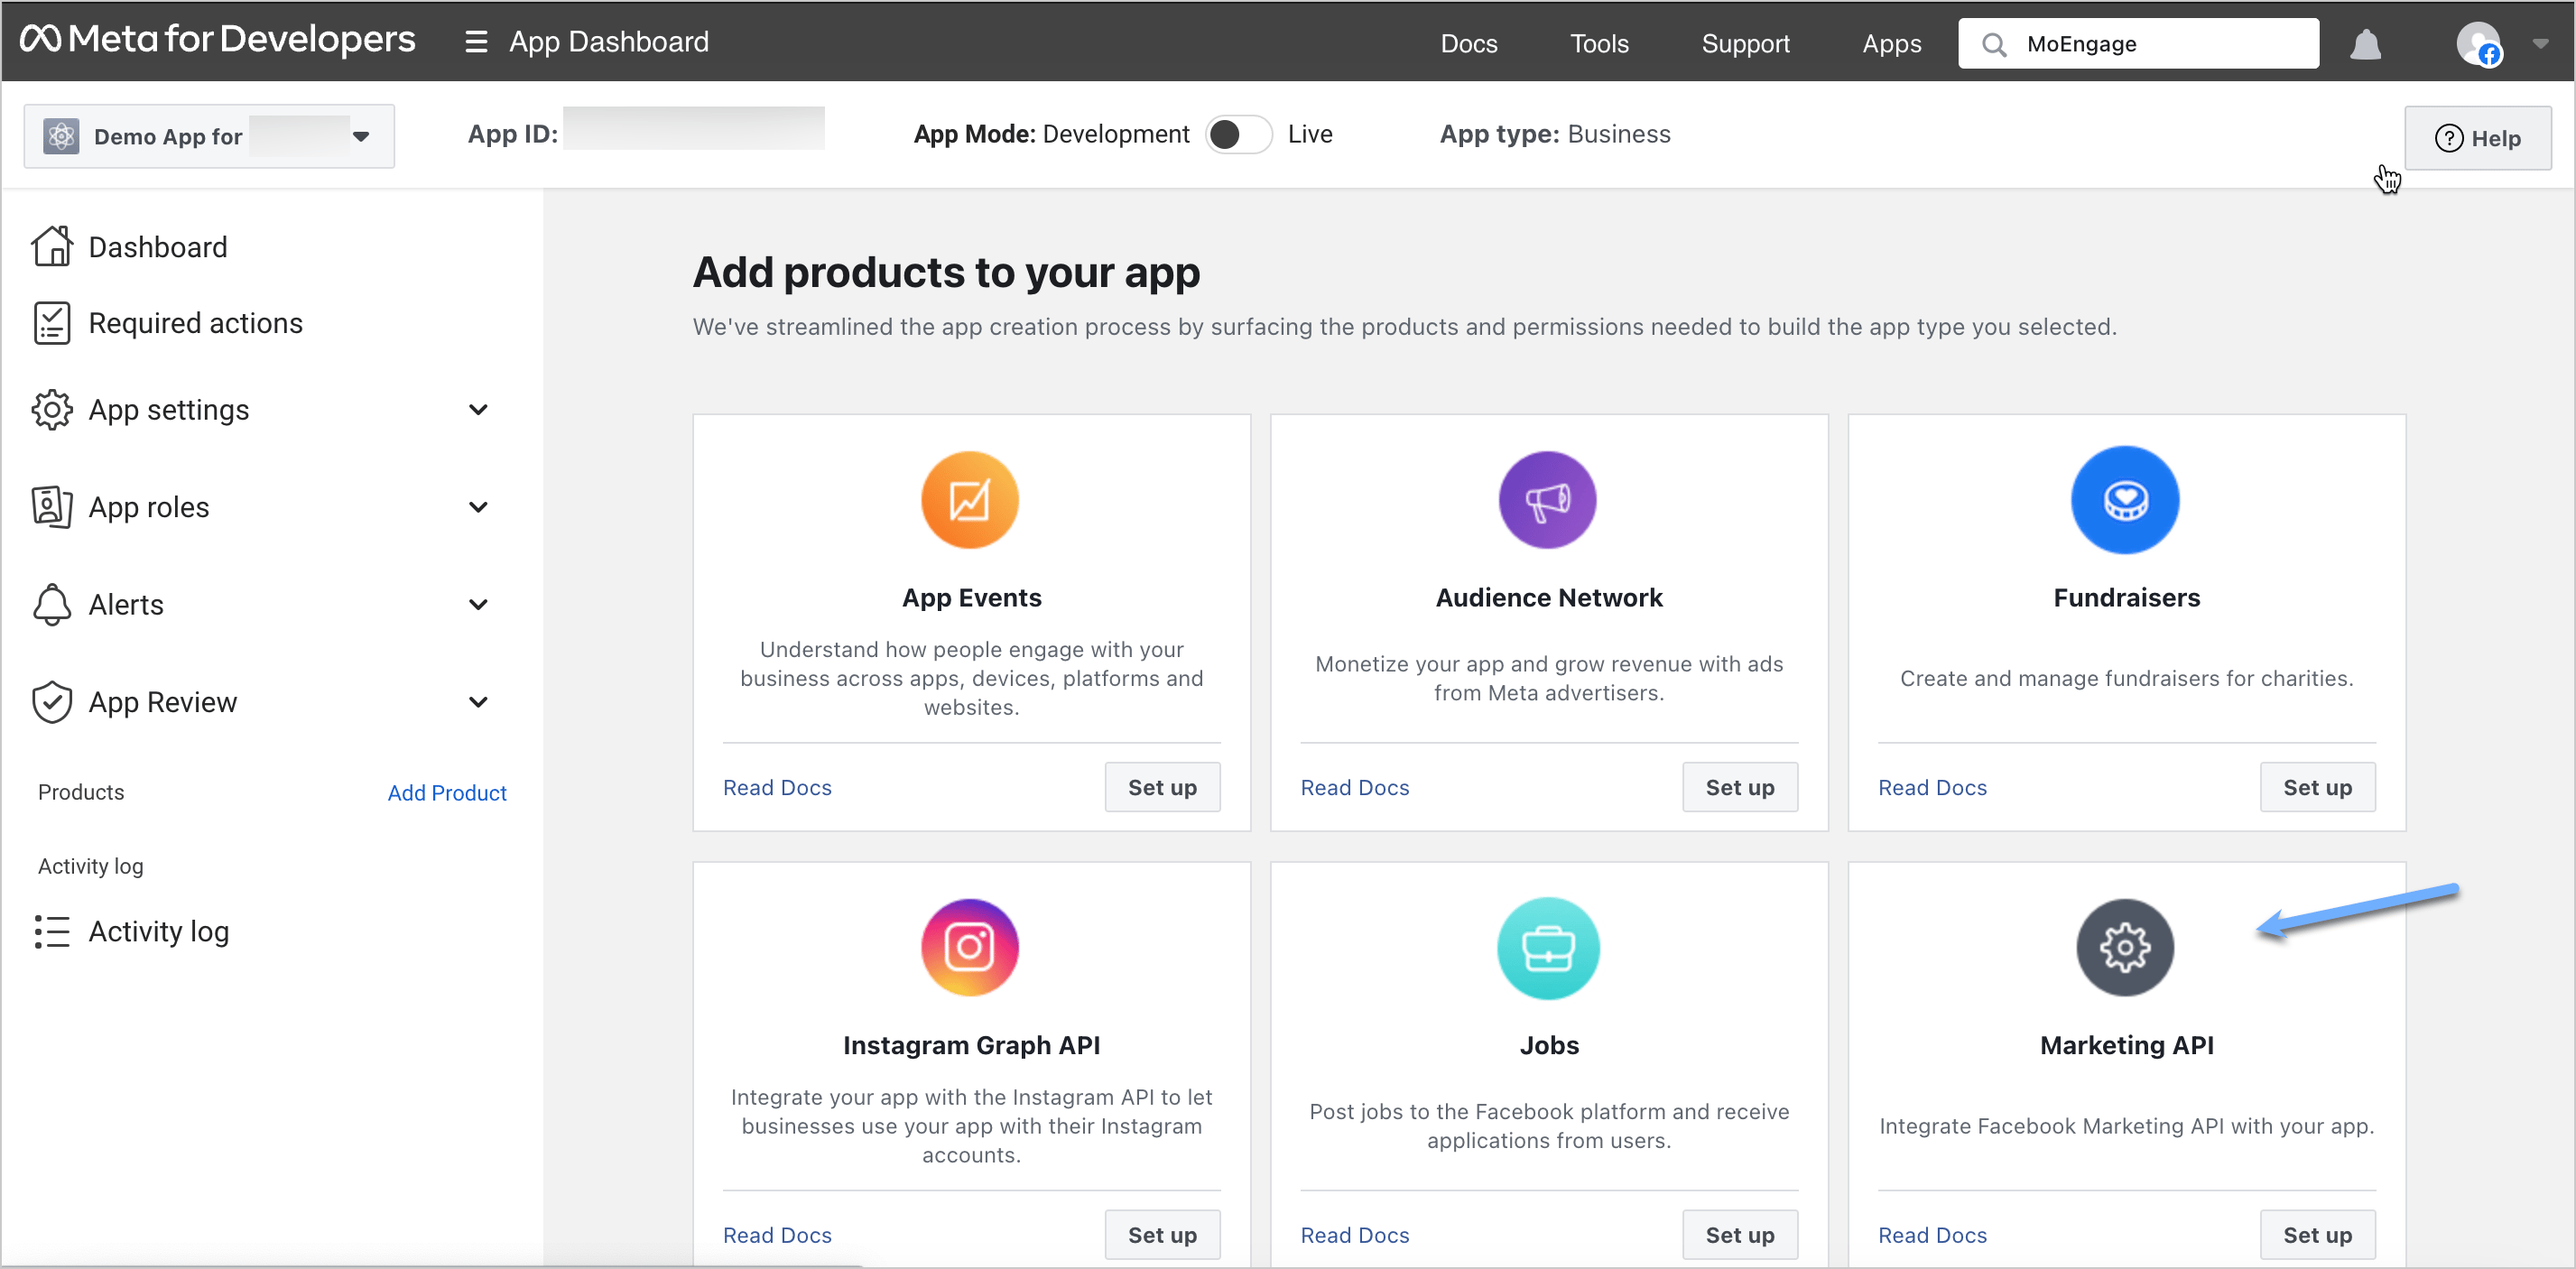 10. Search for **Marketing API** (shown in the image above), and then click **Set up**. Your app is created in development mode and is ready for testing.
### Use an existing Meta app
1. Go to [developers.facebook.com/apps](https://developers.facebook.com/apps), and then in the **App** drop-down menu at the top left corner of the App dashboard, select the app you want to use.
2. Add the **Marketing API** to this app, if you have not already added it.
10. Search for **Marketing API** (shown in the image above), and then click **Set up**. Your app is created in development mode and is ready for testing.
### Use an existing Meta app
1. Go to [developers.facebook.com/apps](https://developers.facebook.com/apps), and then in the **App** drop-down menu at the top left corner of the App dashboard, select the app you want to use.
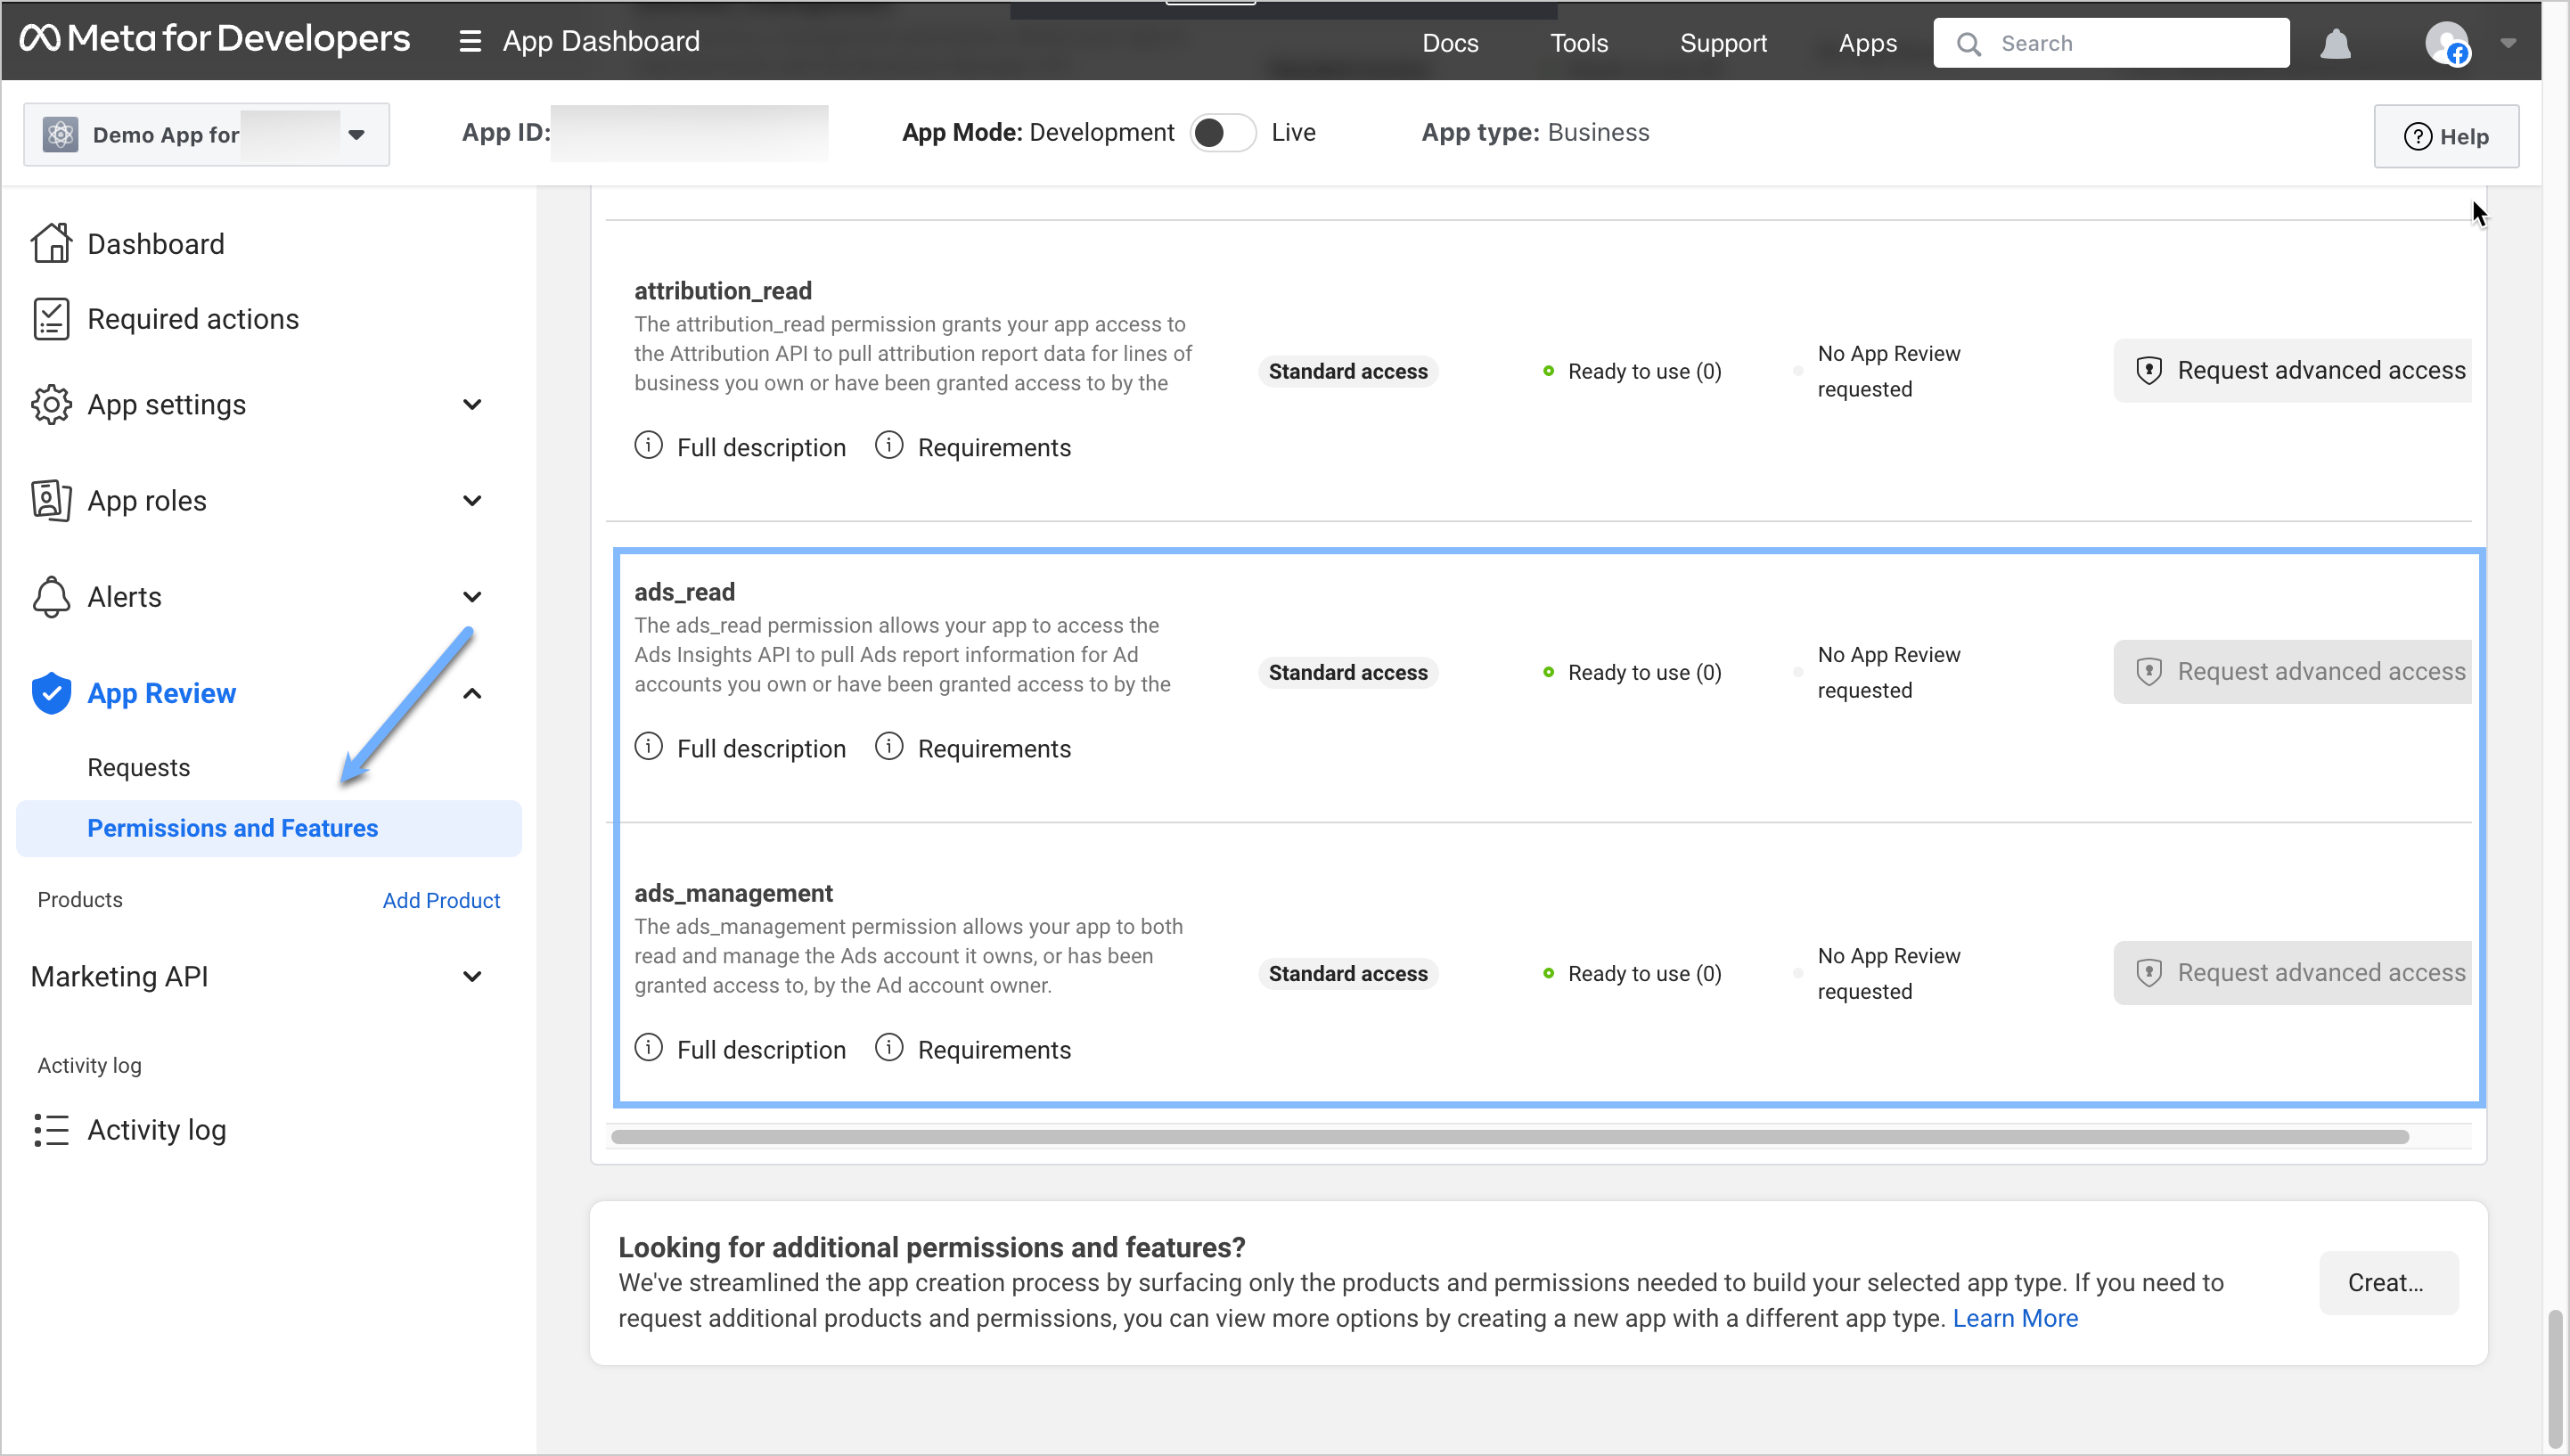
2. Add the **Marketing API** to this app, if you have not already added it. 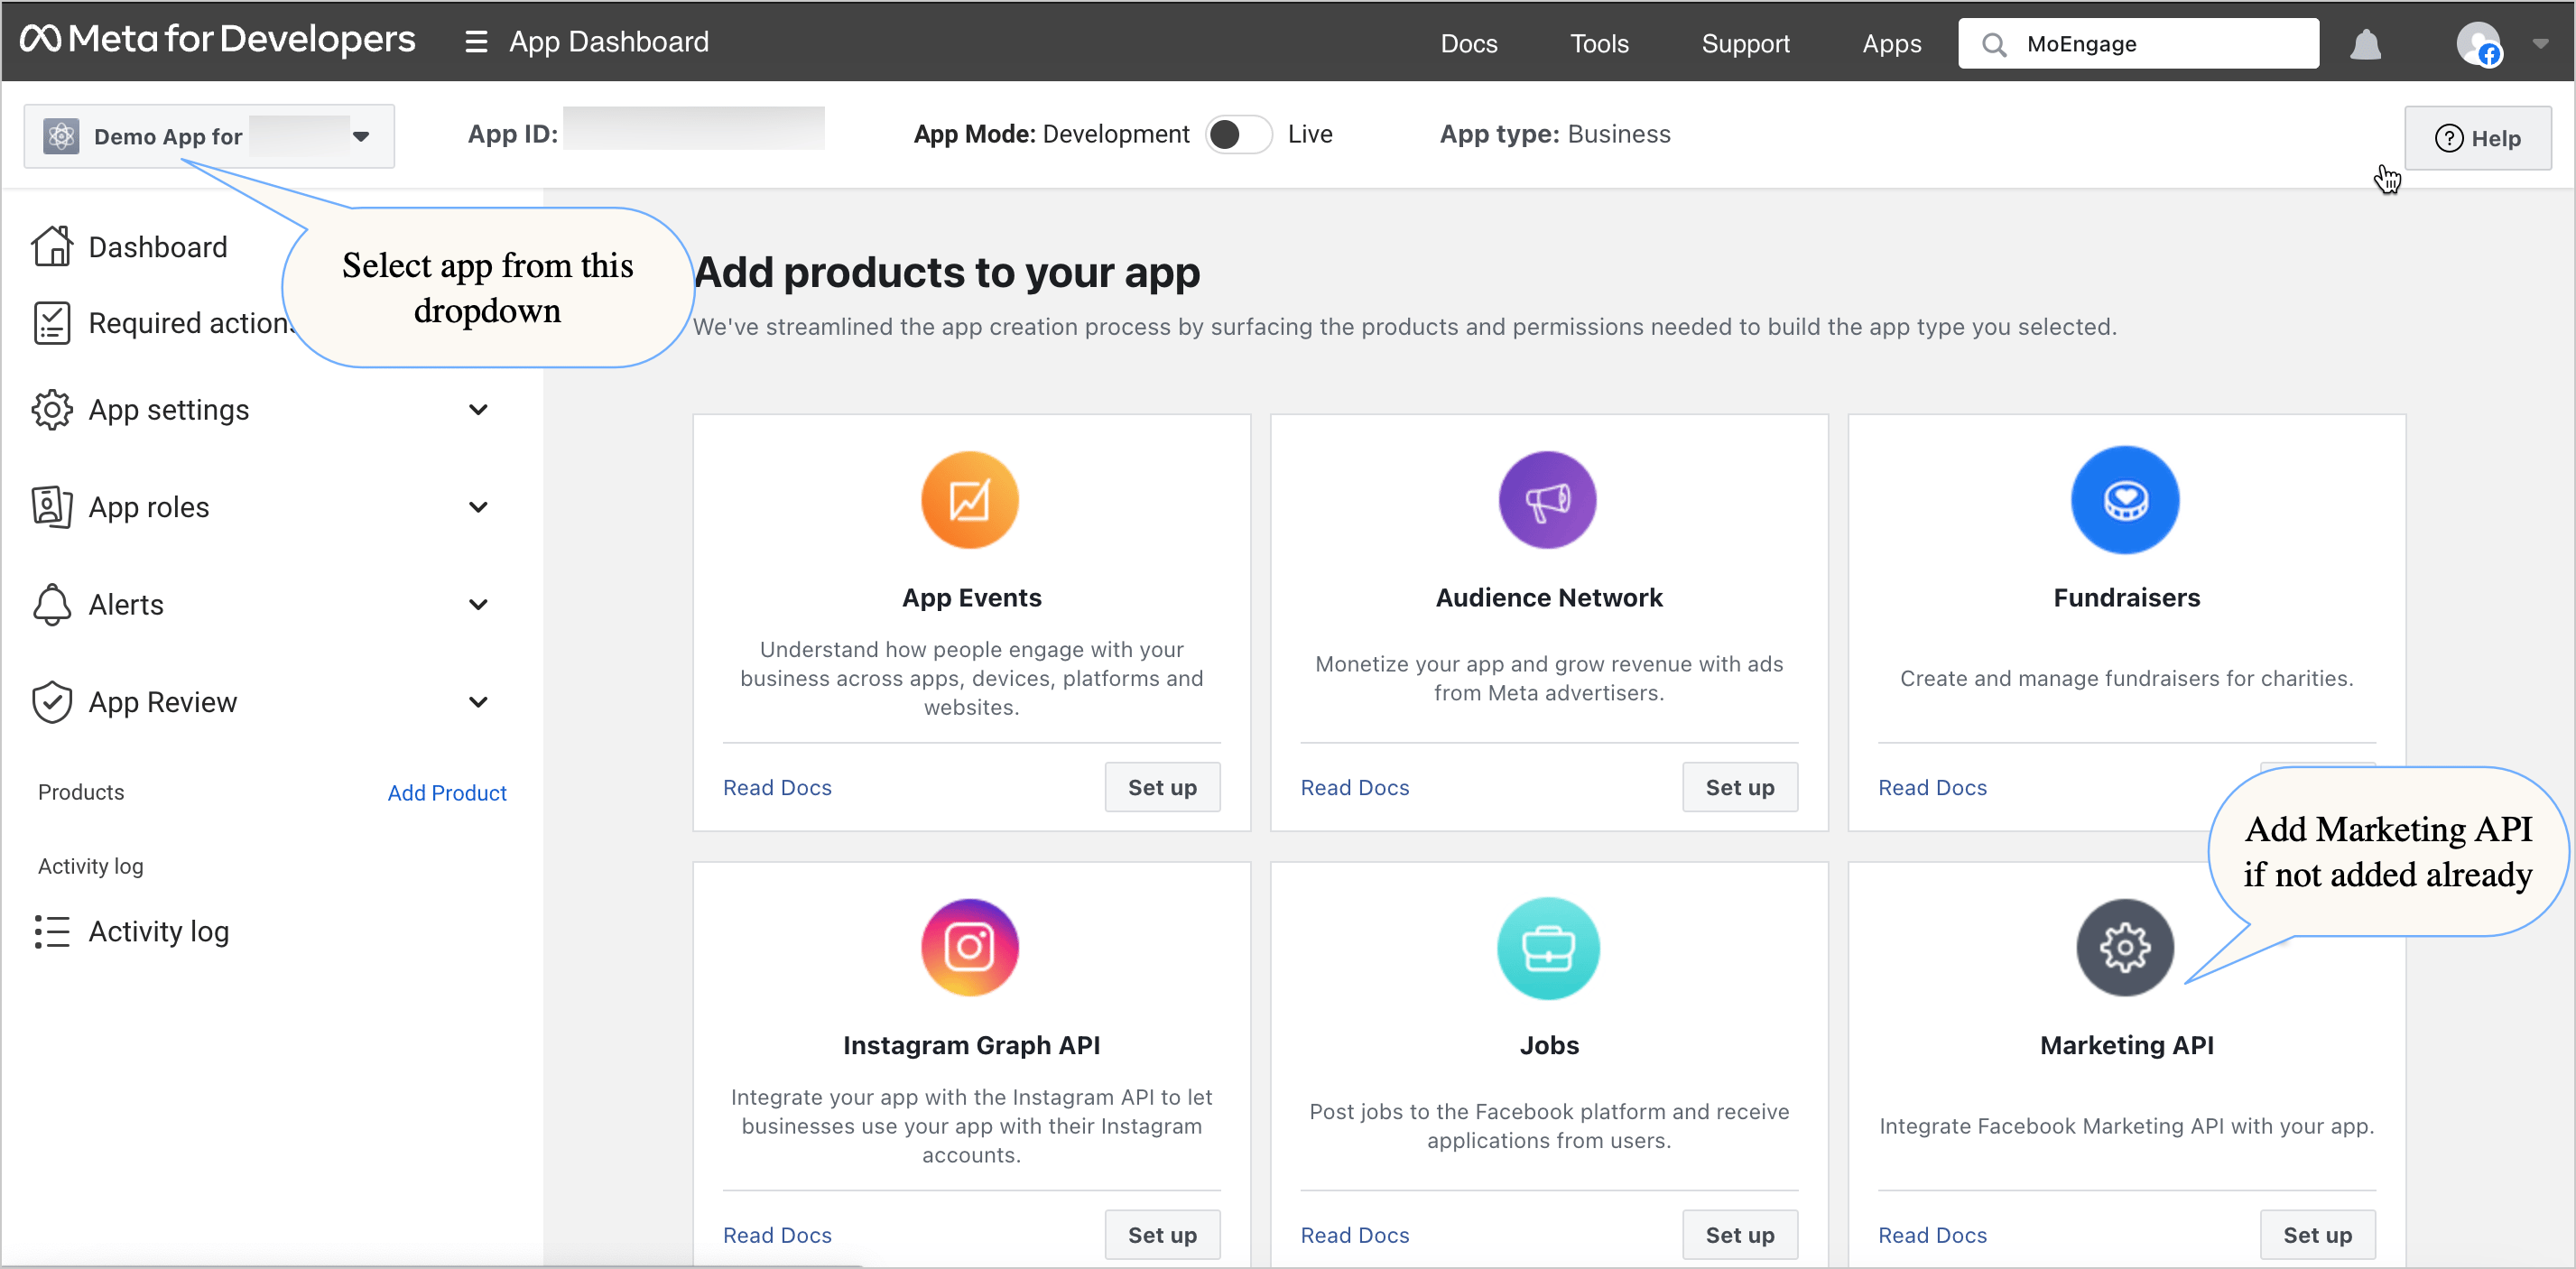 3. If you are using an existing app, ensure that your app has **STANDARD access** for the **Ads Management** and **Ads Read** permissions. To check this, go to **App Review** > **Permissions and Features**, and then search for **ads\_read** and **ads\_management**. You should have **Standard Access** for both of these. Adding or deleting users from Facebook Custom Audiences does not require **Advanced access**.
  4. Copy the app ID displayed at the top of the page.
5. Go to the [Meta Business Settings](https://business.facebook.com/settings) page.
6. In the left menu, click **Accounts**, and then click **Apps**. You can find the name of the app you want to configure in the Apps list on the left.
7. If the app is not on the list, click the **Add** drop-down menu, and then select **Connect an App ID**.
4. Copy the app ID displayed at the top of the page.
5. Go to the [Meta Business Settings](https://business.facebook.com/settings) page.
6. In the left menu, click **Accounts**, and then click **Apps**. You can find the name of the app you want to configure in the Apps list on the left.
7. If the app is not on the list, click the **Add** drop-down menu, and then select **Connect an App ID**. 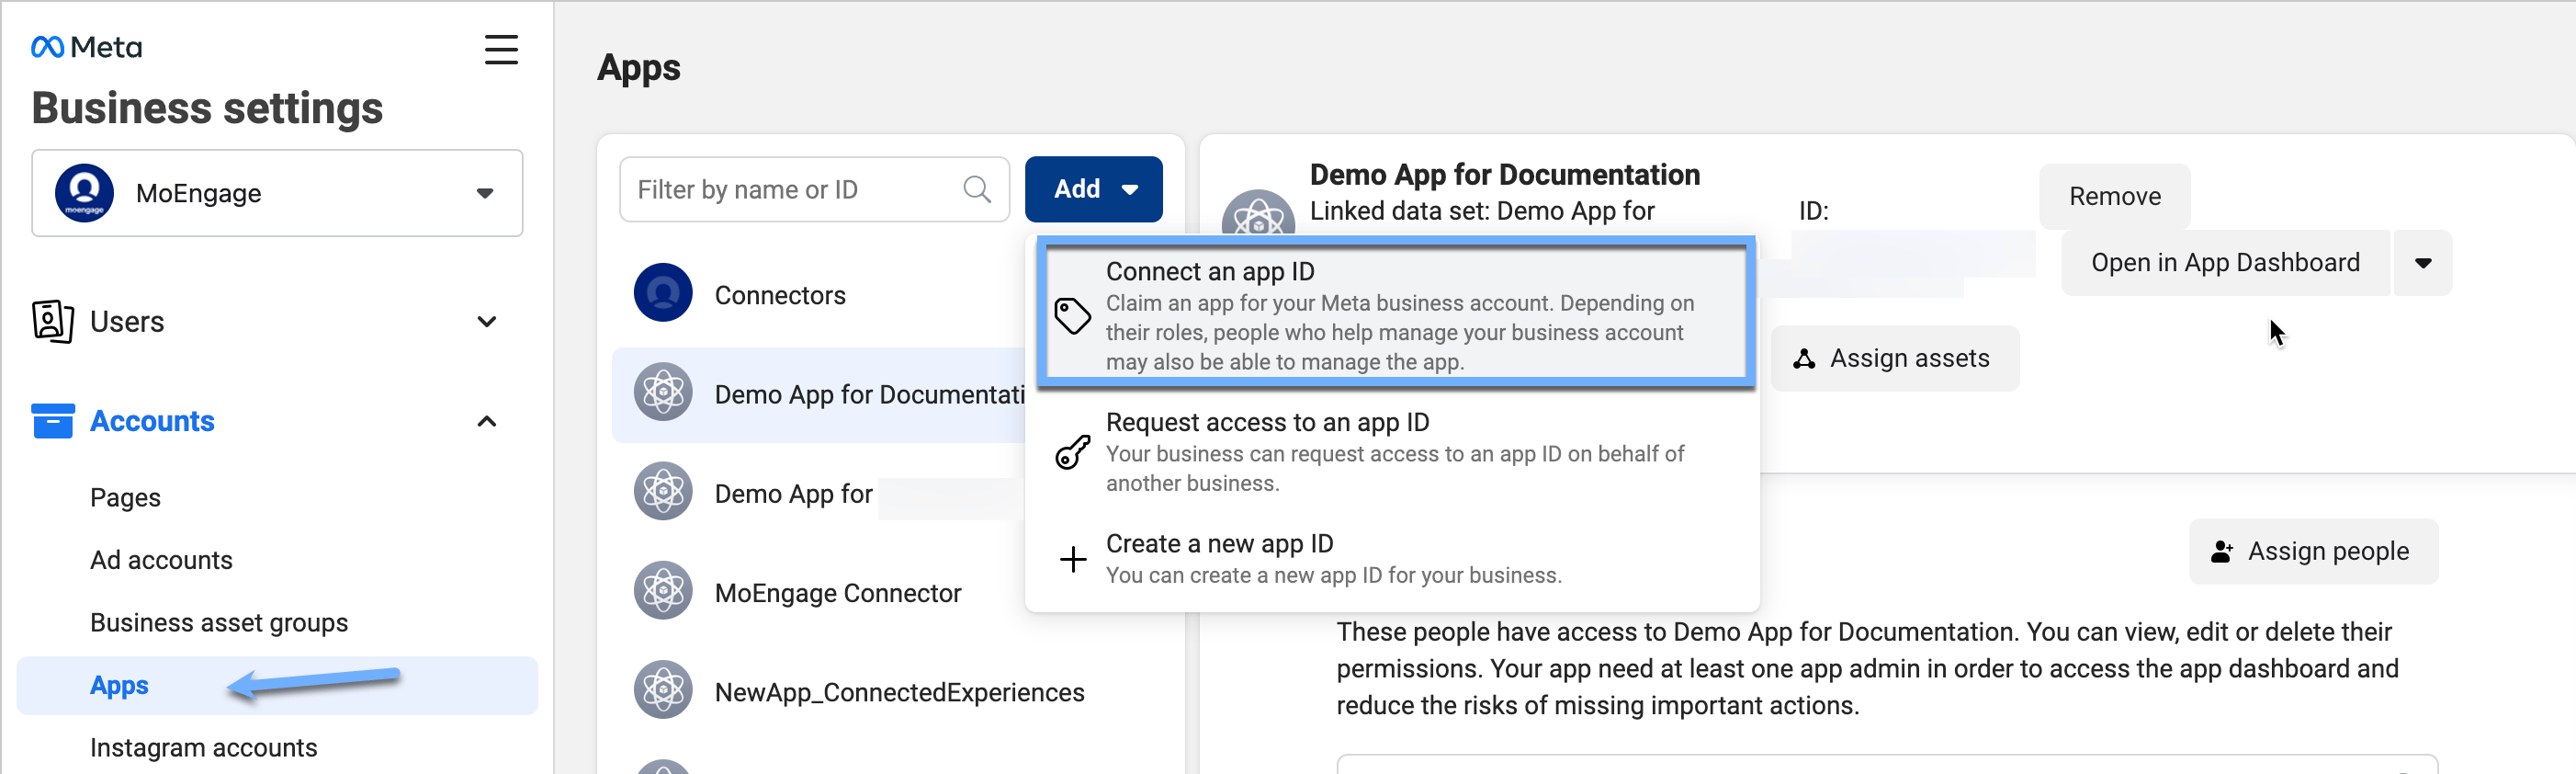 8. In the dialog box, enter the app ID you copied in Step 4, and then click **Add App**.
 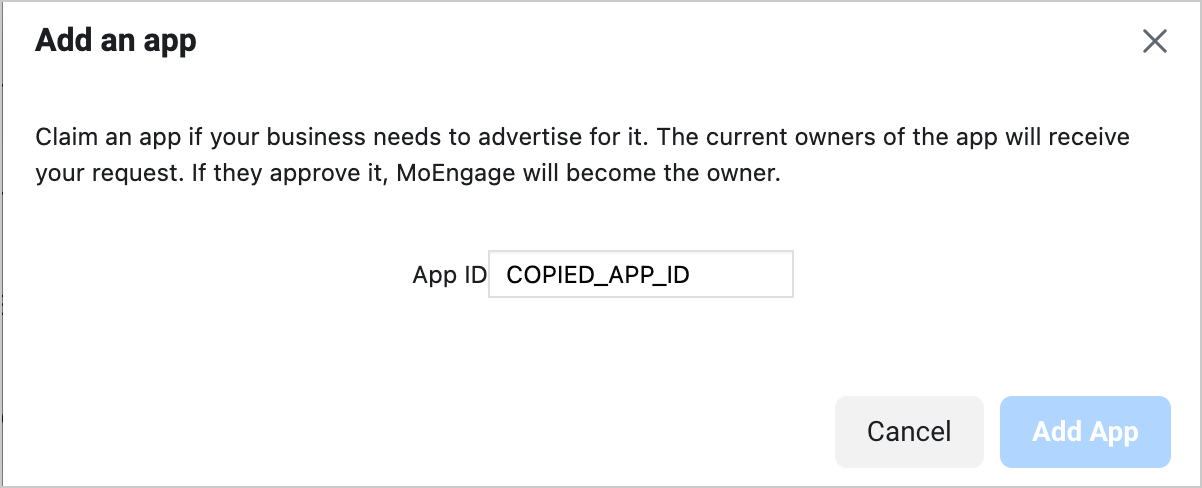 9. The app appears in the **Apps** menu once successfully added.
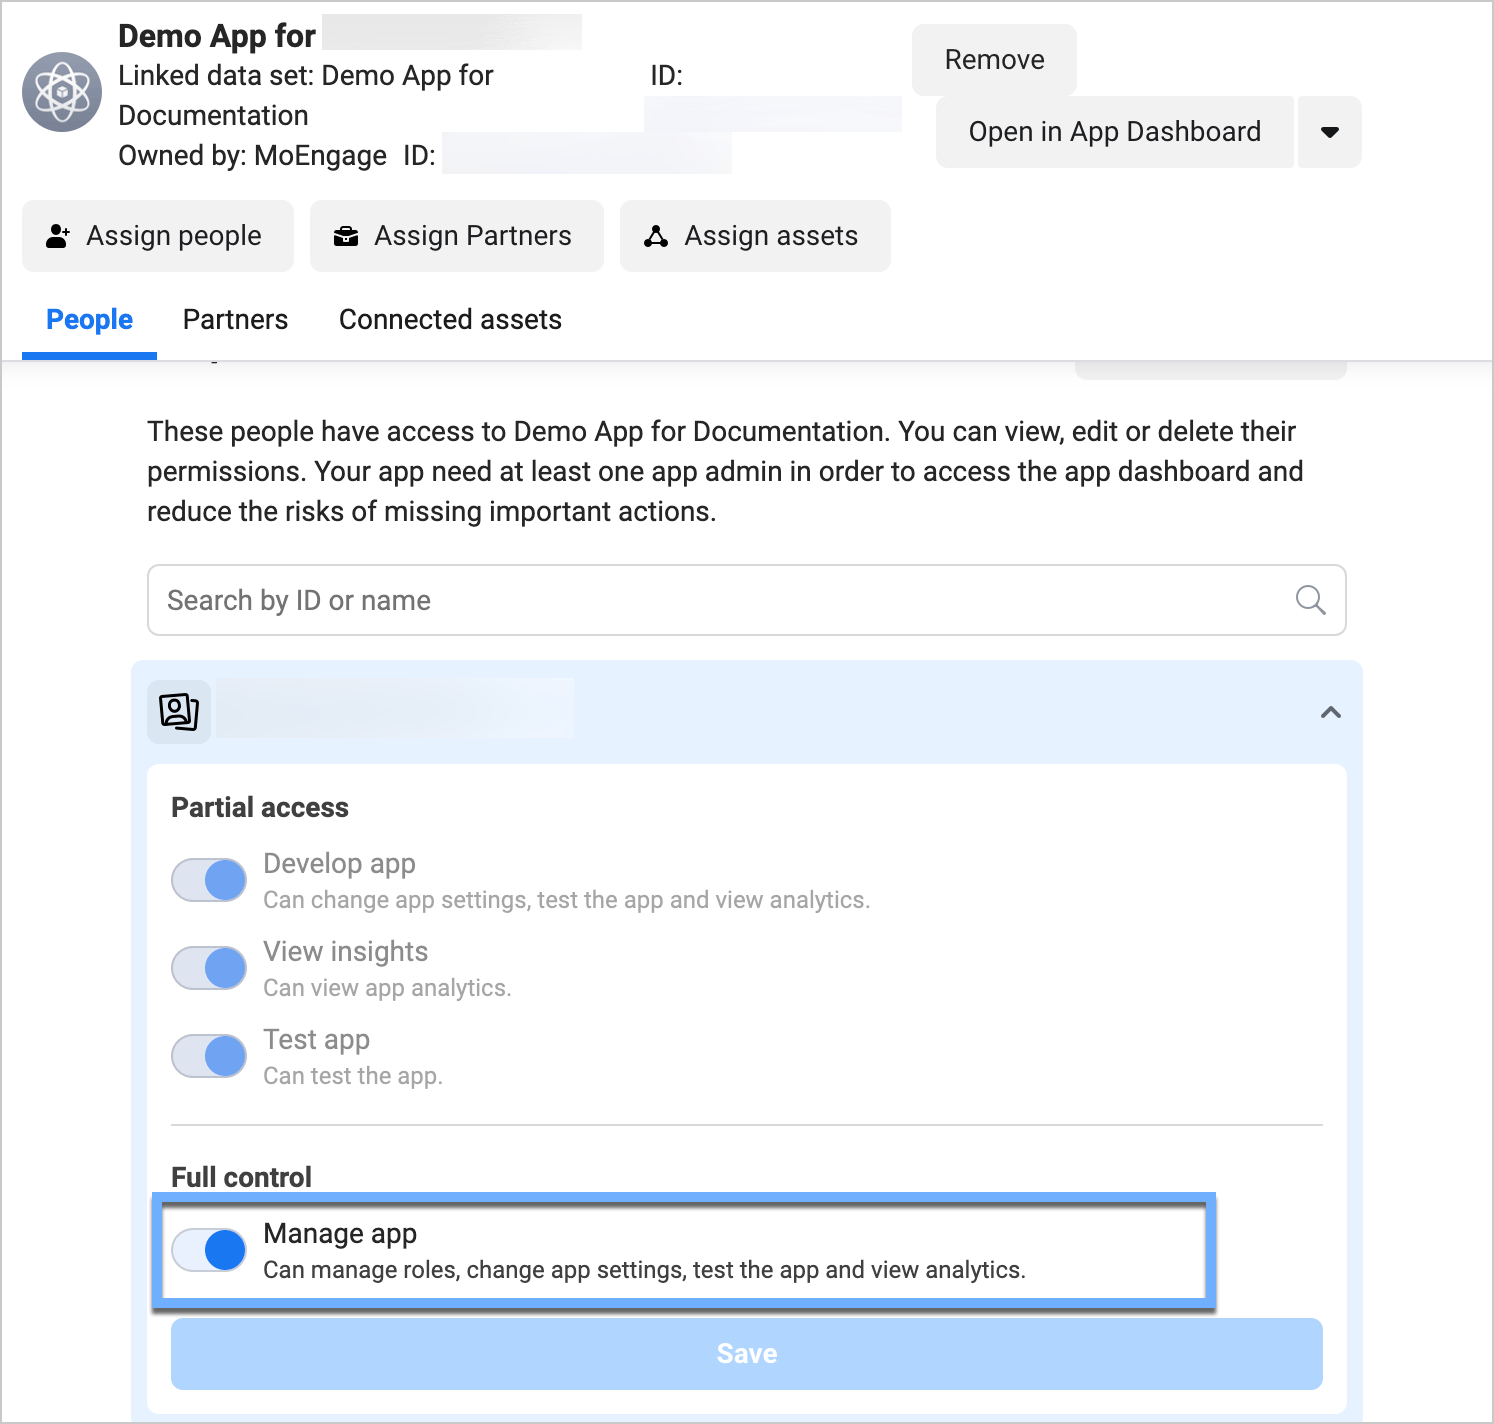
 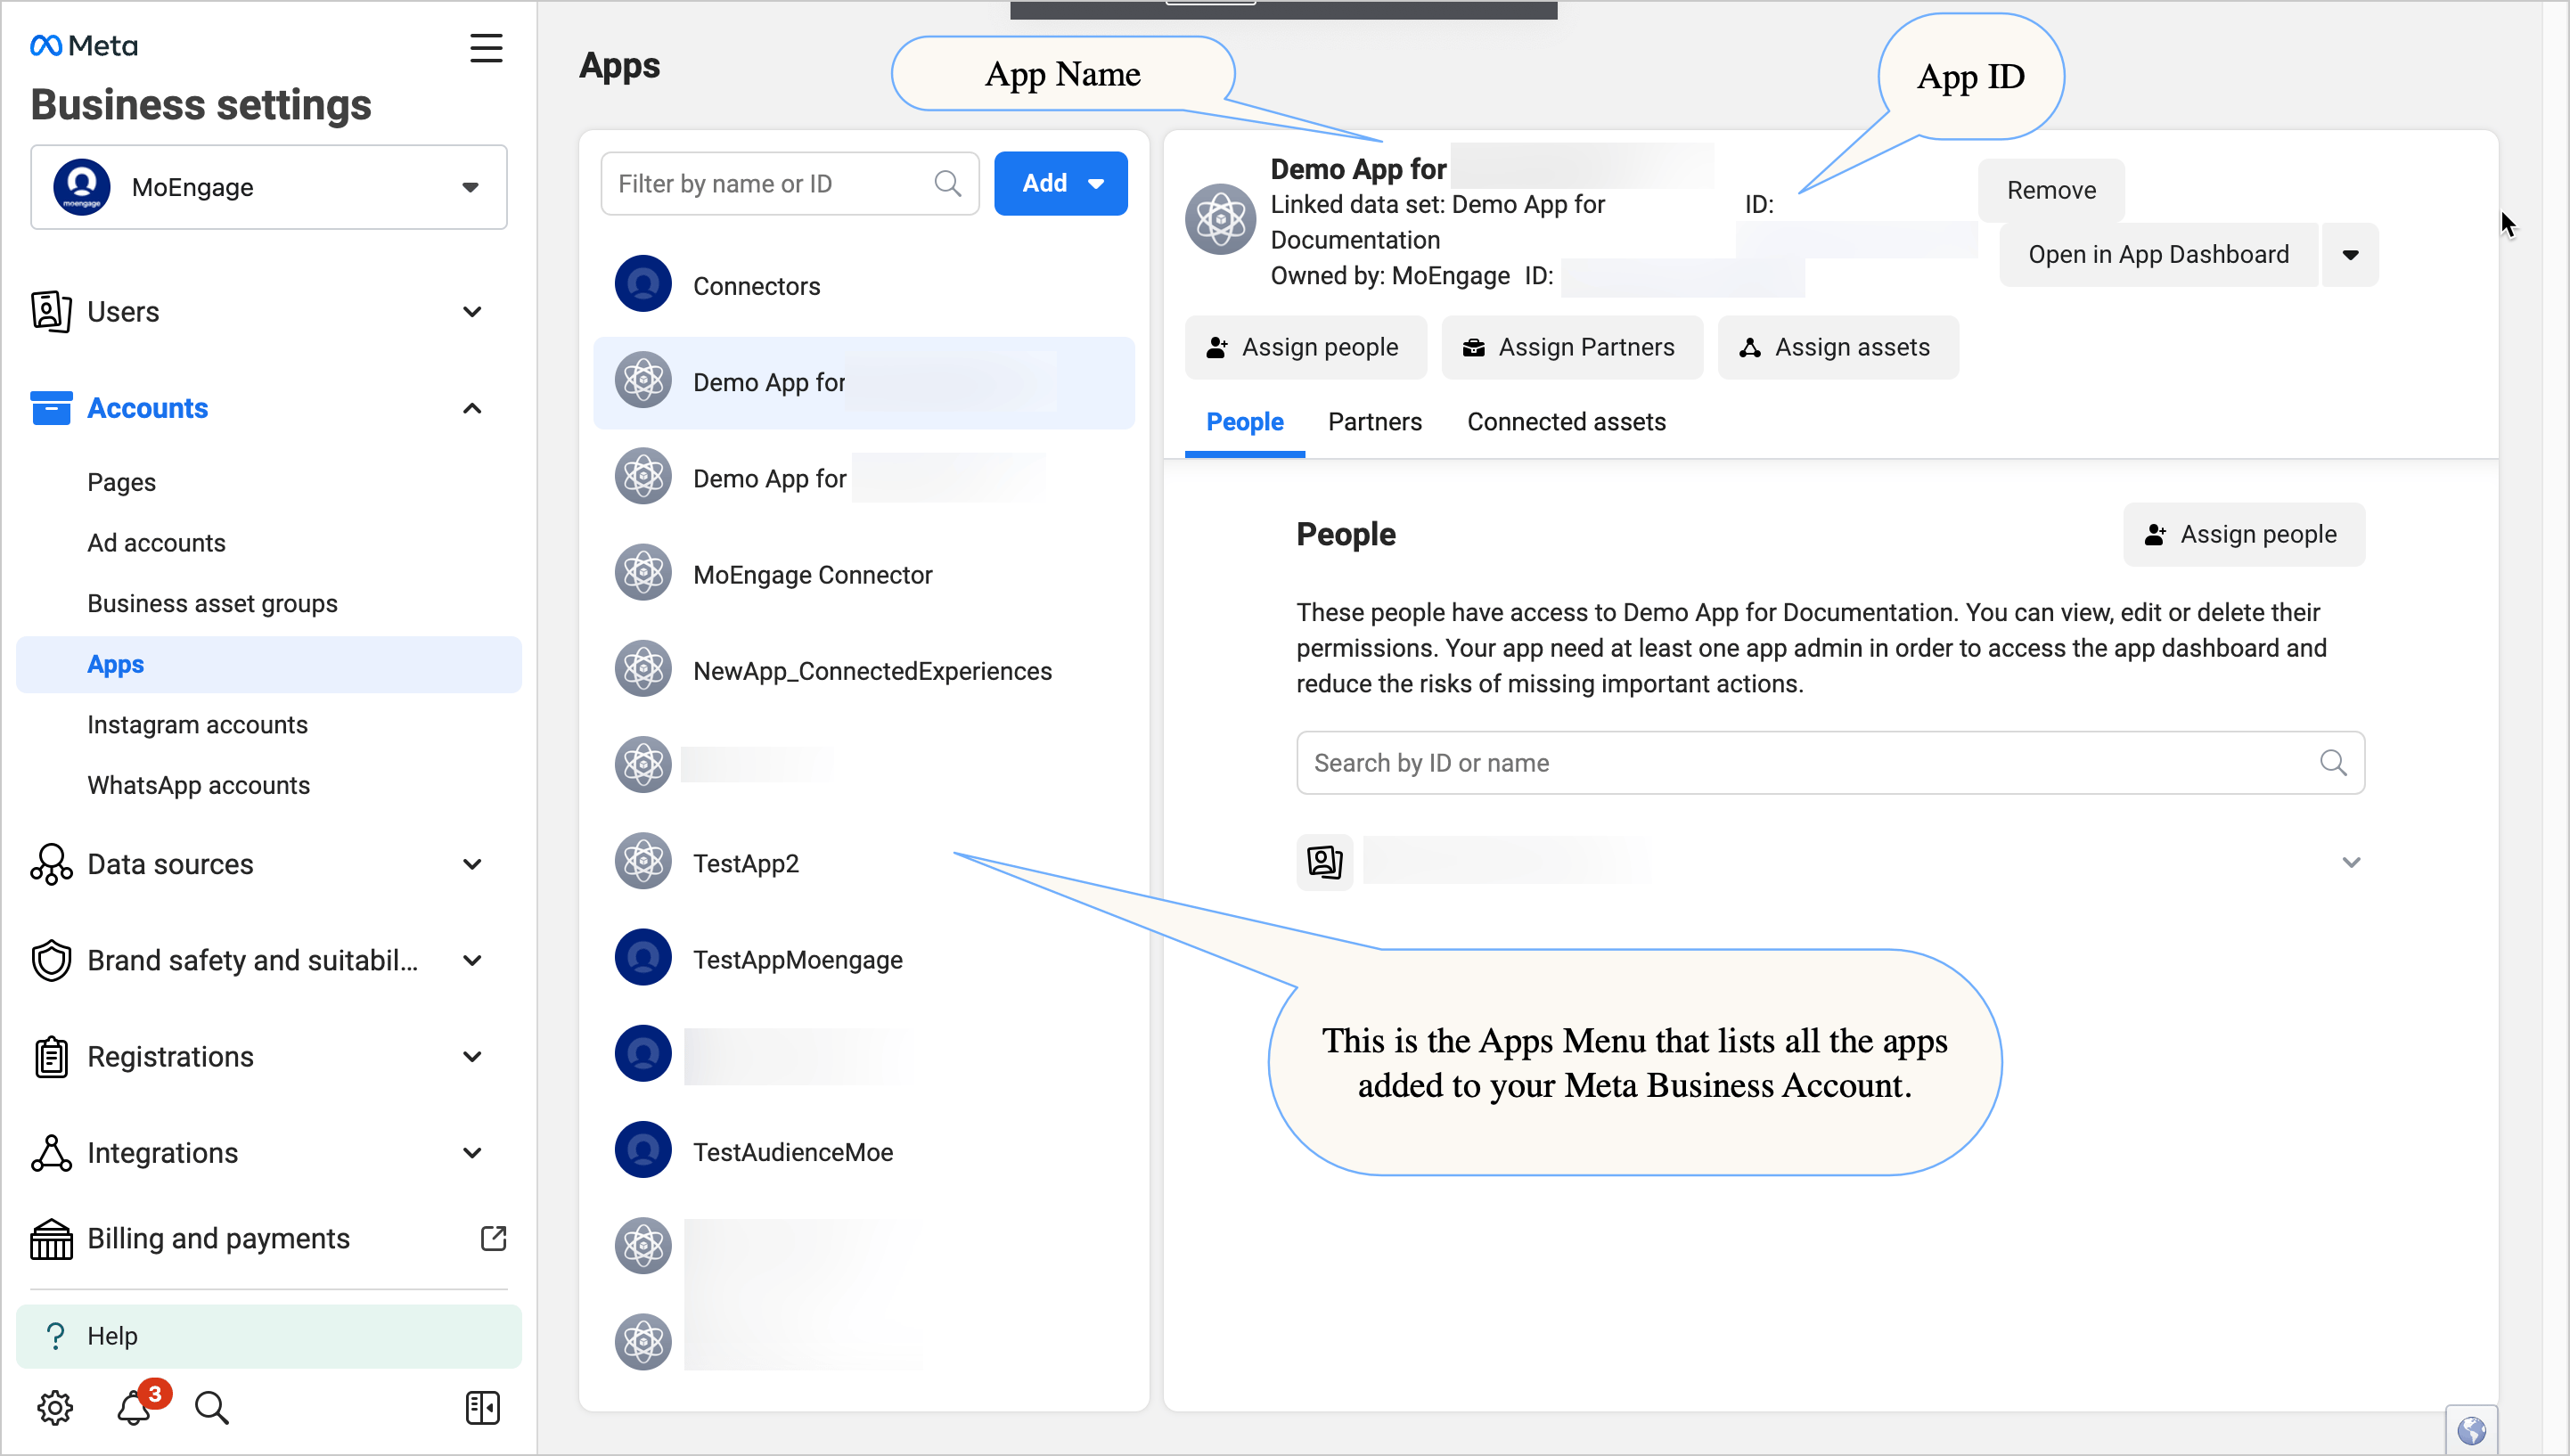 10. Ensure you have admin access to the app you want to use. On the **People** tab, click your ID or name in the list of people with access to the app. Make sure the **Manage App** toggle is on.
  ## Set Up Your Meta Ad Account
### Create a new Meta ad account
1. Go to the [Meta Business Settings](https://business.facebook.com/settings) page. In the left menu, click **Accounts**, and then click **Ad Accounts**.
2. On the right side, in the **Ad Accounts** screen, click the **Add** drop-down menu, and then select **Create a New Ad Account**.
## Set Up Your Meta Ad Account
### Create a new Meta ad account
1. Go to the [Meta Business Settings](https://business.facebook.com/settings) page. In the left menu, click **Accounts**, and then click **Ad Accounts**.
2. On the right side, in the **Ad Accounts** screen, click the **Add** drop-down menu, and then select **Create a New Ad Account**. 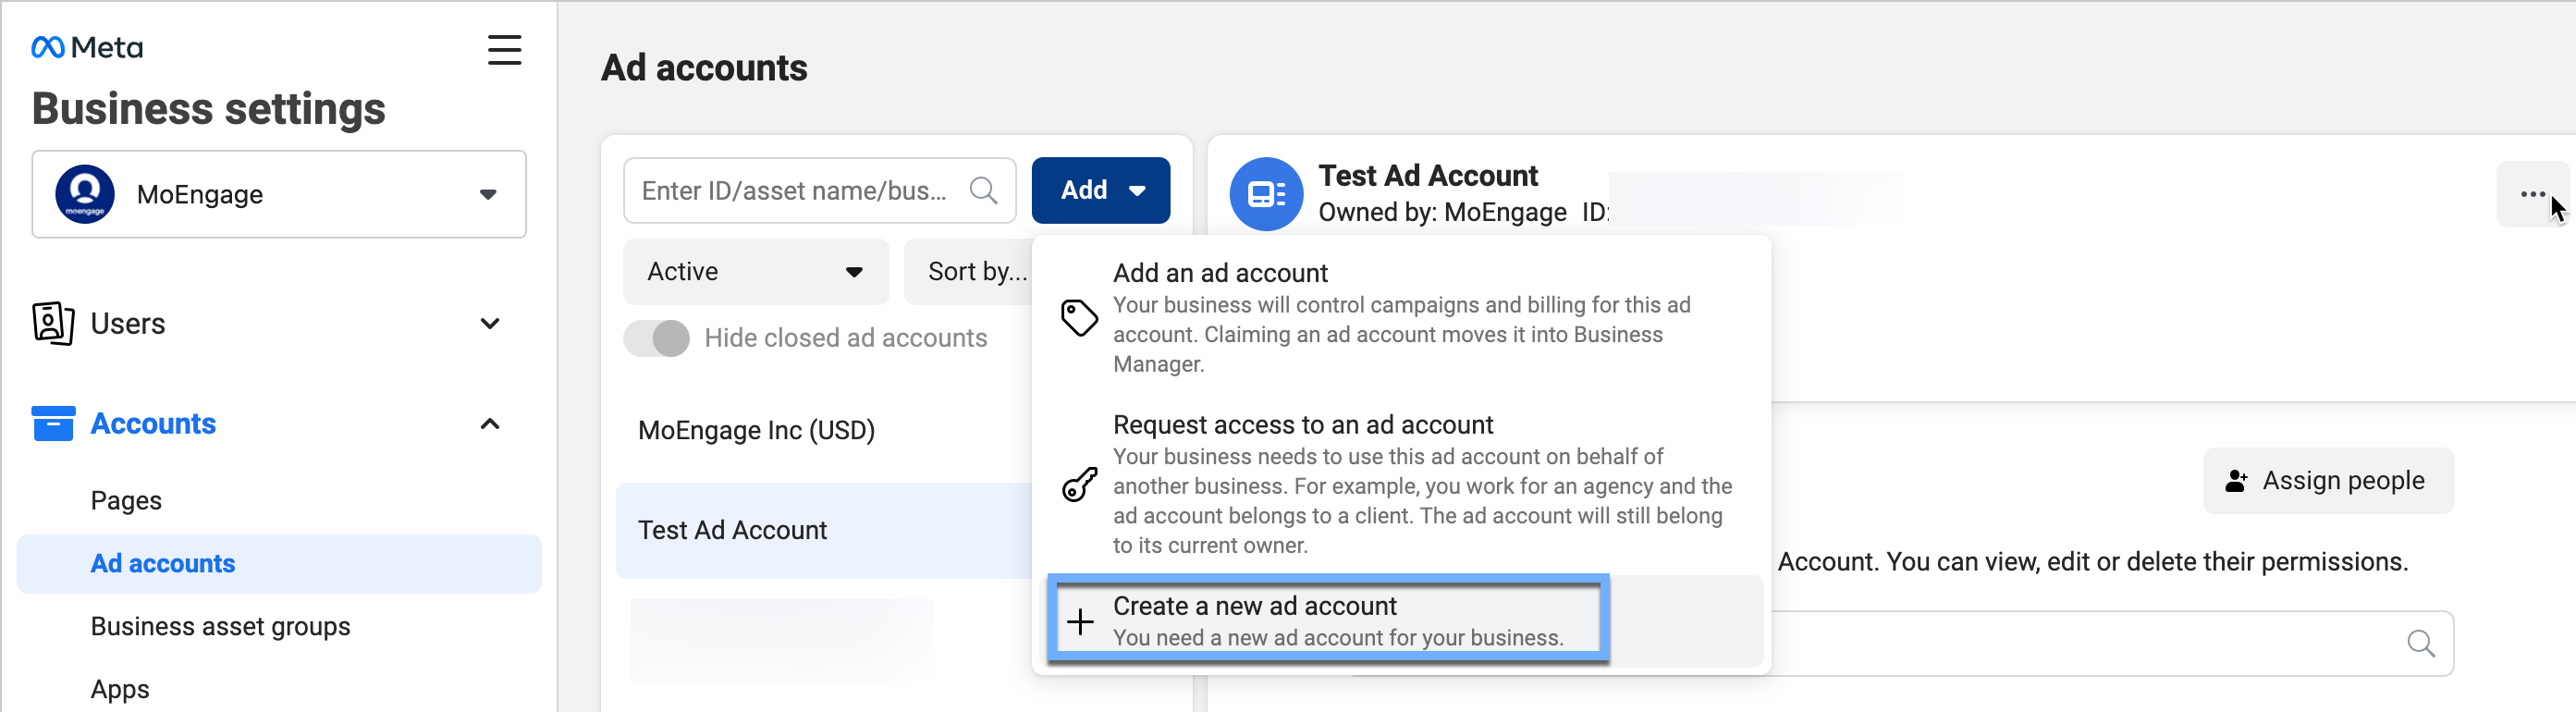 3. Enter a name for the account, the time zone, and the currency. Click **Next**.
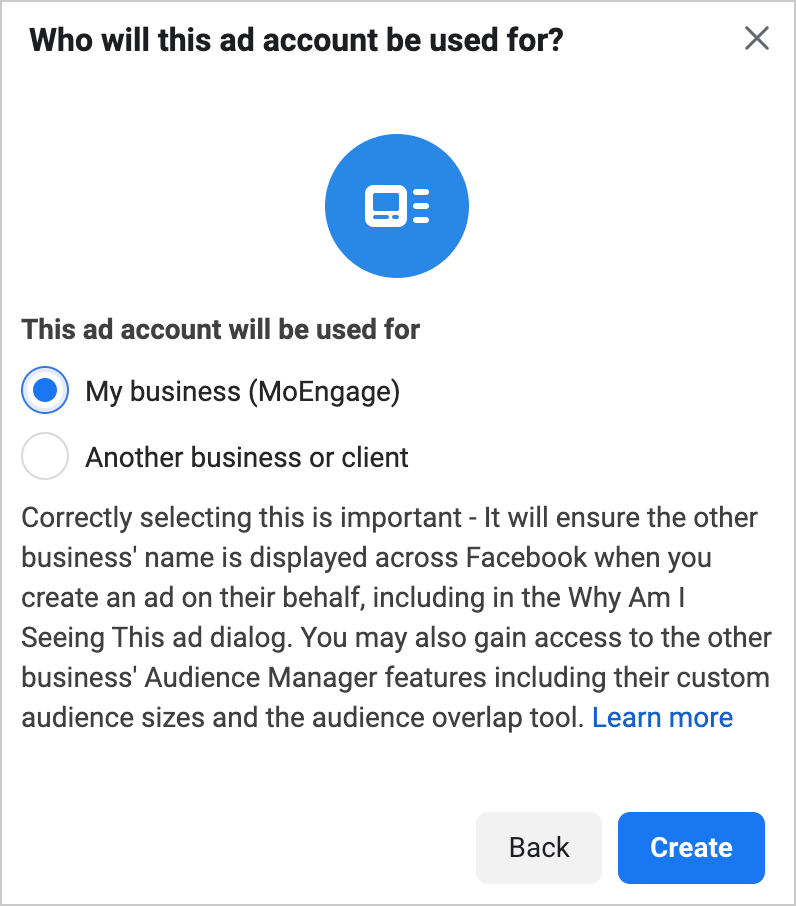
 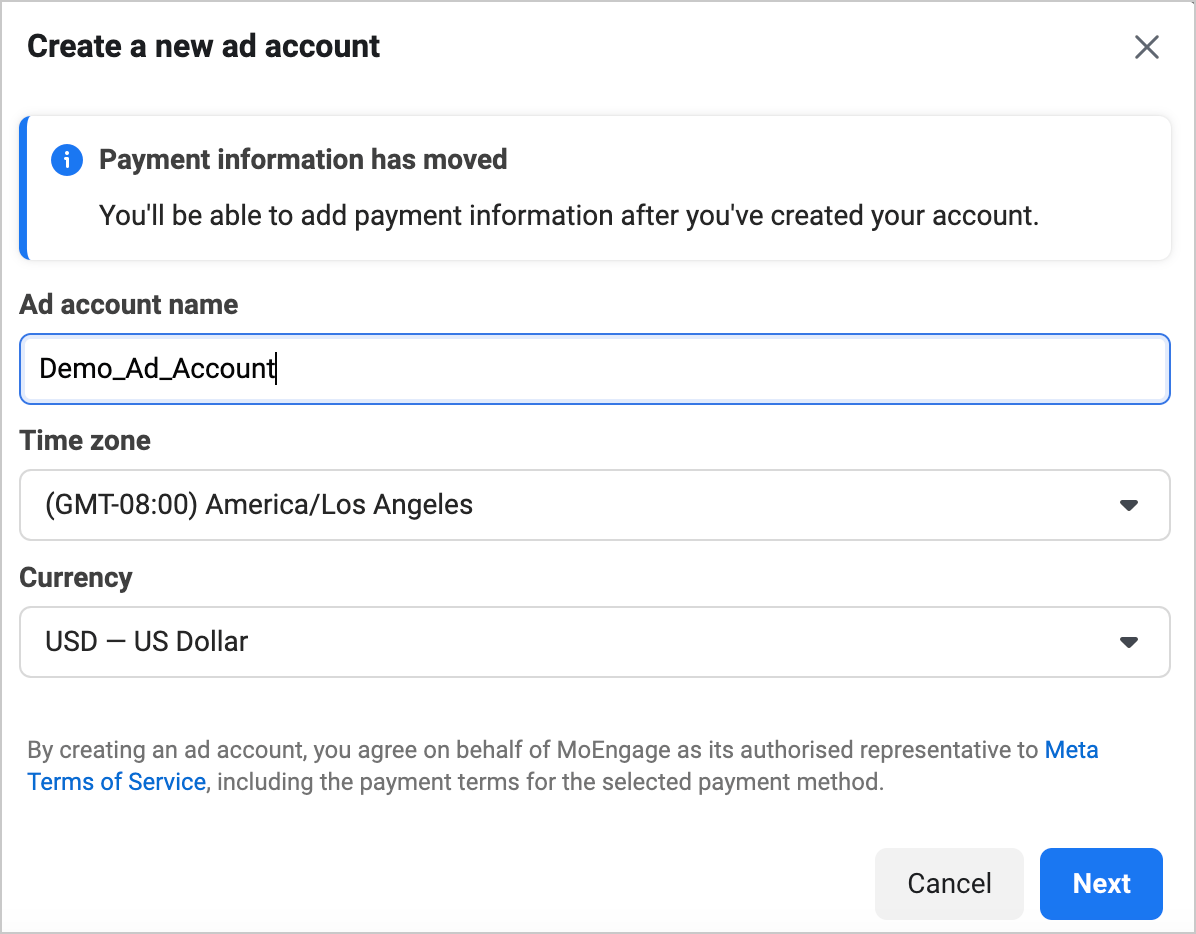 4. On the **Who Will This Ad Account Be Used For** screen, select **My Business**. Click **Create**.
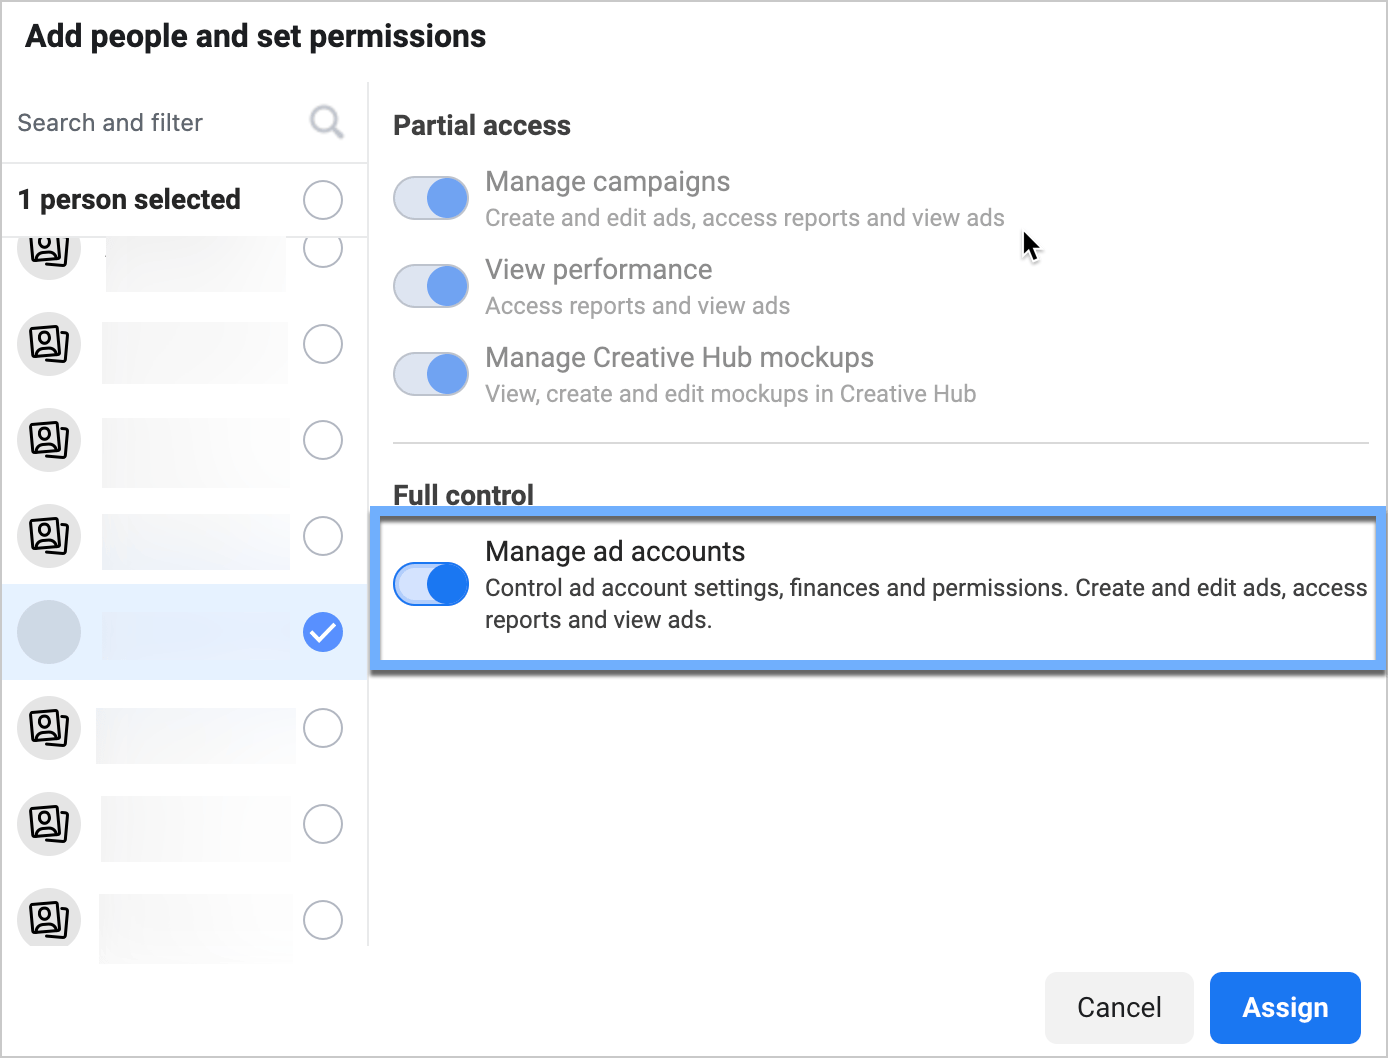
  5. On the next screen, you can add people and set permissions. Select your account, and then enable the **Manage Account** toggle. Click **Assign**.
  6. Add your payment information. Once you add all necessary details, your ad account appears in the **Ad Accounts** menu.
 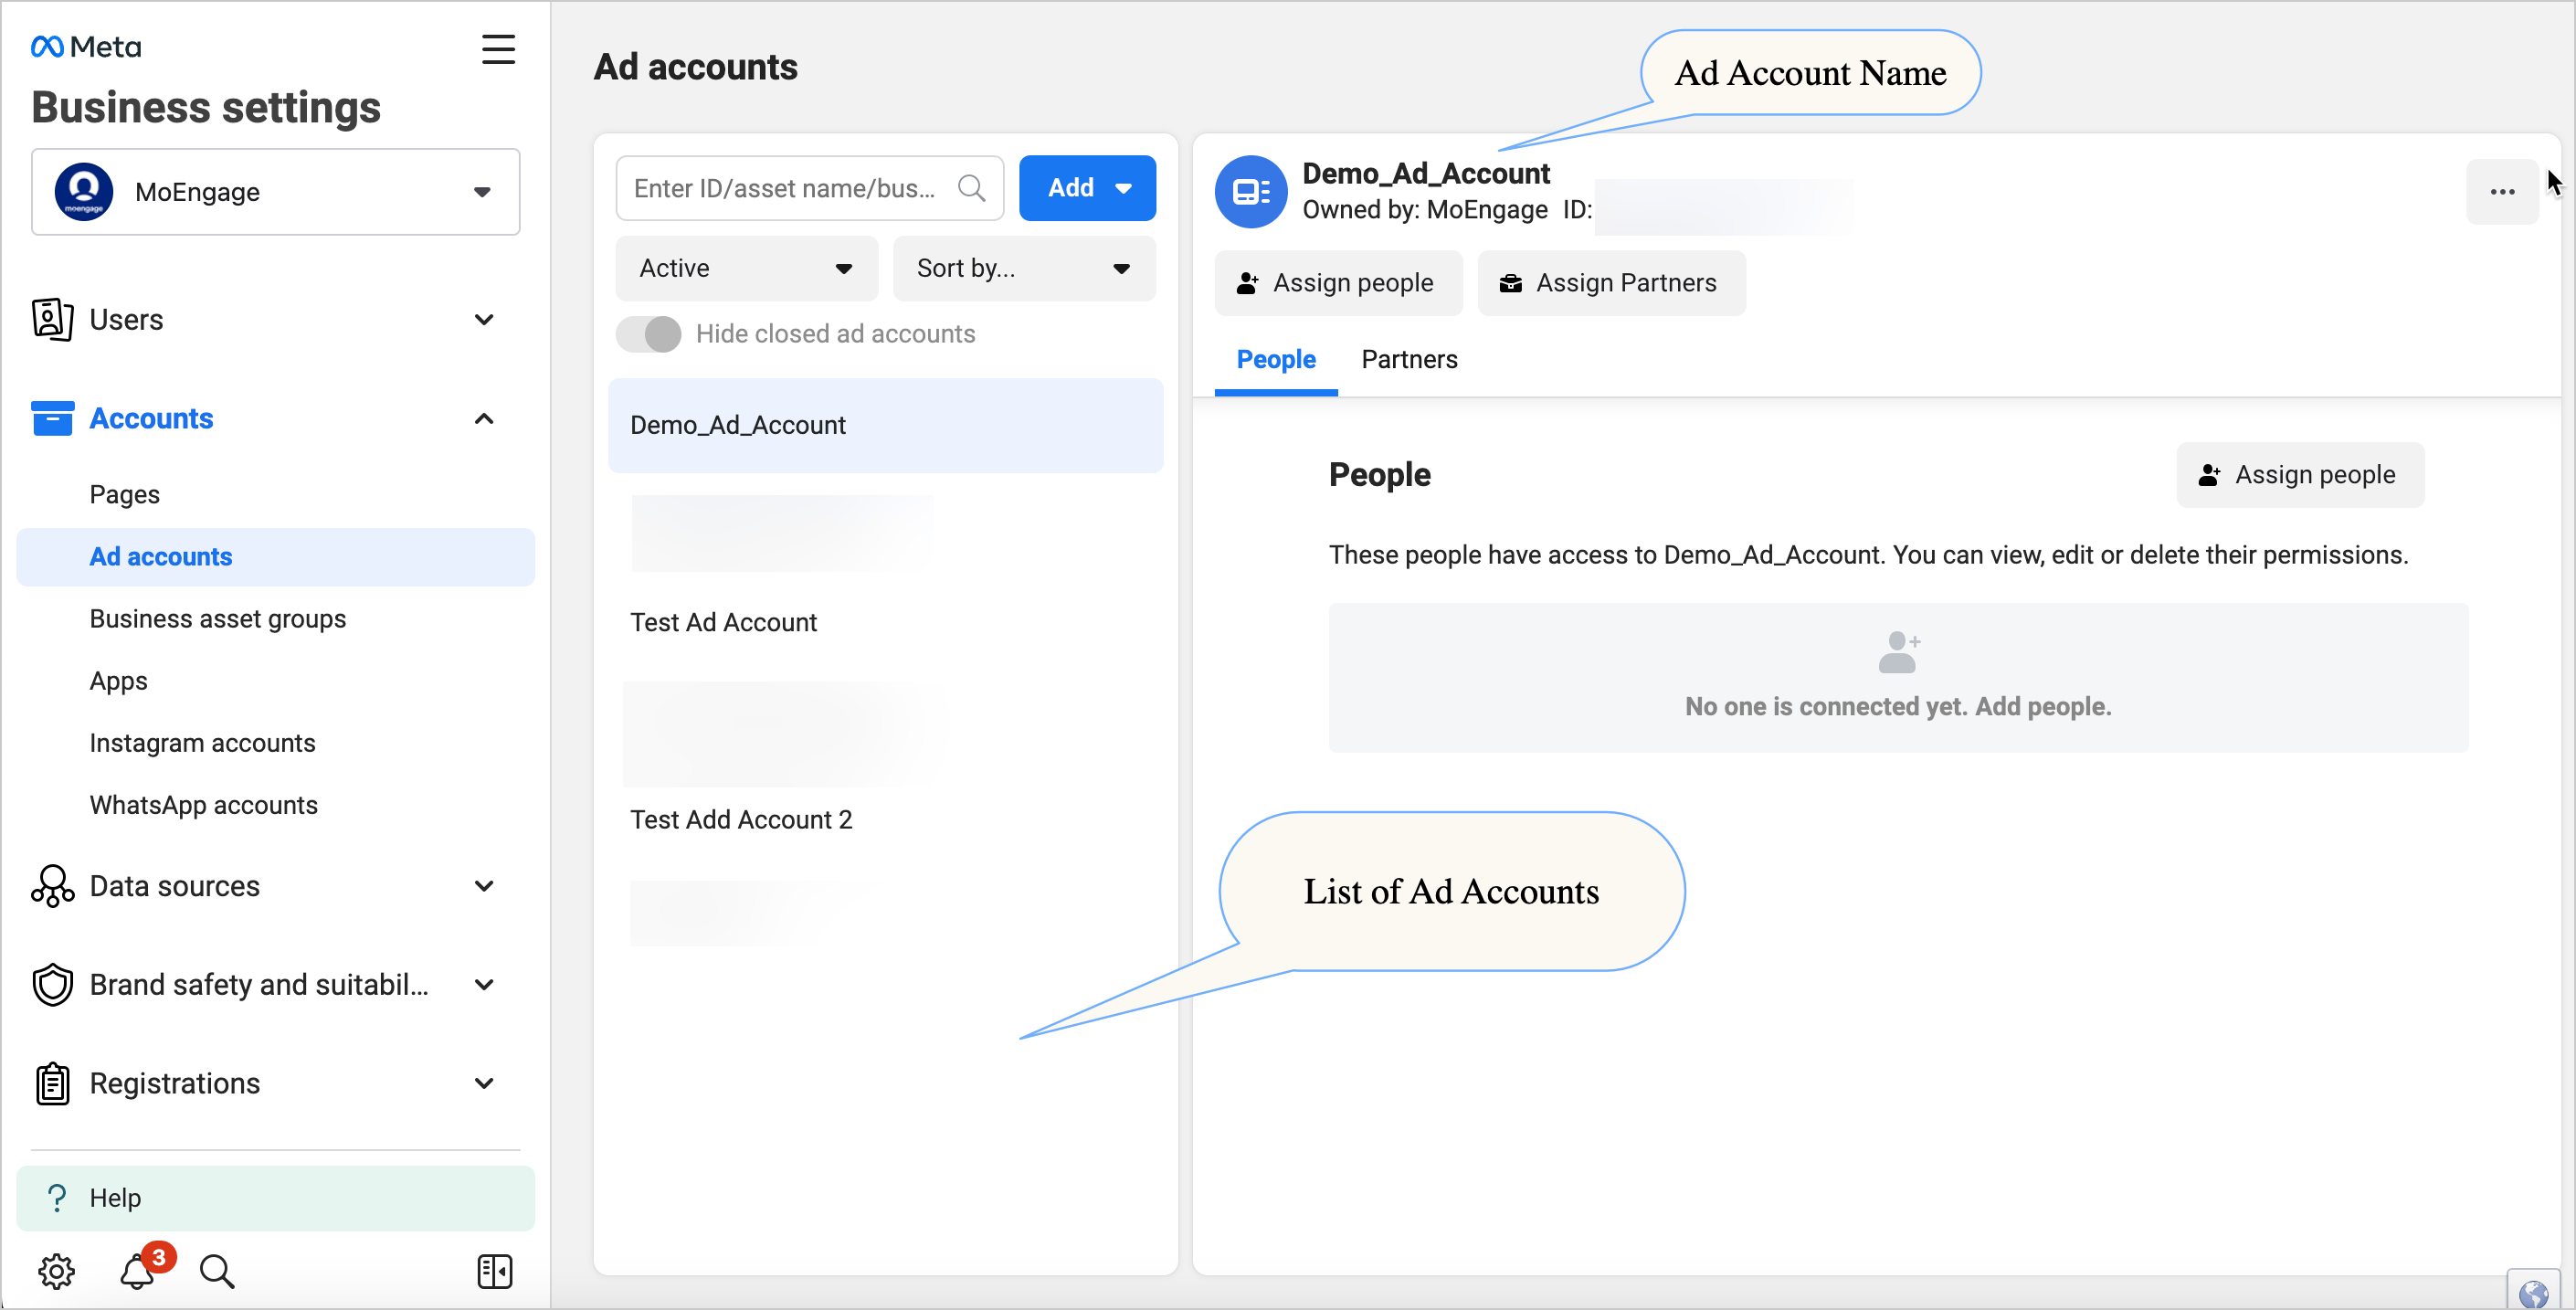 ### Use an Existing Meta Ad Account
1. Go to the [Meta Business Settings](https://business.facebook.com/settings) page. In the left menu, click **Accounts**, and then click **Ad Accounts**.
2. In the **Ad Accounts** list on the right side of the screen, click the ad account you want to use. The ad account details appear on the Ad Account dashboard.
3. Click your user name on the **People** tab. To confirm that you have admin access to the ad account, ensure the **Manage Ad Accounts** toggle is on.
### Use an Existing Meta Ad Account
1. Go to the [Meta Business Settings](https://business.facebook.com/settings) page. In the left menu, click **Accounts**, and then click **Ad Accounts**.
2. In the **Ad Accounts** list on the right side of the screen, click the ad account you want to use. The ad account details appear on the Ad Account dashboard.
3. Click your user name on the **People** tab. To confirm that you have admin access to the ad account, ensure the **Manage Ad Accounts** toggle is on. 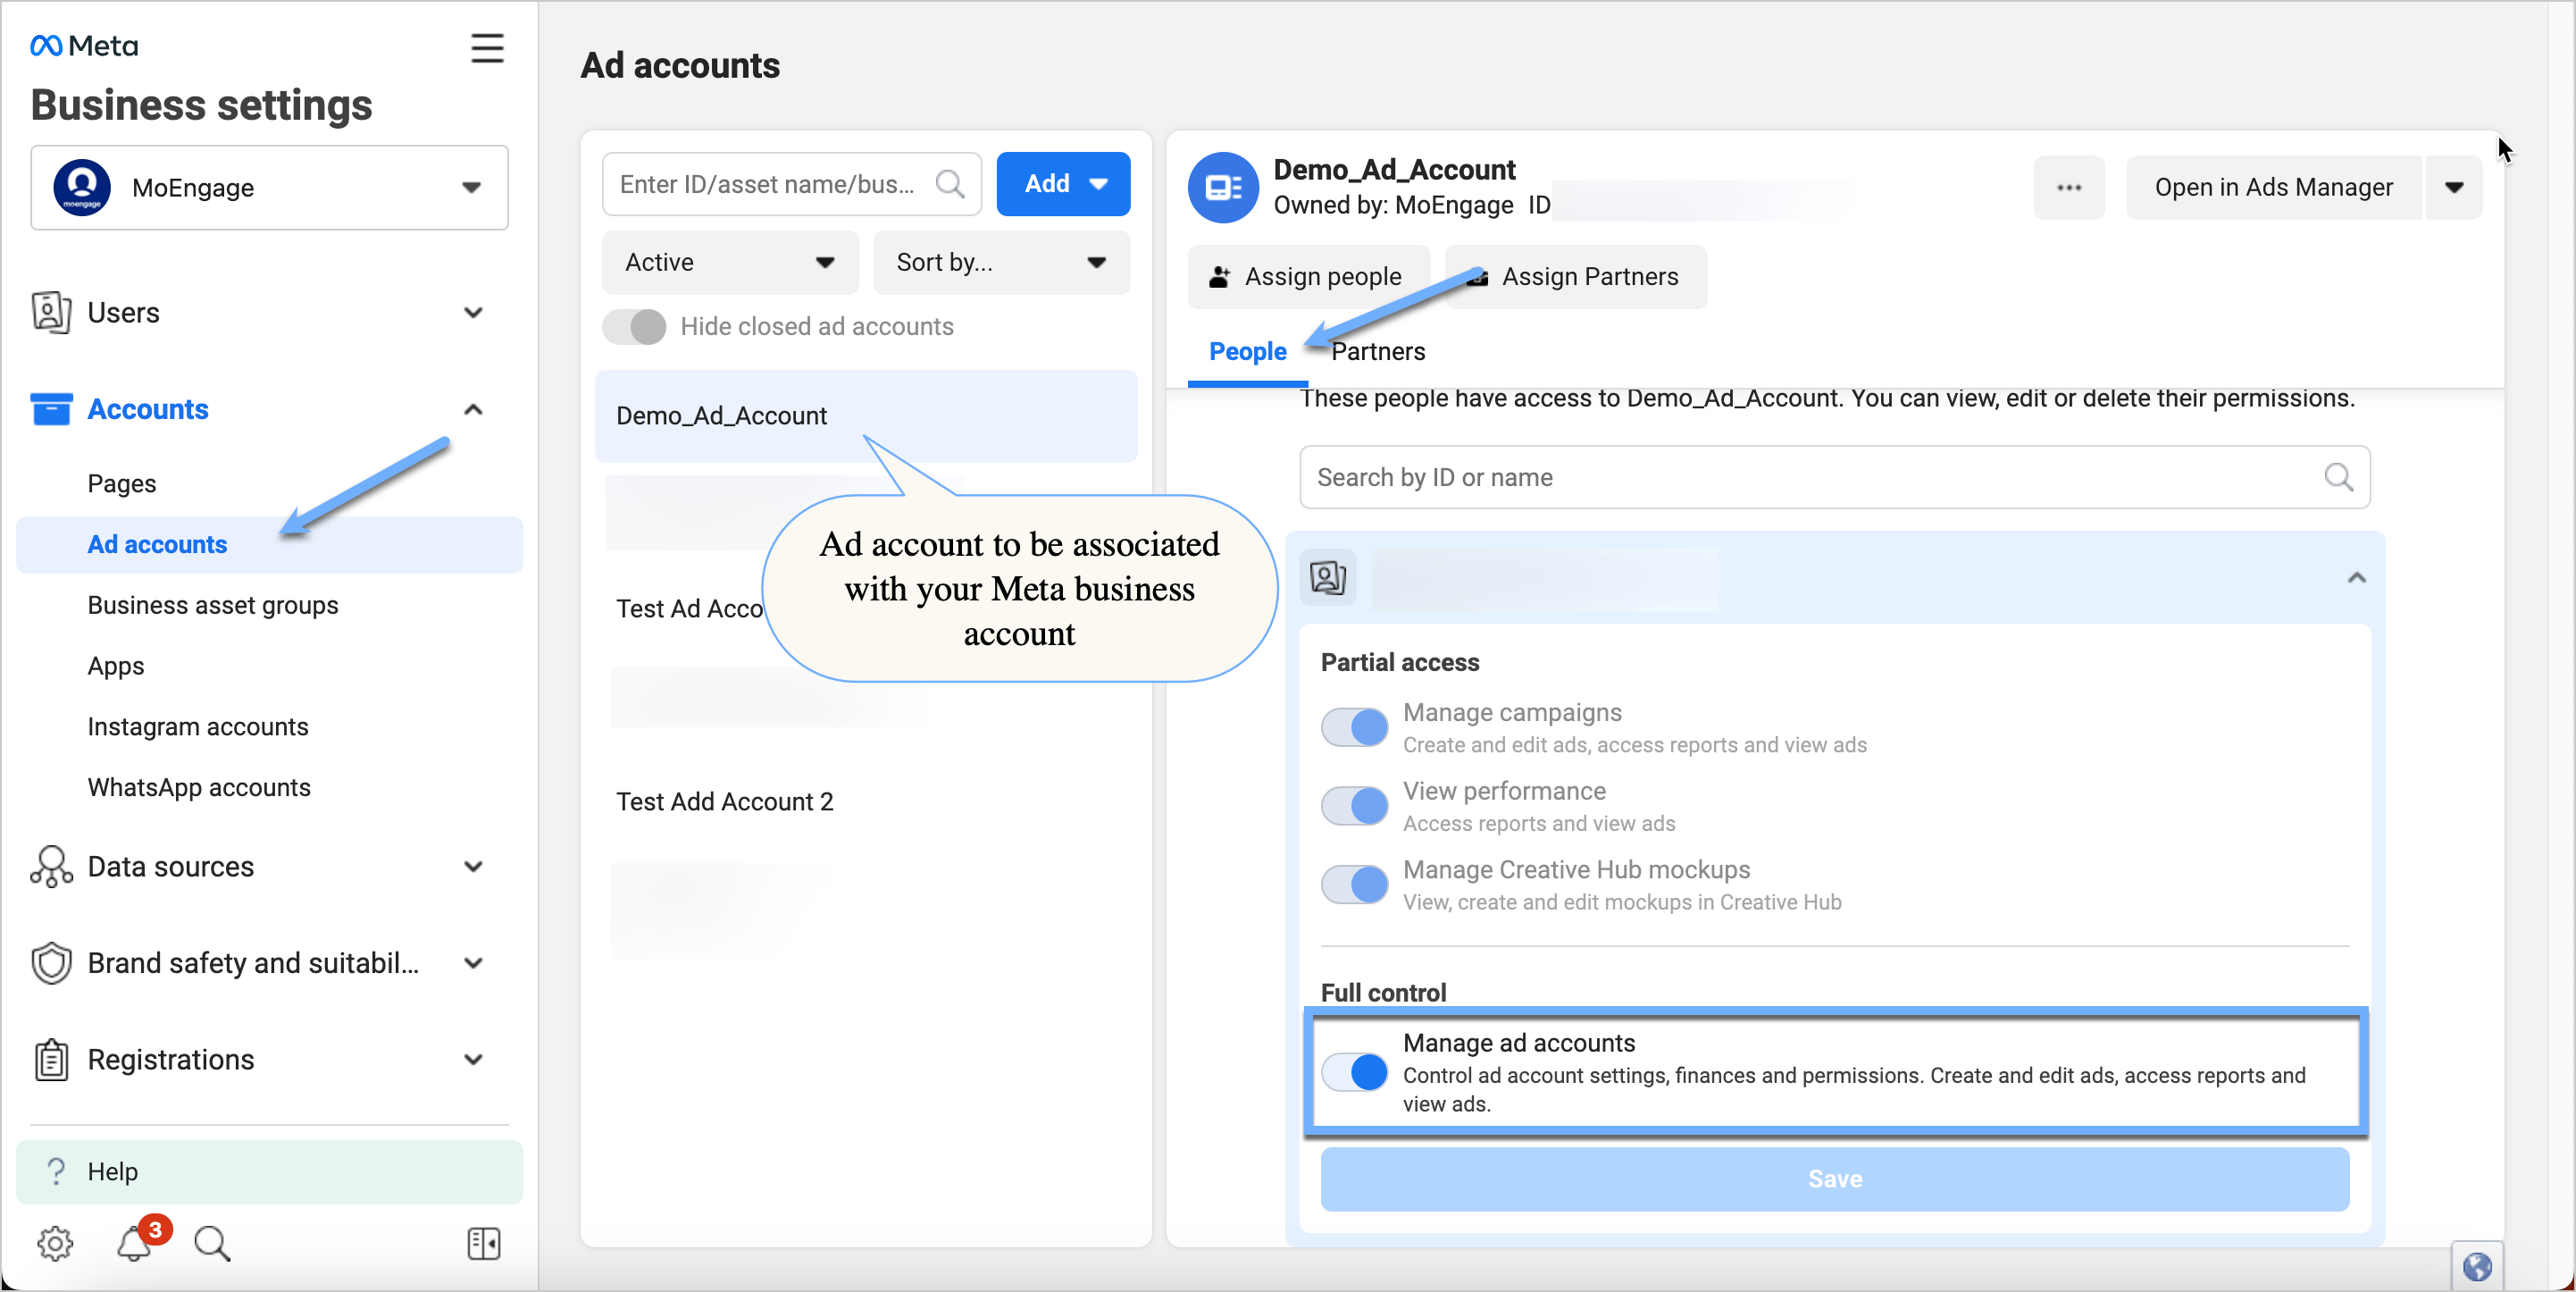 4. If the ad account name is not in the menu, click the **All Tools** menu, and then select **Ad Account Settings**.
 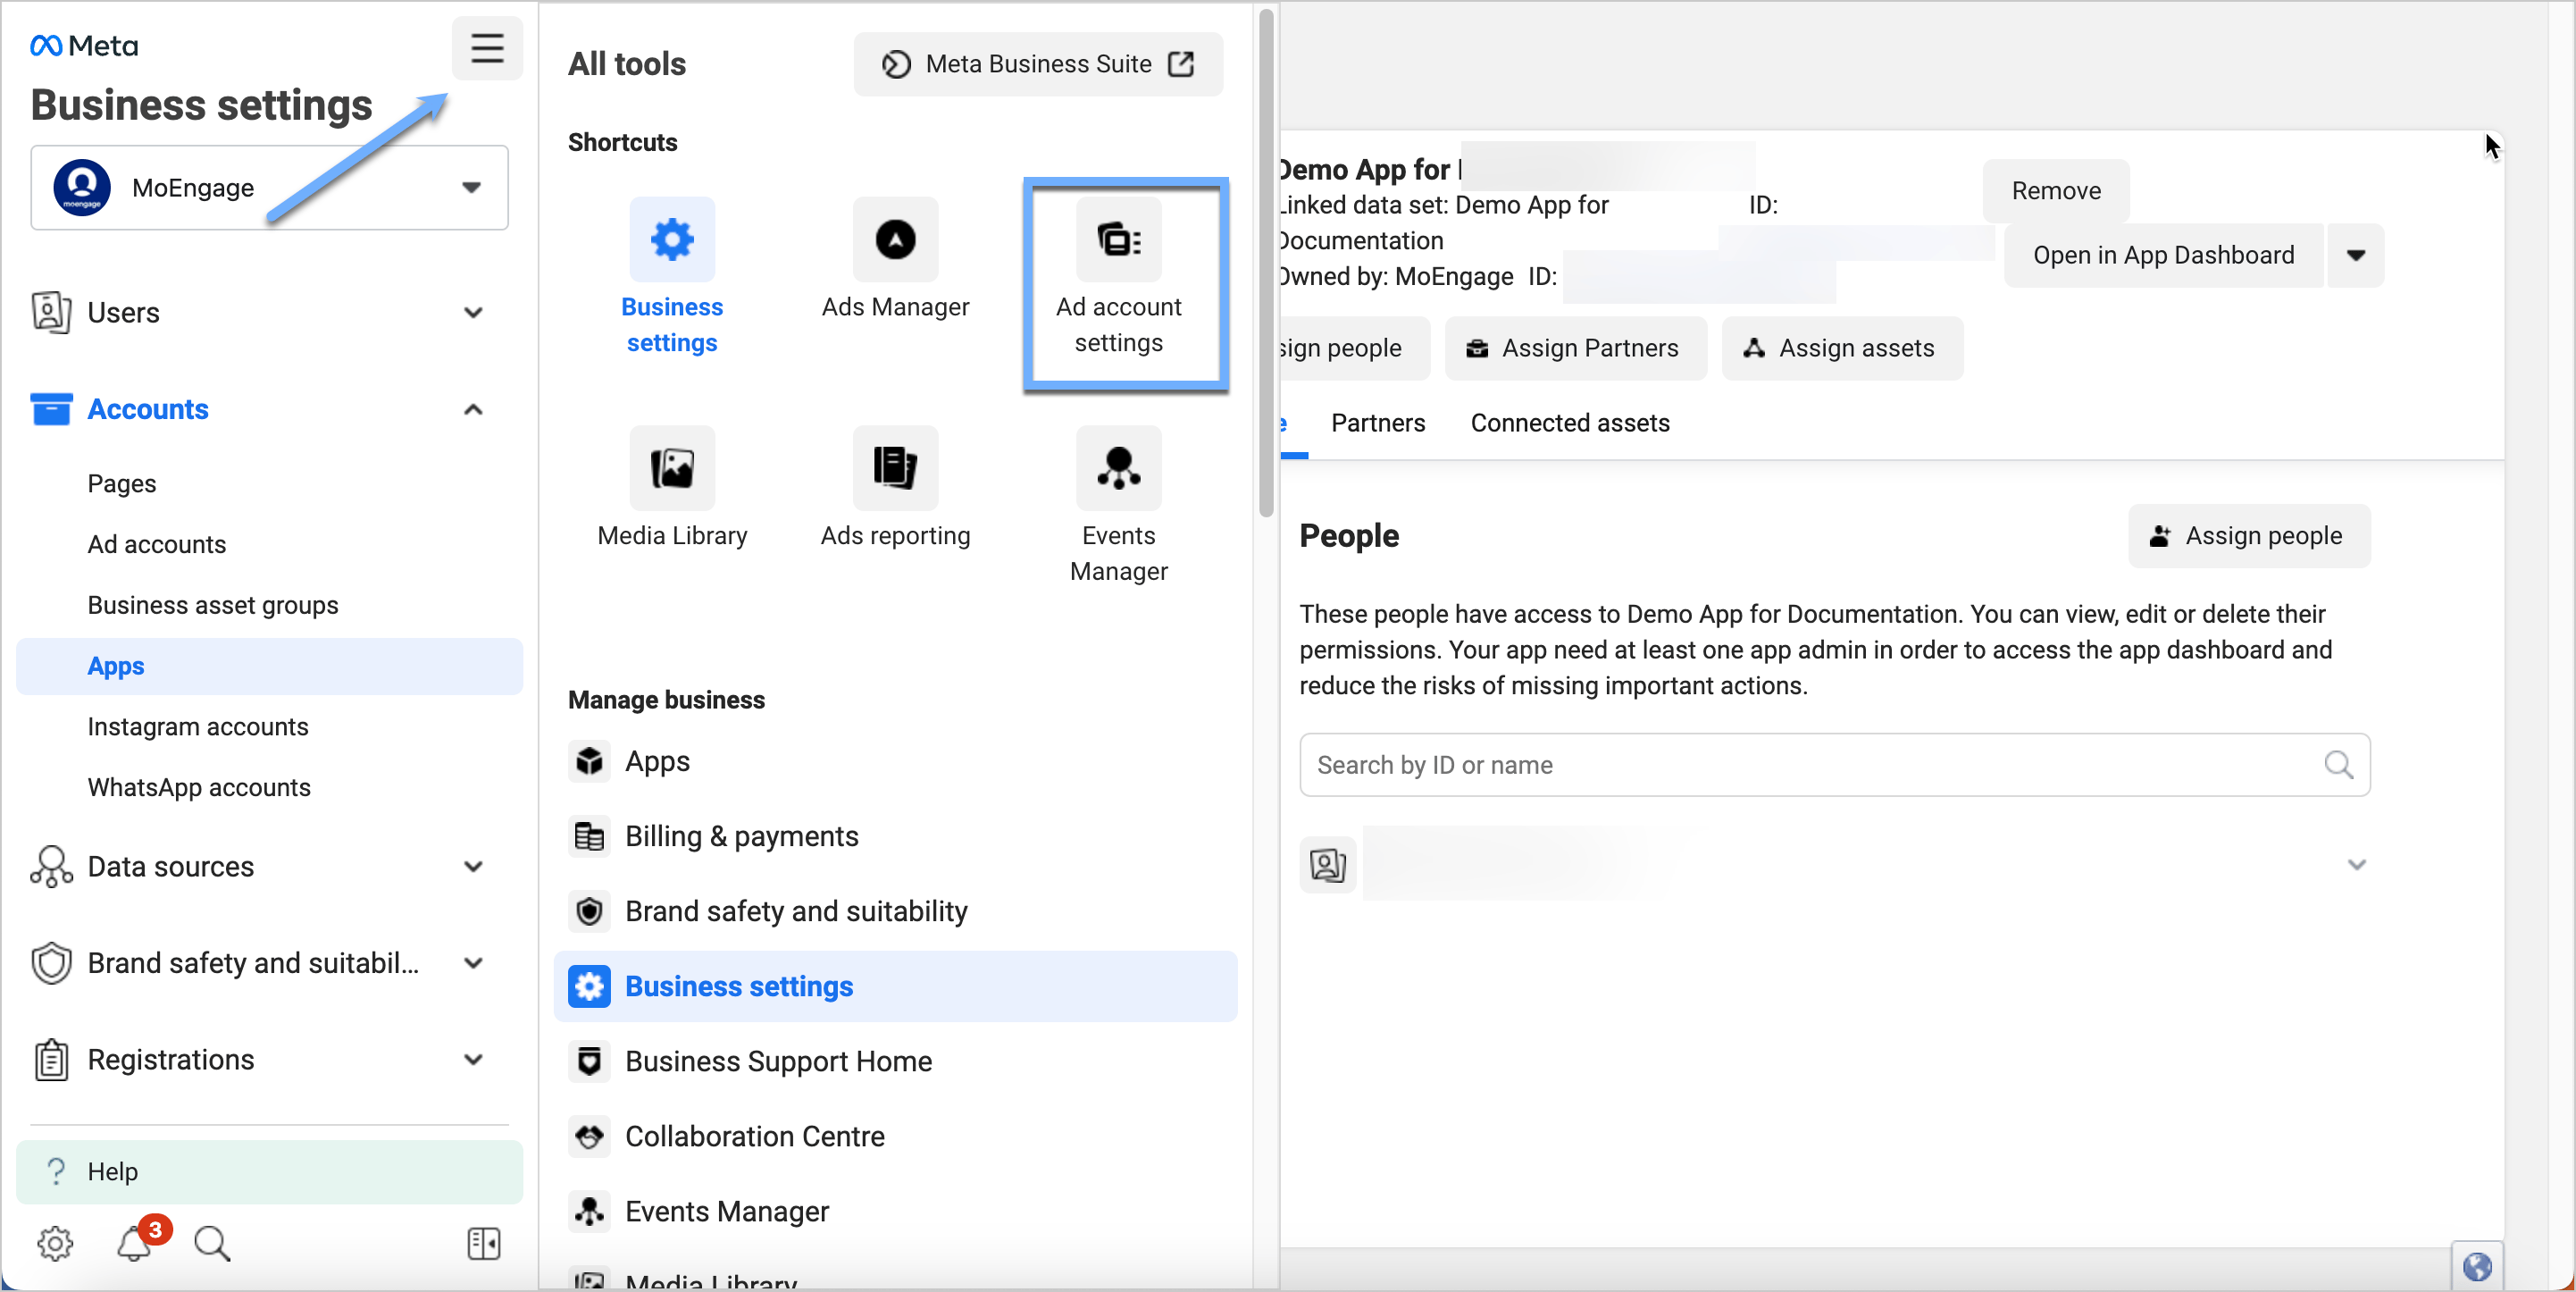 5. Copy the **Ad Account ID** from the **Ad Account Settings** page that opens.
 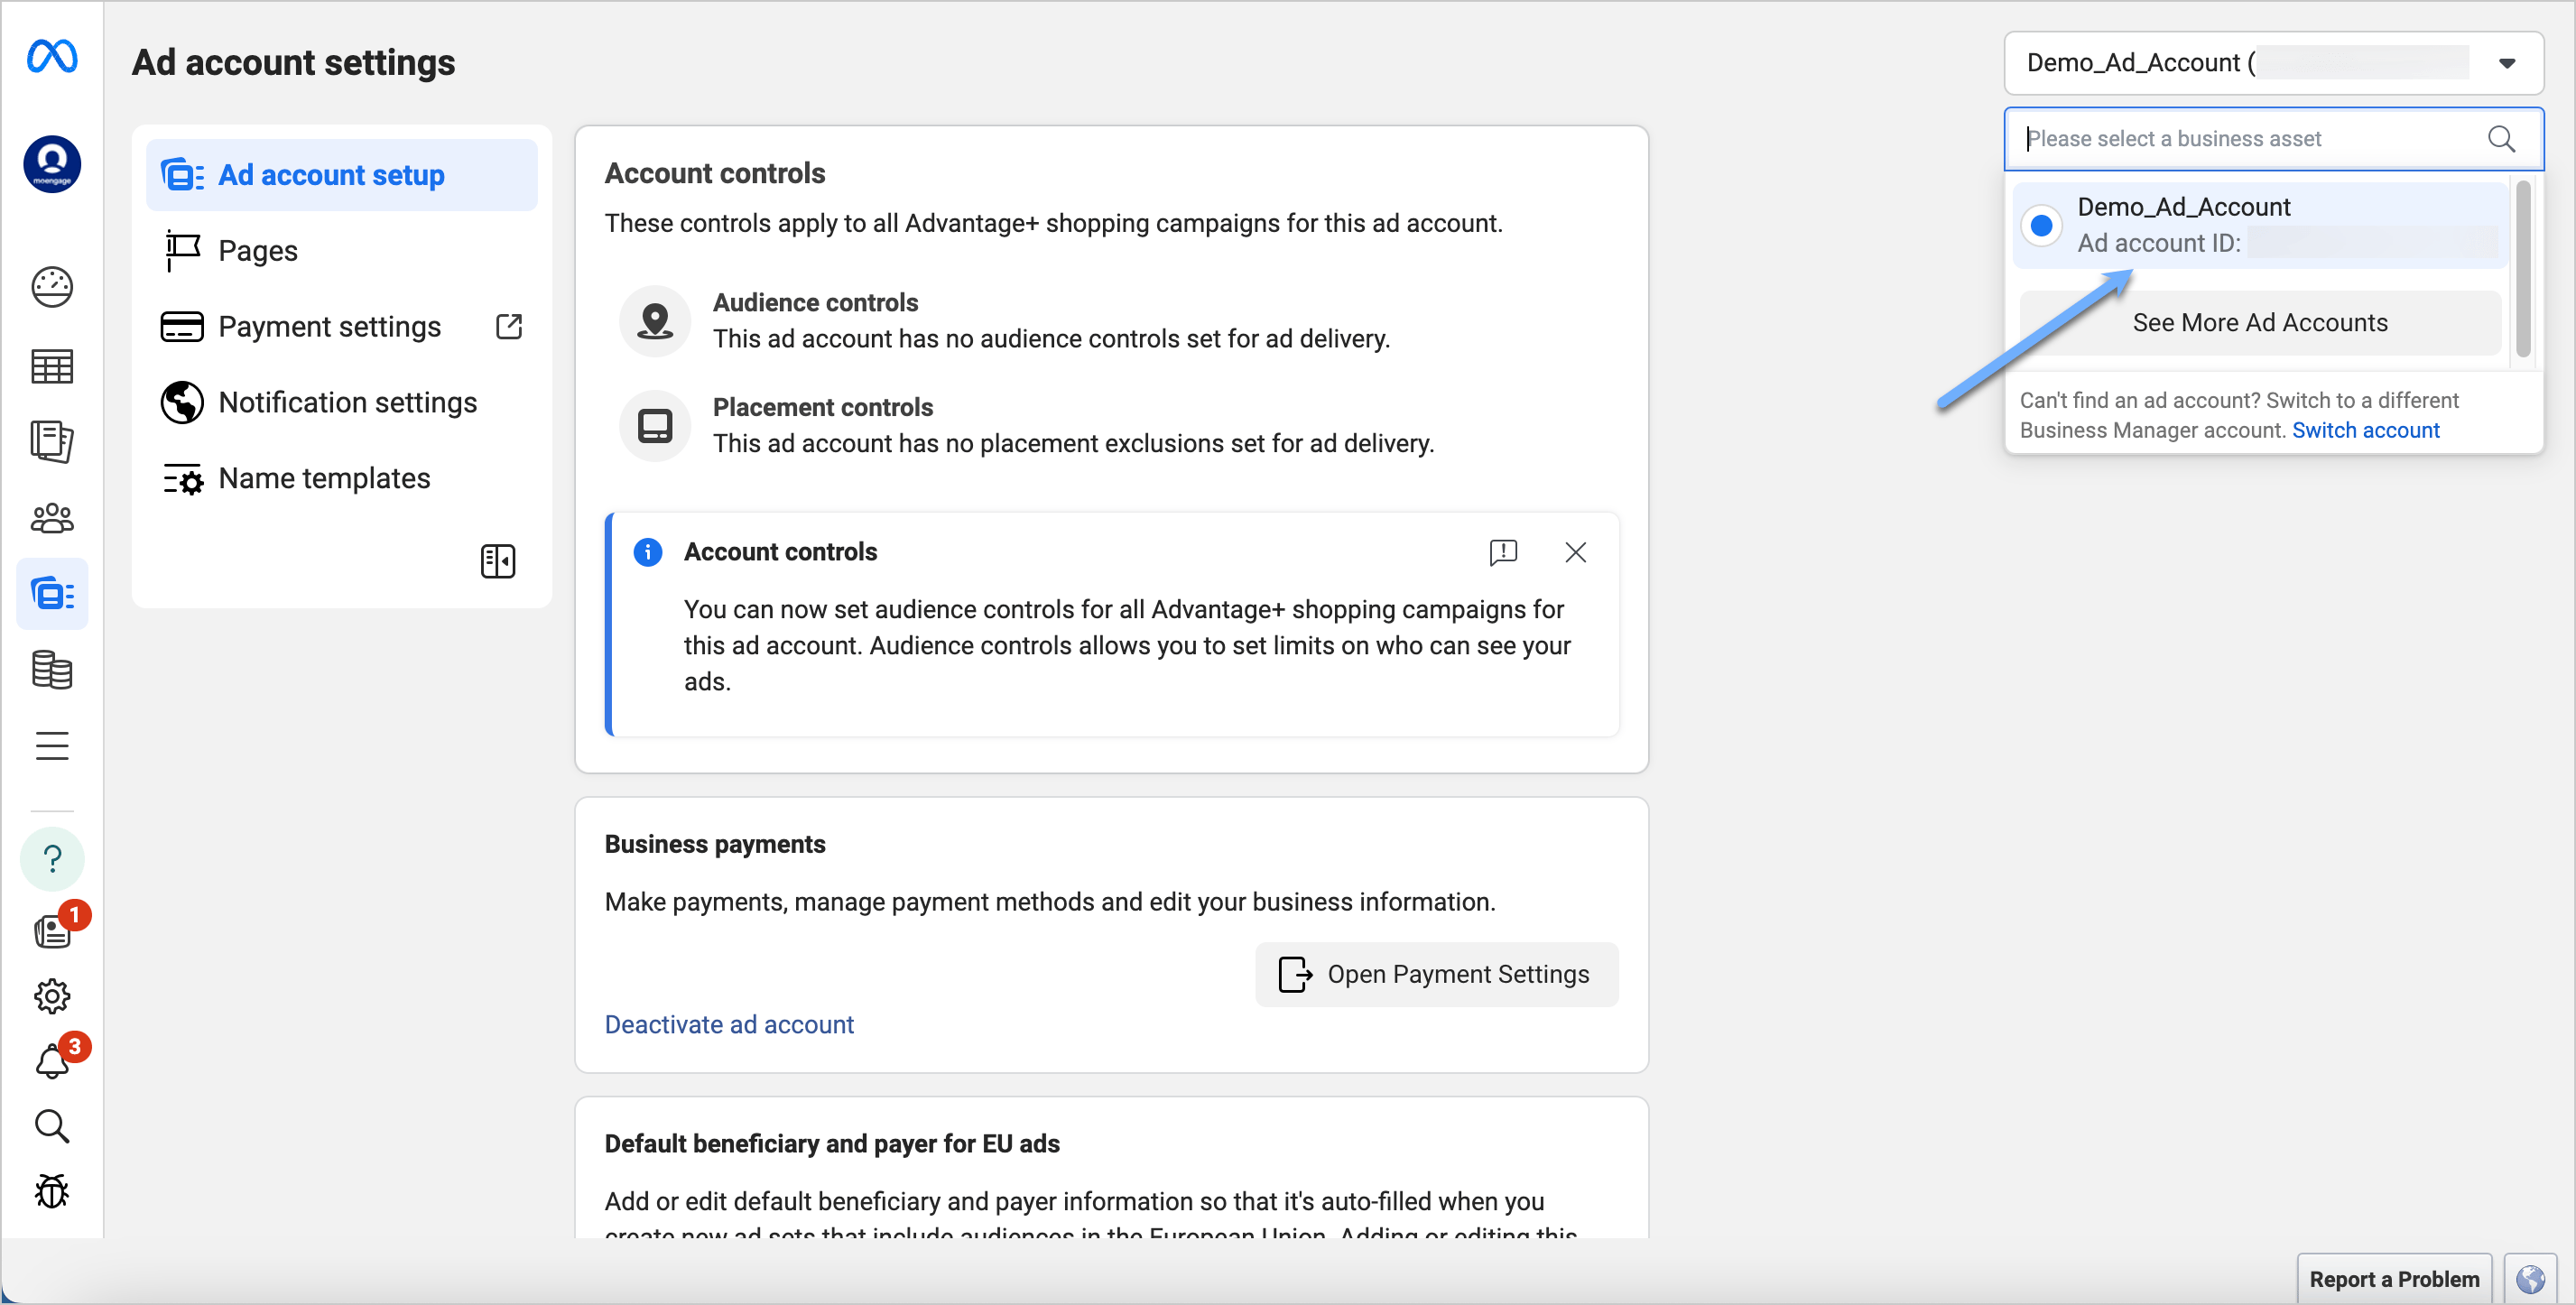 6. Go back to the [Meta Business Settings](https://business.facebook.com/settings) page. In the left menu, click **Accounts**, and then click **Ad Accounts**.
7. Click the **Add** drop-down menu, and then select **Add an Ad Account**. Paste the copied **Ad Account ID**, and then click **Add Ad Account**. Once the account is added, the ad account name appears in the menu. Make sure you have admin access to the ad account you want to associate with your custom audience, as explained in Step 3.
## Next Steps
Once you have successfully set up your Meta app and ad account, you can proceed with [integrating MoEngage with Facebook Custom Audiences](/user-guide/campaigns-and-channels/facebook-audience/getting-started-with-facebook-audience/facebook-audience-settings-on-moengage-dashboard). This integration allows you to create and manage custom audiences directly from MoEngage.
6. Go back to the [Meta Business Settings](https://business.facebook.com/settings) page. In the left menu, click **Accounts**, and then click **Ad Accounts**.
7. Click the **Add** drop-down menu, and then select **Add an Ad Account**. Paste the copied **Ad Account ID**, and then click **Add Ad Account**. Once the account is added, the ad account name appears in the menu. Make sure you have admin access to the ad account you want to associate with your custom audience, as explained in Step 3.
## Next Steps
Once you have successfully set up your Meta app and ad account, you can proceed with [integrating MoEngage with Facebook Custom Audiences](/user-guide/campaigns-and-channels/facebook-audience/getting-started-with-facebook-audience/facebook-audience-settings-on-moengage-dashboard). This integration allows you to create and manage custom audiences directly from MoEngage.