> ## Documentation Index
> Fetch the complete documentation index at: https://moengage-unity-sdk-initialization-split.mintlify.site/llms.txt
> Use this file to discover all available pages before exploring further.
# Create a Google Ads Audience Campaign
> Follow these steps to create a Google Ads Audience campaign in MoEngage, from defining your target users to configuring audience sync details.
To create a Google Ads Audience campaign, perform the following steps:
1. On the sidebar menu in MoEngage, hover over the **Engage** menu item  . The **Engage** menu appears.
2. Click **+ New Campaign**.
. The **Engage** menu appears.
2. Click **+ New Campaign**.  You can also click **All Campaigns** on the **Engage** menu and then click **+ Create campaign** on the All campaigns page.
3. On the **New Campaign** dialog box, click **Google Ads**.
You can also click **All Campaigns** on the **Engage** menu and then click **+ Create campaign** on the All campaigns page.
3. On the **New Campaign** dialog box, click **Google Ads**.  The Google Ads Audience creation page appears.
 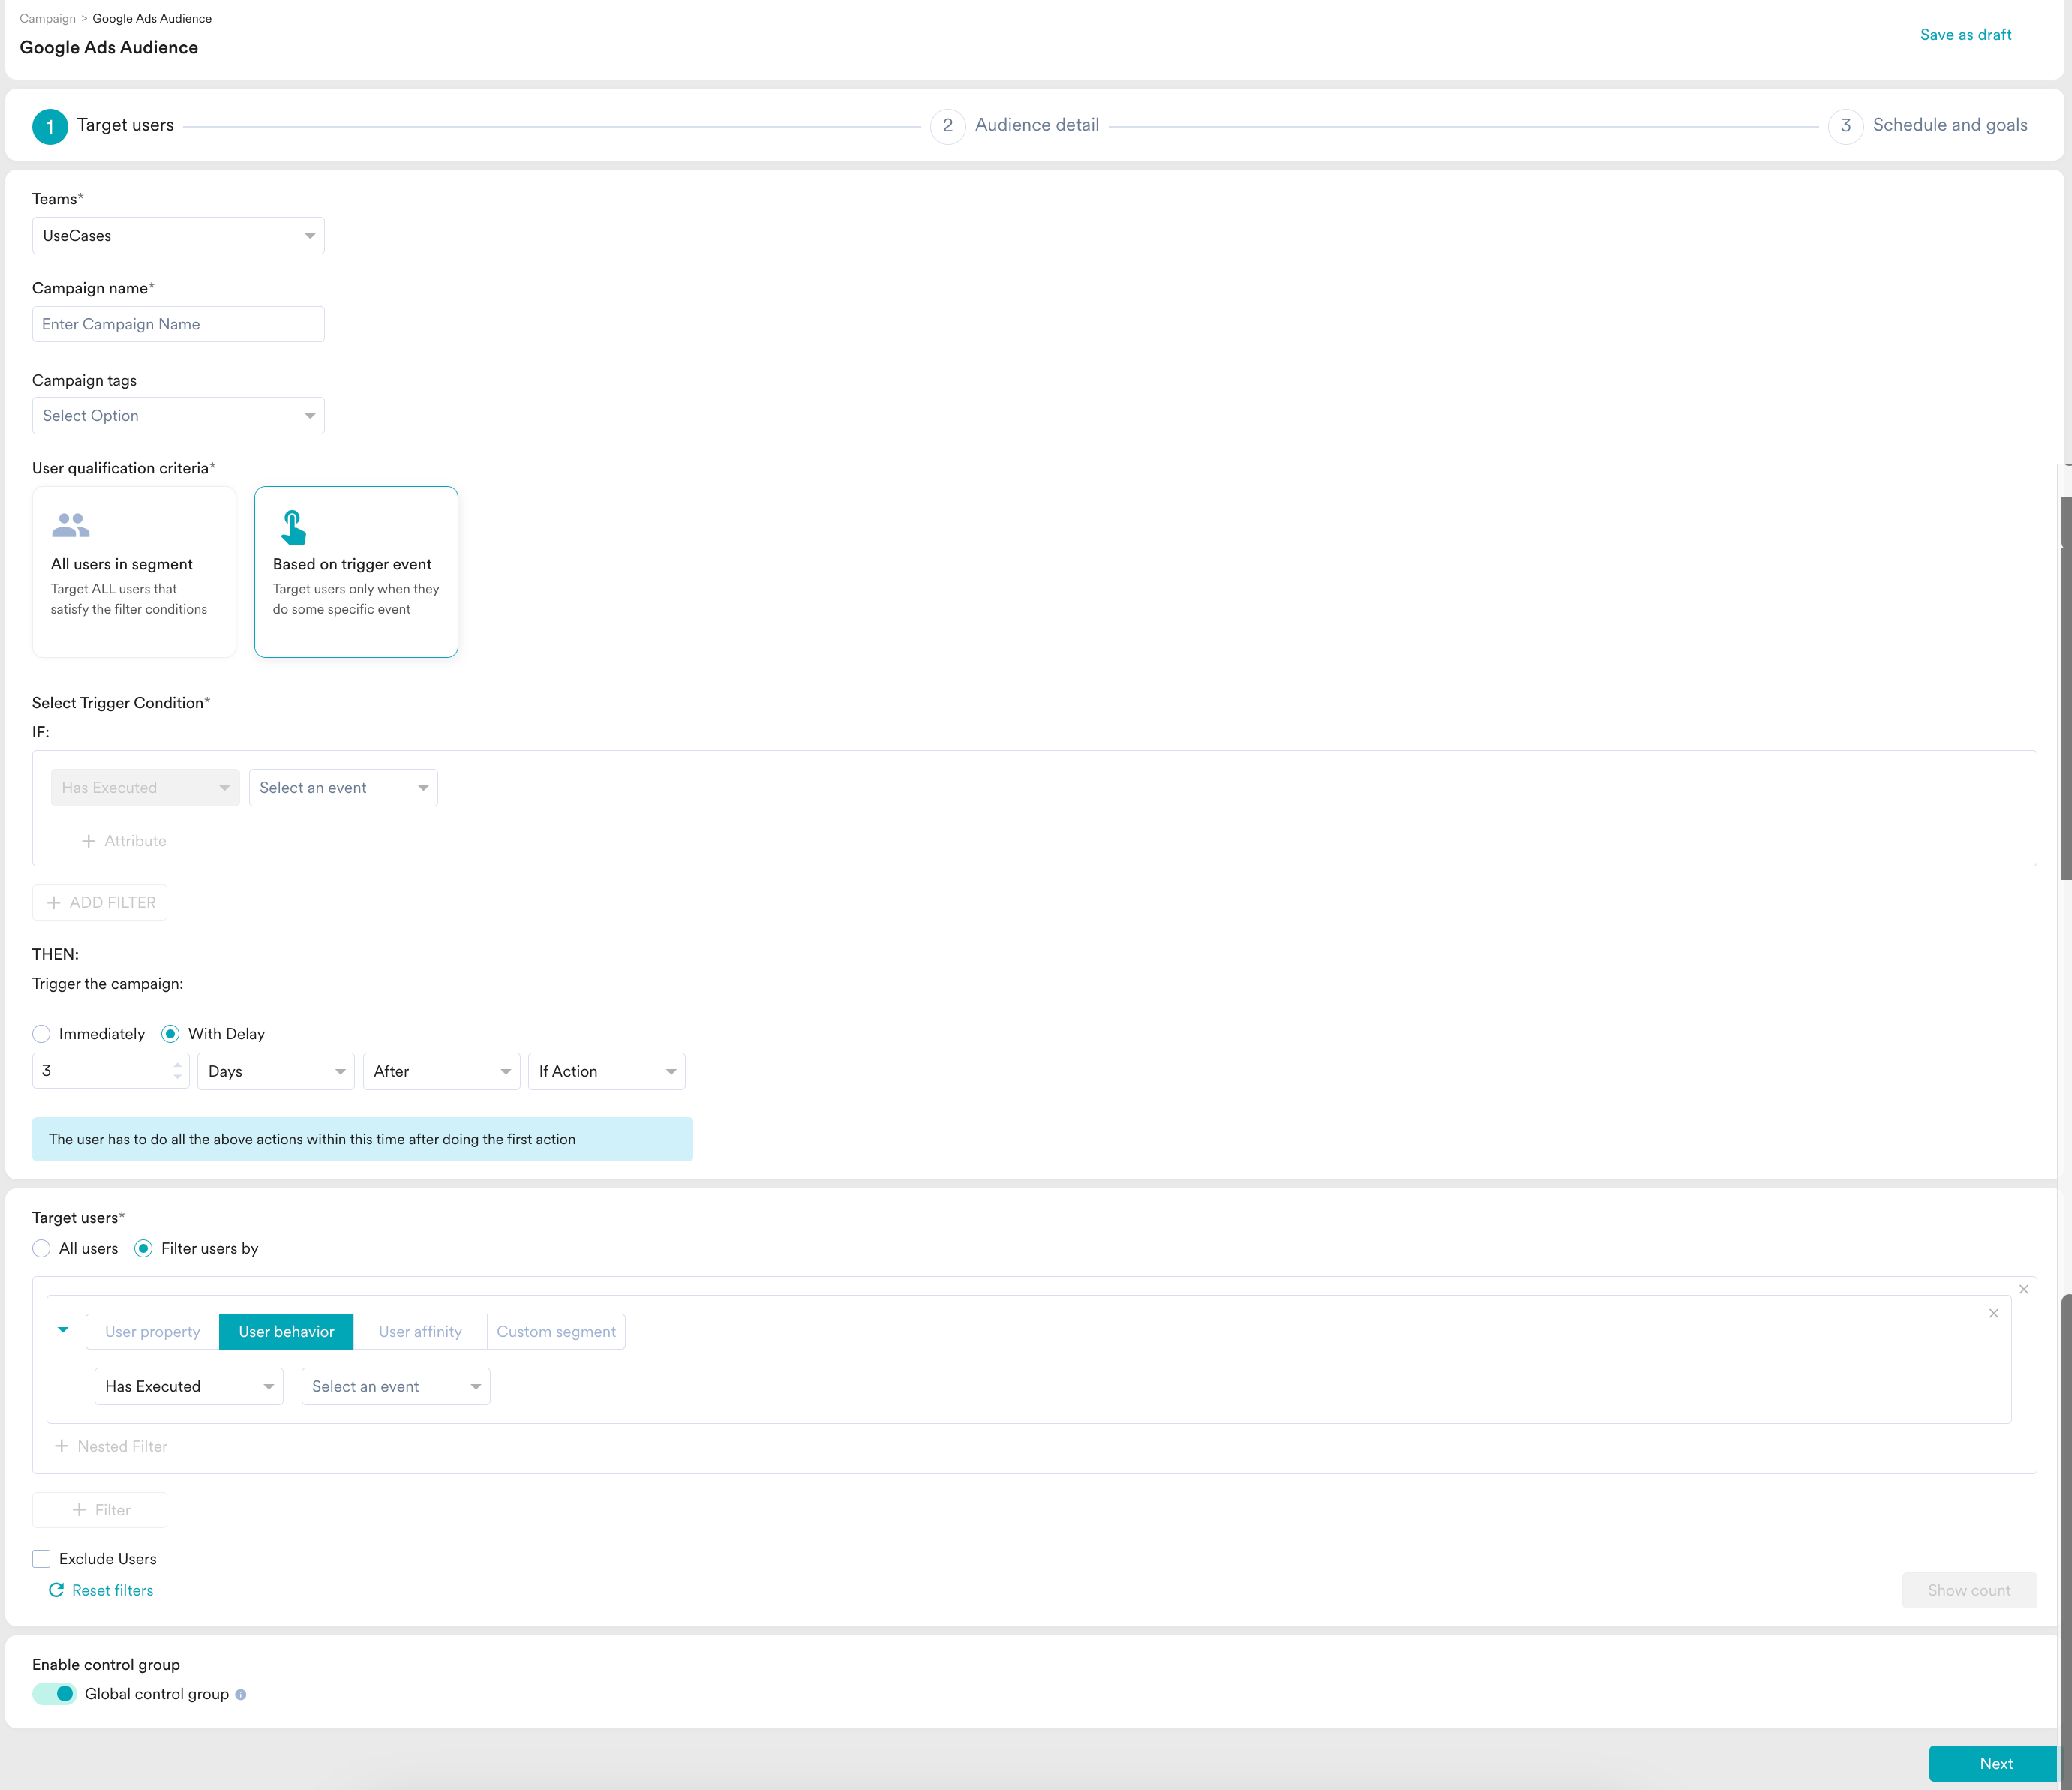 # Steps to Create a Google Ads Audience Campaign
The following are the steps to create a Google Ads Audience campaign:
1. [Target users](#step-1-target-users): Define the target audience for the campaign.
2. [Audience detail](#step-2-audience-detail): Define the audience to be added or deleted from the Google Ads Account.
3. [Schedule and goals](#step-3-schedule-and-goals): Define the campaign's delivery schedule and goals.
## Step 1: Target Users
This section contains the following:
### Campaign Details
The campaign details section contains the following fields:
* **Teams**: If your organization has teams enabled, select a team in the drop-down list. For more information, refer to [Teams in MoEngage](https://moengage.com/docs/user-guide/settings/account/team-management/teams-in-moengage). This field is used to select the Team associated with this campaign from the list of Teams.
* **Campaign name**: Enter the name of the campaign to manage and identify the campaign. The campaign name must have at least five characters, and the limit is 256.
* **Campaign tags**: Select campaign tags from the drop-down list, to identify your campaign. You can select a maximum of five tags. These tags can be used to add context to your campaigns and describe the campaign's purpose. Once added, tags allow you to filter campaigns on the All Campaigns page. For more information, refer to [Campaign Tags](/user-guide/campaigns-and-channels/getting-started/introduction/campaign-tags).
# Steps to Create a Google Ads Audience Campaign
The following are the steps to create a Google Ads Audience campaign:
1. [Target users](#step-1-target-users): Define the target audience for the campaign.
2. [Audience detail](#step-2-audience-detail): Define the audience to be added or deleted from the Google Ads Account.
3. [Schedule and goals](#step-3-schedule-and-goals): Define the campaign's delivery schedule and goals.
## Step 1: Target Users
This section contains the following:
### Campaign Details
The campaign details section contains the following fields:
* **Teams**: If your organization has teams enabled, select a team in the drop-down list. For more information, refer to [Teams in MoEngage](https://moengage.com/docs/user-guide/settings/account/team-management/teams-in-moengage). This field is used to select the Team associated with this campaign from the list of Teams.
* **Campaign name**: Enter the name of the campaign to manage and identify the campaign. The campaign name must have at least five characters, and the limit is 256.
* **Campaign tags**: Select campaign tags from the drop-down list, to identify your campaign. You can select a maximum of five tags. These tags can be used to add context to your campaigns and describe the campaign's purpose. Once added, tags allow you to filter campaigns on the All Campaigns page. For more information, refer to [Campaign Tags](/user-guide/campaigns-and-channels/getting-started/introduction/campaign-tags). 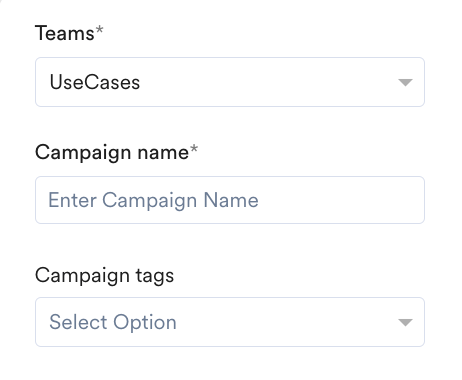 ### User Qualification Criteria
This section helps define the users you want to add to or remove from the custom Facebook Audience. You can define two types of user segments here:
This option selects all users who meet the filter criteria. Select the **All Users in Segment** option to create a custom segment of all users who satisfy the filter criteria defined in the **Target Users** section.
Event-triggered campaigns enable you to synchronize audiences based on different user action events. For example, you can remind users about an item they added to their cart but have not purchased. For more information about creating such campaigns, see [Create an Event-Triggered Campaign](/user-guide/campaigns-and-channels/getting-started/triggers/event/create-an-event-triggered-campaign).
Select the **Based on Trigger Event** option to create a custom segment of all users who meet the filter criteria defined in the **Target Users** section.
After you configure the trigger conditions, create your segment filter in the **All Users in Segment** section as described previously.
### Target Users
This section provides segmentation filters to select your campaign's target users. The following options are available:
This option sends the campaign to all app users. You cannot add multiple filters when you use this option.
### User Qualification Criteria
This section helps define the users you want to add to or remove from the custom Facebook Audience. You can define two types of user segments here:
This option selects all users who meet the filter criteria. Select the **All Users in Segment** option to create a custom segment of all users who satisfy the filter criteria defined in the **Target Users** section.
Event-triggered campaigns enable you to synchronize audiences based on different user action events. For example, you can remind users about an item they added to their cart but have not purchased. For more information about creating such campaigns, see [Create an Event-Triggered Campaign](/user-guide/campaigns-and-channels/getting-started/triggers/event/create-an-event-triggered-campaign).
Select the **Based on Trigger Event** option to create a custom segment of all users who meet the filter criteria defined in the **Target Users** section.
After you configure the trigger conditions, create your segment filter in the **All Users in Segment** section as described previously.
### Target Users
This section provides segmentation filters to select your campaign's target users. The following options are available:
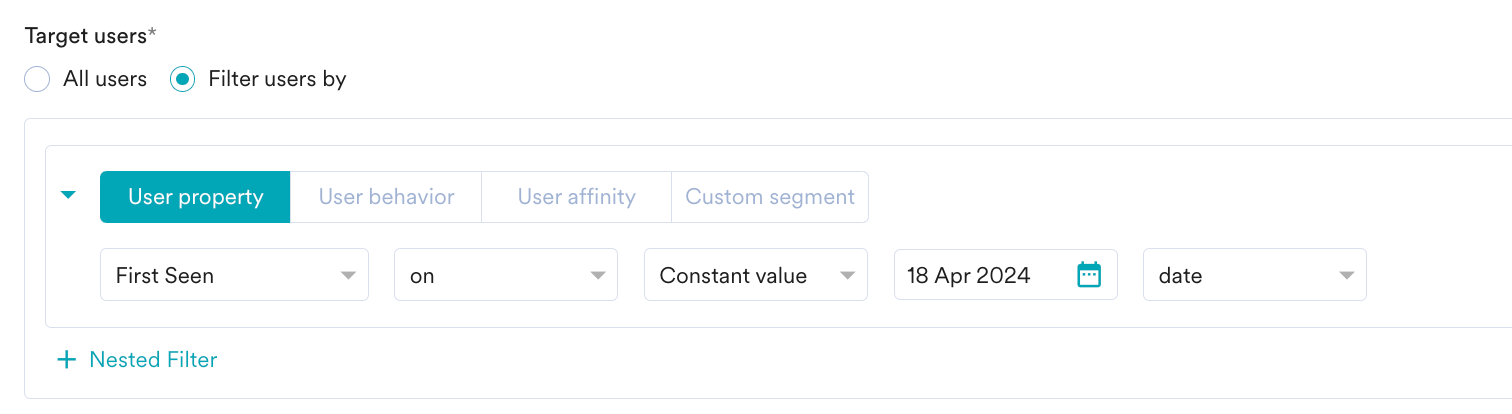
This option sends the campaign to all app users. You cannot add multiple filters when you use this option. 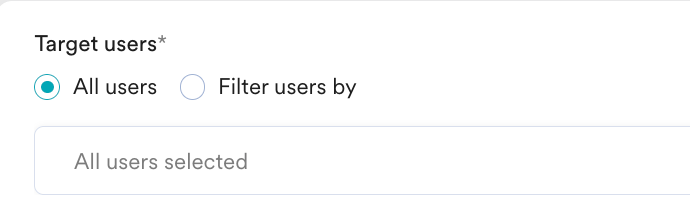 This option targets users based on user properties such as first seen, last seen, city, and so on. Click the **User Property** tab, and do the following:
1. Select the desired attribute from the drop-down list. This enables filters based on the selected attributes. For example, number attributes can have filter conditions such as 'is equal to', 'is not equal to', 'is between', and so on, while string attributes have different filters.
2. Enter the filter value(s) to create the user segment.
3. Click **+ Nested Filter** to add a filter for nested AND or OR conditions. (This step is optional). For more information, see [Create Segments](https://moengage.com/docs/user-guide/segment/new-ui-experience/create-segments).
This option targets users based on user properties such as first seen, last seen, city, and so on. Click the **User Property** tab, and do the following:
1. Select the desired attribute from the drop-down list. This enables filters based on the selected attributes. For example, number attributes can have filter conditions such as 'is equal to', 'is not equal to', 'is between', and so on, while string attributes have different filters.
2. Enter the filter value(s) to create the user segment.
3. Click **+ Nested Filter** to add a filter for nested AND or OR conditions. (This step is optional). For more information, see [Create Segments](https://moengage.com/docs/user-guide/segment/new-ui-experience/create-segments).
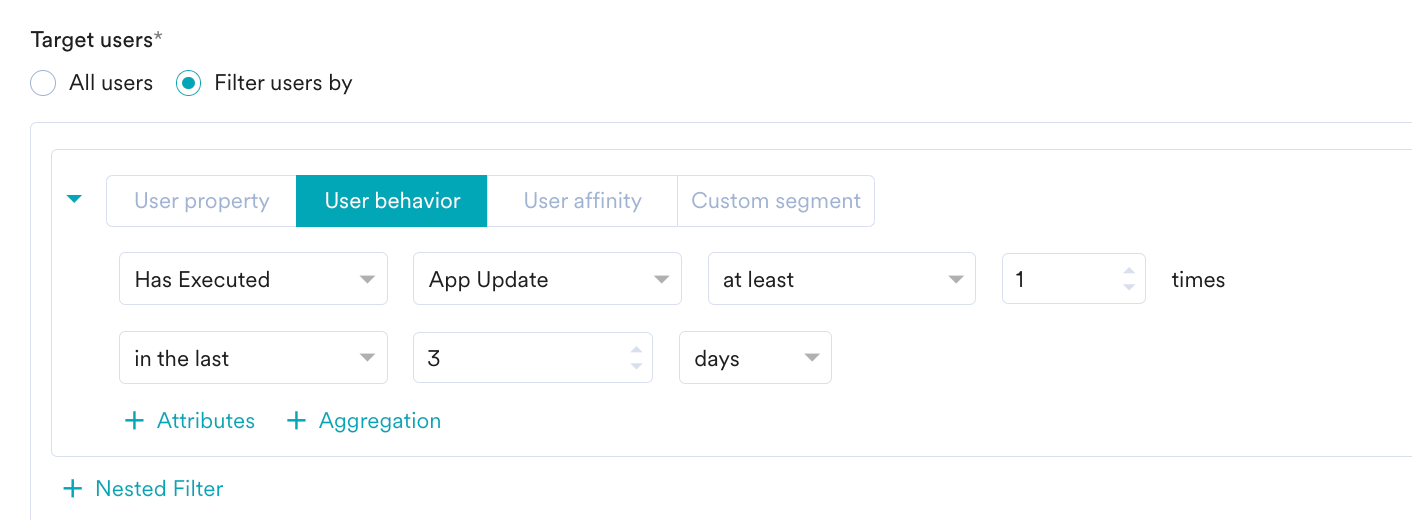
 This option targets users based on user behavior or events, such as app/site opened, viewed product, and so on. Click **User Behavior**, and do the following:
1. Select the execution condition and the desired user activity (event).
2. Enter the event frequency and time duration for the event execution.
3. Click **+ Attributes** and add an event attribute with a filter condition.
4. Enter the filter value(s) to create a rule.
5. Use the **+ Aggregation** button to add aggregation functionality. For more information, see [Aggregation Operations](https://moengage.com/docs/user-guide/segment/advanced-concepts/aggregation-operations).
6. Click **+ Nested Filter** to add a filter for nested AND or OR conditions. (This step is optional). For more information, see [Create Segments](https://moengage.com/docs/user-guide/segment/segment-operations/rule-based-filter-segments).
This option targets users based on user behavior or events, such as app/site opened, viewed product, and so on. Click **User Behavior**, and do the following:
1. Select the execution condition and the desired user activity (event).
2. Enter the event frequency and time duration for the event execution.
3. Click **+ Attributes** and add an event attribute with a filter condition.
4. Enter the filter value(s) to create a rule.
5. Use the **+ Aggregation** button to add aggregation functionality. For more information, see [Aggregation Operations](https://moengage.com/docs/user-guide/segment/advanced-concepts/aggregation-operations).
6. Click **+ Nested Filter** to add a filter for nested AND or OR conditions. (This step is optional). For more information, see [Create Segments](https://moengage.com/docs/user-guide/segment/segment-operations/rule-based-filter-segments).
 This option targets groups of users based on a user performing an action with a specific attribute value. For more information, see [User Affinity](https://moengage.com/docs/user-guide/segment/segment-operations/rule-based-filter-segments). Click **User Affinity**, and do the following:
1. Select the desired user event or attribute.
2. Select the user affinity parameter from the following:
* **Predominantly**: Select the affinity attribute with a filter condition, and then provide the affinity values.
* **For a minimum of**: Select the affinity attribute with a filter condition, and then provide the affinity values.
* **Most no. of times**: Enter a value or use the arrows to define the top percentage of users.
* **Least no. of times**: Enter a value or use the arrows to define the bottom percentage of users.
3. Enter a value or use the arrows to define the time duration for the event execution.
4. Click **+ Attribute** to add more attributes to the filter.
5. Click **+ Nested Filter** to add a filter for nested AND or OR conditions. (This step is optional).
This option targets groups of users based on a user performing an action with a specific attribute value. For more information, see [User Affinity](https://moengage.com/docs/user-guide/segment/segment-operations/rule-based-filter-segments). Click **User Affinity**, and do the following:
1. Select the desired user event or attribute.
2. Select the user affinity parameter from the following:
* **Predominantly**: Select the affinity attribute with a filter condition, and then provide the affinity values.
* **For a minimum of**: Select the affinity attribute with a filter condition, and then provide the affinity values.
* **Most no. of times**: Enter a value or use the arrows to define the top percentage of users.
* **Least no. of times**: Enter a value or use the arrows to define the bottom percentage of users.
3. Enter a value or use the arrows to define the time duration for the event execution.
4. Click **+ Attribute** to add more attributes to the filter.
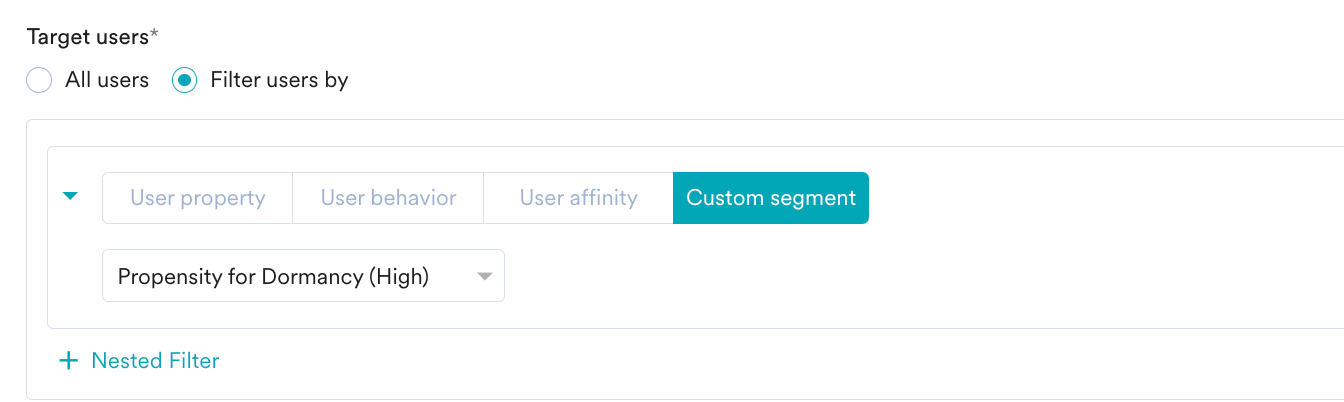
5. Click **+ Nested Filter** to add a filter for nested AND or OR conditions. (This step is optional). 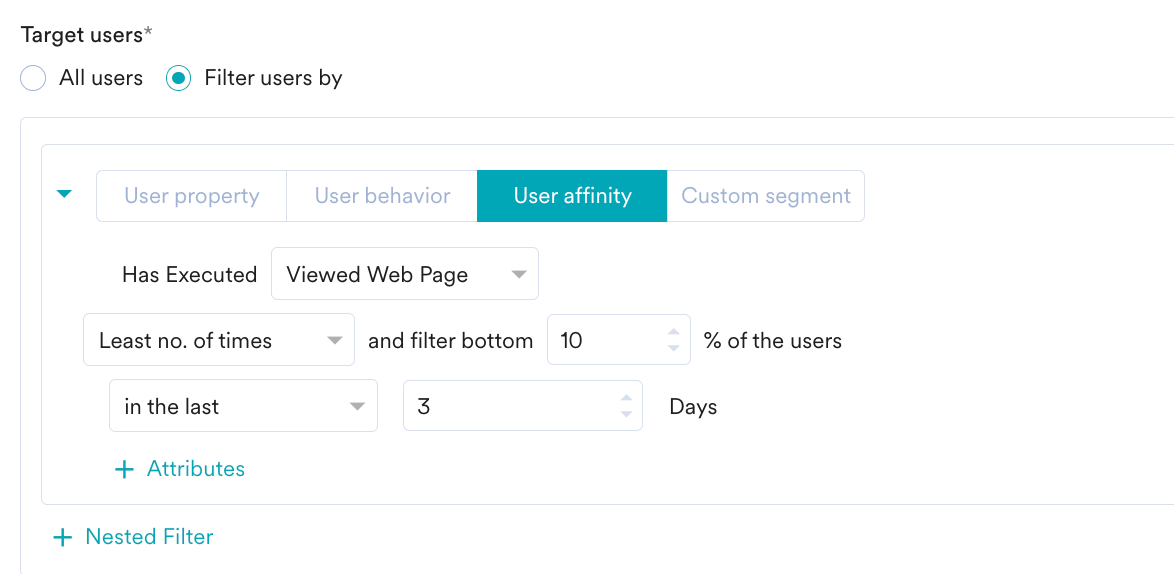 This option selects a custom segment as the target audience.
1. Select a custom segment as the target audience from the list of available custom segments.
2. Click **+ Nested Filter** to add a filter for nested AND or OR conditions. (This step is optional). For more information, see [Custom Segments](https://moengage.com/docs/user-guide/segment/segment-operations/custom-segments).
This option selects a custom segment as the target audience.
1. Select a custom segment as the target audience from the list of available custom segments.
2. Click **+ Nested Filter** to add a filter for nested AND or OR conditions. (This step is optional). For more information, see [Custom Segments](https://moengage.com/docs/user-guide/segment/segment-operations/custom-segments).
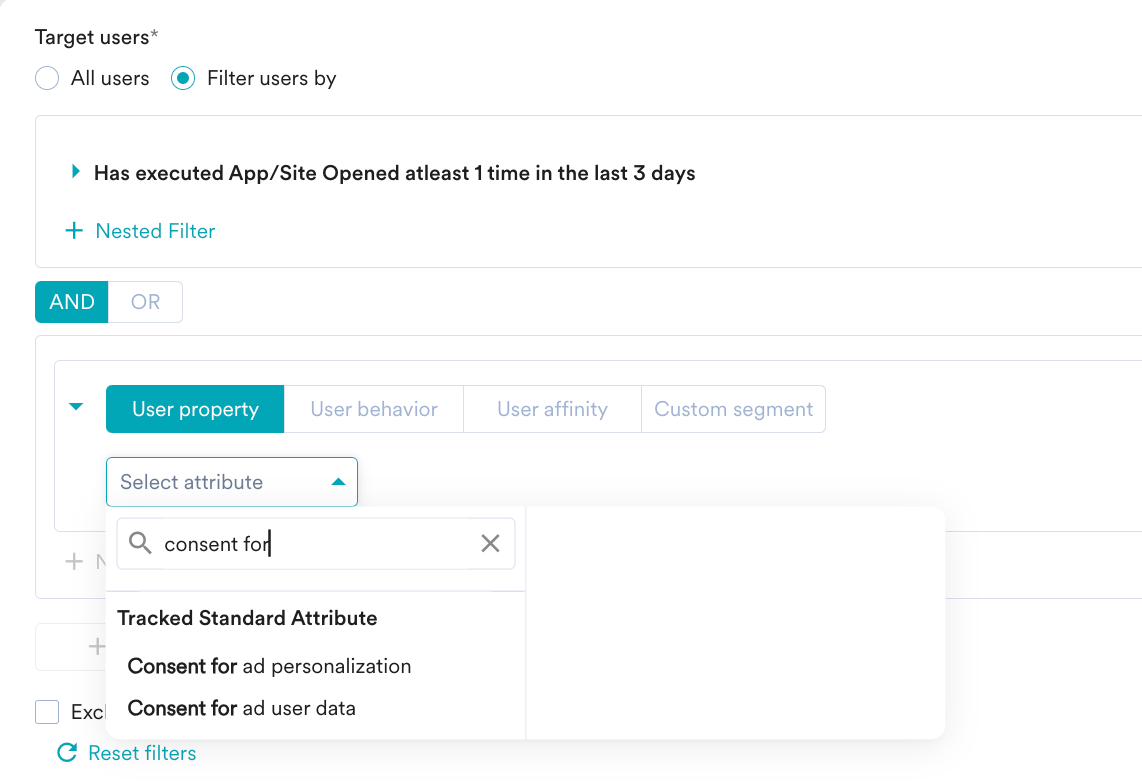
 After selecting the filter criteria, you can do the following as well:
* **Create Multiple Filters**: You can create and combine multiple user property rules, user activity rules, and custom segment rules to create a complex user segment using this option.
1. Click **+ Filter**.
2. Click **AND** or **OR**.
3. Select the attribute or event and define the filter conditions.
* **Exclude Users**: Select this checkbox to define the filter criteria for users to be excluded from the campaign.
* **Reset Filters**: Click this option to reset the segmentation filters.
* **Show Count**: Click this button to display the total number of users who are currently in the configured segment.
After selecting the filter criteria, you can do the following as well:
* **Create Multiple Filters**: You can create and combine multiple user property rules, user activity rules, and custom segment rules to create a complex user segment using this option.
1. Click **+ Filter**.
2. Click **AND** or **OR**.
3. Select the attribute or event and define the filter conditions.
* **Exclude Users**: Select this checkbox to define the filter criteria for users to be excluded from the campaign.
* **Reset Filters**: Click this option to reset the segmentation filters.
* **Show Count**: Click this button to display the total number of users who are currently in the configured segment.
 ### Comply with the EU User Consent Policy of Google
This is applicable only if you have customers in the EU region. If not, you need not take any action. For more information, refer to [Overview](/user-guide/settings/account/security/overview).
To comply with the [EU User Consent Policy](https://support.google.com/google-ads/answer/14310715#:~:text=These%20consent%20fields%20are:) of Google for clients syncing EU customers' data from MoEngage to Google ads:
* Collect consent from those customers.
* While creating a segmentation, add another filter in the **User property** tab to include a consent parameter, along with your target audience.
* **Consent for ad user data**: Used to track consent for sending user data to Google for advertising purposes.
* **Consent for ad personalization**: Used to track consent for personalized advertising.
### Comply with the EU User Consent Policy of Google
This is applicable only if you have customers in the EU region. If not, you need not take any action. For more information, refer to [Overview](/user-guide/settings/account/security/overview).
To comply with the [EU User Consent Policy](https://support.google.com/google-ads/answer/14310715#:~:text=These%20consent%20fields%20are:) of Google for clients syncing EU customers' data from MoEngage to Google ads:
* Collect consent from those customers.
* While creating a segmentation, add another filter in the **User property** tab to include a consent parameter, along with your target audience.
* **Consent for ad user data**: Used to track consent for sending user data to Google for advertising purposes.
* **Consent for ad personalization**: Used to track consent for personalized advertising.
 Make sure that the users you are sending to MoEngage to be synced with Google have the same consent.
Google does not allow us to sync a segment that has users with multiple consent types at the same time. Do not create a segment in which users have mixed consent types. For example, you cannot sync users with consent type "Granted" and "Unspecified" in the same batch.
### What Happens If You Do Not Add This Filter?
* If you send users with the same consent, MoEngage will sync them to Google ads center.
* If you send users with the mixed consent, MoEngage will fail the sync. You will see the following error:\
Failed due to mismatch in consent for the users
* If you send users with denied consent, Google will fail the sync. MoEngage will show the following error:\
Failed due to denied consent
### Control Group
This section contains information about control groups for the campaign. To exclude users from the control groups, do the following:
In the **Enable control group** section, enable the **Global control group** toggle to exclude the users from the campaign's target segment. For more information, refer to [Control Group](https://moengage.com/docs/user-guide/campaigns-and-channels/getting-started/introduction/control-groups).
Make sure that the users you are sending to MoEngage to be synced with Google have the same consent.
Google does not allow us to sync a segment that has users with multiple consent types at the same time. Do not create a segment in which users have mixed consent types. For example, you cannot sync users with consent type "Granted" and "Unspecified" in the same batch.
### What Happens If You Do Not Add This Filter?
* If you send users with the same consent, MoEngage will sync them to Google ads center.
* If you send users with the mixed consent, MoEngage will fail the sync. You will see the following error:\
Failed due to mismatch in consent for the users
* If you send users with denied consent, Google will fail the sync. MoEngage will show the following error:\
Failed due to denied consent
### Control Group
This section contains information about control groups for the campaign. To exclude users from the control groups, do the following:
In the **Enable control group** section, enable the **Global control group** toggle to exclude the users from the campaign's target segment. For more information, refer to [Control Group](https://moengage.com/docs/user-guide/campaigns-and-channels/getting-started/introduction/control-groups). Click **Next** or use the tabs on the top of the create campaign navigation to move to Step 2.
## Step 2: Audience Detail
### Ad account ID
Select the Ad account ID that contains the details of the custom audience to which you wish to add/delete users. The default Ad account ID is auto-selected. The default Ad account ID is configured in the Google Ads Audience settings page during integration. You can change the default selection at any time.
### Add or delete Google custom audience
Select the operation (add or delete users) you wish to perform through this campaign.
With this option, you can add users from MoEngage to the existing audience or create a new list by specifying match criteria.
### Select/create custom audience
This option lets you select an existing custom audience or create a new one.
Click **Next** or use the tabs on the top of the create campaign navigation to move to Step 2.
## Step 2: Audience Detail
### Ad account ID
Select the Ad account ID that contains the details of the custom audience to which you wish to add/delete users. The default Ad account ID is auto-selected. The default Ad account ID is configured in the Google Ads Audience settings page during integration. You can change the default selection at any time.
### Add or delete Google custom audience
Select the operation (add or delete users) you wish to perform through this campaign.
With this option, you can add users from MoEngage to the existing audience or create a new list by specifying match criteria.
### Select/create custom audience
This option lets you select an existing custom audience or create a new one.
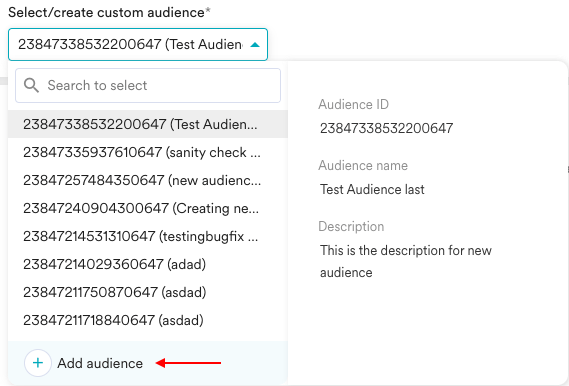 **Types of Custom Audiences**
There are four types of Custom Audiences, and these are shown in the **Select/create custom audience** drop-down list:
* Custom Audience matched based on Android Device Identifier\
This is the list of users from the target segment that are matched based on the Android device identifier.
* Custom Audience matched based on iOS Device Identifier\
This is the list of users from the target segment that are matched based on the iOS device identifier.
* Custom Audience matched based on Customer Information (Email ID and Mobile Number)\
This is the list of users from the target segment that are matched based on customer information - email id and mobile number.
* Unknown Audience\
This could a list of users from an old audience list where the mobile number or email id was not being used to identify the user. This is a rare occurrence.
#### Use existing custom audience
We will fetch and show the list of custom audiences that exist corresponding to the selected Ad Account ID. You can see the name and description of each custom audience and select the one you wish to use. In case you are not able to find the custom audience you are looking for, make sure you have chosen the right Ad Account ID.
#### Create a new custom audience
You can also create a new custom audience and then use this custom audience to add users to Google Ads.
To create a new audience:
1. On the **Select/create custom audience** drop-down list, click **+ Add audience**.
**Types of Custom Audiences**
There are four types of Custom Audiences, and these are shown in the **Select/create custom audience** drop-down list:
* Custom Audience matched based on Android Device Identifier\
This is the list of users from the target segment that are matched based on the Android device identifier.
* Custom Audience matched based on iOS Device Identifier\
This is the list of users from the target segment that are matched based on the iOS device identifier.
* Custom Audience matched based on Customer Information (Email ID and Mobile Number)\
This is the list of users from the target segment that are matched based on customer information - email id and mobile number.
* Unknown Audience\
This could a list of users from an old audience list where the mobile number or email id was not being used to identify the user. This is a rare occurrence.
#### Use existing custom audience
We will fetch and show the list of custom audiences that exist corresponding to the selected Ad Account ID. You can see the name and description of each custom audience and select the one you wish to use. In case you are not able to find the custom audience you are looking for, make sure you have chosen the right Ad Account ID.
#### Create a new custom audience
You can also create a new custom audience and then use this custom audience to add users to Google Ads.
To create a new audience:
1. On the **Select/create custom audience** drop-down list, click **+ Add audience**.  The Create new audience pop-up window is displayed.
 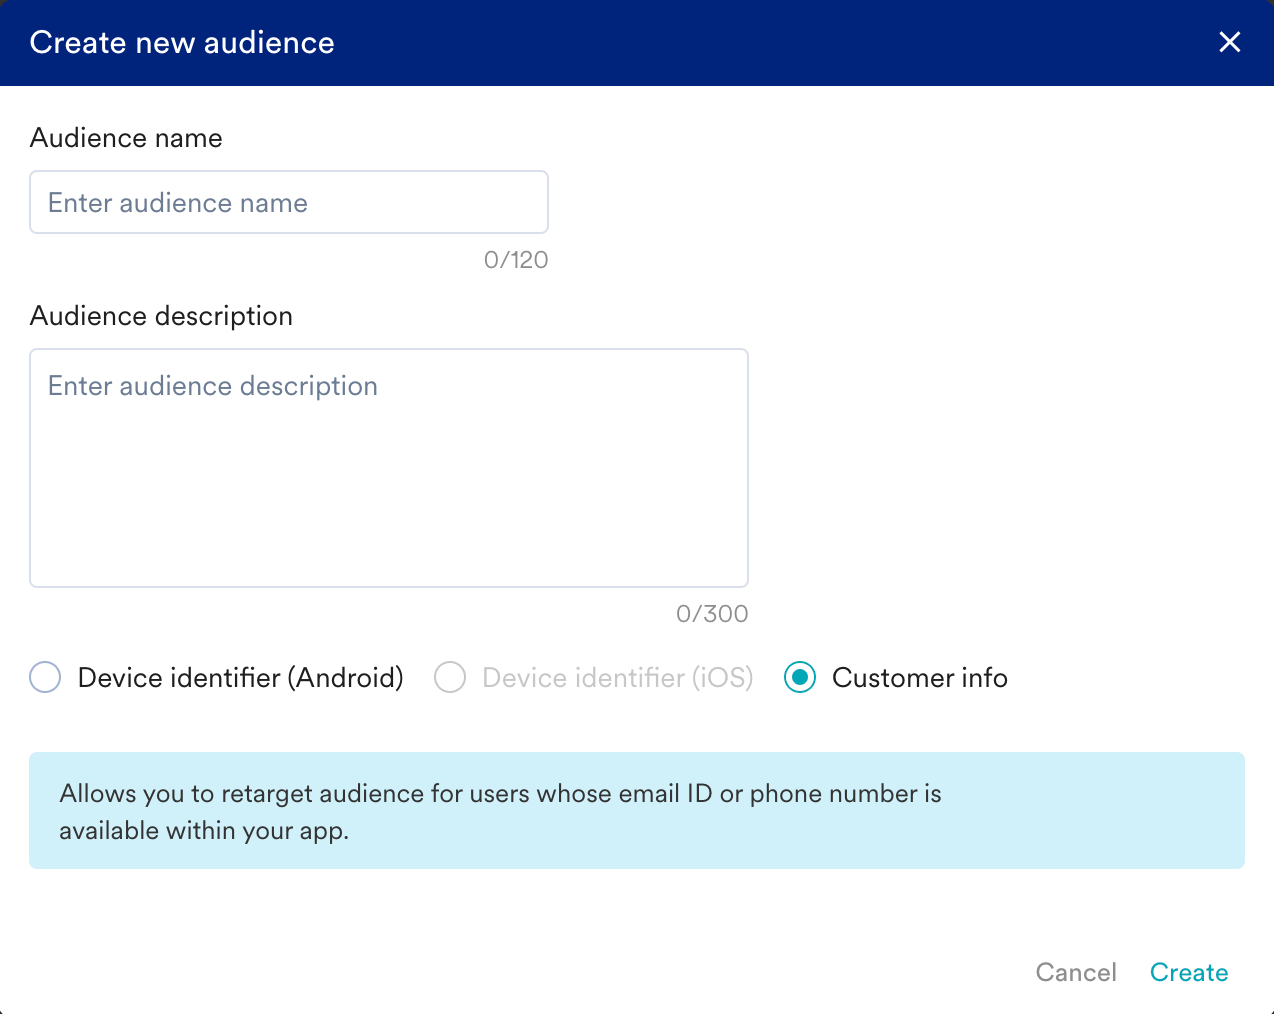 2. In the **Audience name** field, enter a name.
3. In the **Audience description** field, enter a description.
4. Select the type of custom audience to be created using any of the following options:
* Device identifier (Android)
* Device identifier (iOS)
* Customer info
5. Click **Create**.
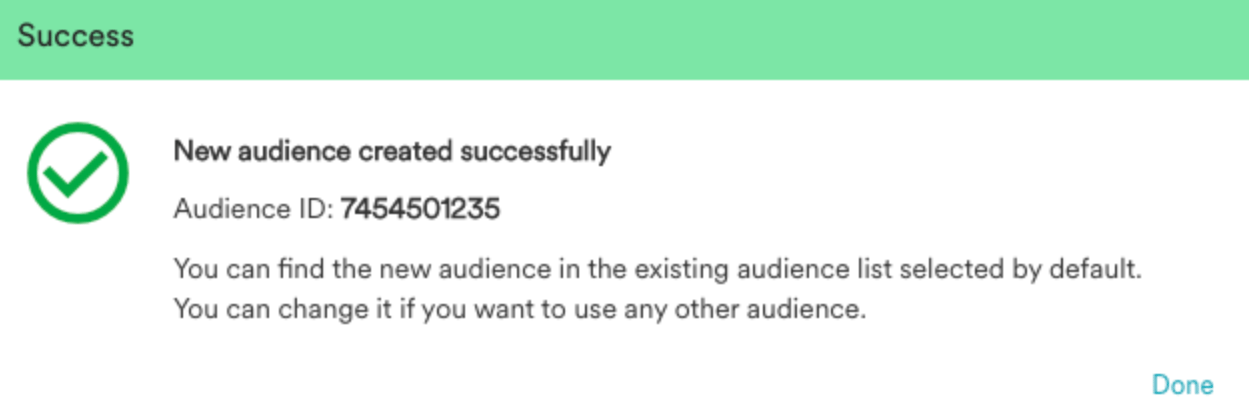
After you add the new custom audience, you get the following success notification.
2. In the **Audience name** field, enter a name.
3. In the **Audience description** field, enter a description.
4. Select the type of custom audience to be created using any of the following options:
* Device identifier (Android)
* Device identifier (iOS)
* Customer info
5. Click **Create**.
After you add the new custom audience, you get the following success notification.
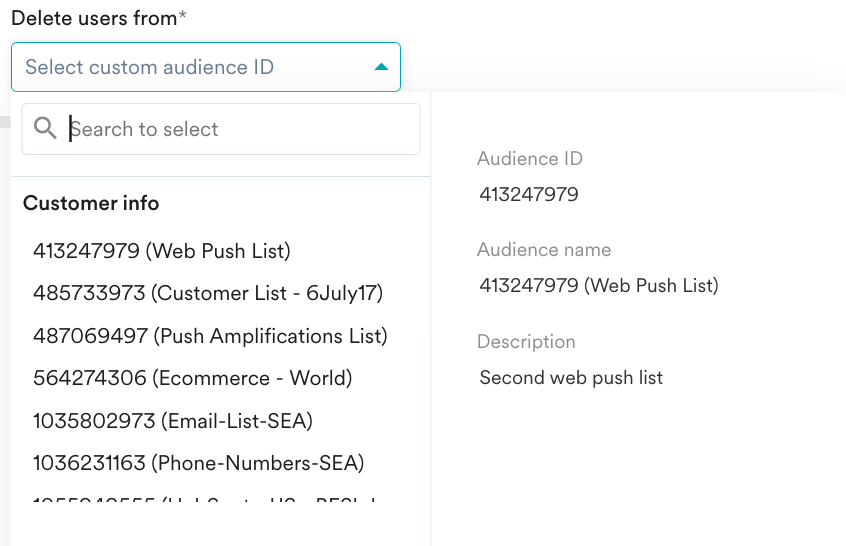
 This option lets you delete users from the audience by specifying match criteria.
### Delete users from
This option lets you delete users from the audience.
This option lets you delete users from the audience by specifying match criteria.
### Delete users from
This option lets you delete users from the audience.
 ### Match Identifiers
You can select one of the following identifiers based on which Google Ads Audience will match the user.
* **Device identifier** \[Google Advertising ID (Android), Advertising Identifier (iOS)]: Selecting this option will match the device identifiers and filter the users in the Audience.
* **Customer match info**: Selecting this option will match the customer information based on the identifier(s) chosen.
* **Email id**: You can choose the attribute that stores the Email ID of the customer in the DB here.
* **Mobile Number**: You can choose the attribute that stores the Mobile Number of the customer in the DB here.
For a better match, we recommend using both the Email ID and Mobile Number.
Either customer match or device identifier will be selected based on the audience type selected above. For Email and SMS, the default attributes are auto-populated based on the [Email settings](https://app.moengage.com/v3/#/settings/email/general) and [SMS settings](https://app.moengage.com/v3/#/settings/sms/sms-general), respectively.
Google does not allow the use of both Android and iOS device identifiers in the same cohort sync. Separate campaigns would have to be created for that.
Test campaigns enable previewing the campaign on a test device to ensure that your notification is conveyed in the manner that you desire.
You can test the campaign you created by selecting any of the following options and providing the value for the attribute chosen for your test user:
* Unique ID
* Email ID
* Mobile Number (Registered With MoEngage)
* Google Advertising Identifier
* iOS Identifier For Advertising
* Device Push Token
* Custom Segment
### Match Identifiers
You can select one of the following identifiers based on which Google Ads Audience will match the user.
* **Device identifier** \[Google Advertising ID (Android), Advertising Identifier (iOS)]: Selecting this option will match the device identifiers and filter the users in the Audience.
* **Customer match info**: Selecting this option will match the customer information based on the identifier(s) chosen.
* **Email id**: You can choose the attribute that stores the Email ID of the customer in the DB here.
* **Mobile Number**: You can choose the attribute that stores the Mobile Number of the customer in the DB here.
For a better match, we recommend using both the Email ID and Mobile Number.
Either customer match or device identifier will be selected based on the audience type selected above. For Email and SMS, the default attributes are auto-populated based on the [Email settings](https://app.moengage.com/v3/#/settings/email/general) and [SMS settings](https://app.moengage.com/v3/#/settings/sms/sms-general), respectively.
Google does not allow the use of both Android and iOS device identifiers in the same cohort sync. Separate campaigns would have to be created for that.
Test campaigns enable previewing the campaign on a test device to ensure that your notification is conveyed in the manner that you desire.
You can test the campaign you created by selecting any of the following options and providing the value for the attribute chosen for your test user:
* Unique ID
* Email ID
* Mobile Number (Registered With MoEngage)
* Google Advertising Identifier
* iOS Identifier For Advertising
* Device Push Token
* Custom Segment
 Click **Next**, or use the tabs at the top of the campaign creation navigation to move to Step 3, **Schedule and Goals**.
## Step 3: Schedule and Goals
This section contains the following:
* [Delivery schedule](#delivery-schedule): Choose when the campaign should be delivered to your users and the periodicity of delivery.
* [Conversion goals](#conversion-goals): Choose the conversion goals and revenue metrics to be tracked for the campaign.
### Delivery Schedule
Choose this option to send the campaign immediately to the target users.
Click **Next**, or use the tabs at the top of the campaign creation navigation to move to Step 3, **Schedule and Goals**.
## Step 3: Schedule and Goals
This section contains the following:
* [Delivery schedule](#delivery-schedule): Choose when the campaign should be delivered to your users and the periodicity of delivery.
* [Conversion goals](#conversion-goals): Choose the conversion goals and revenue metrics to be tracked for the campaign.
### Delivery Schedule
Choose this option to send the campaign immediately to the target users. 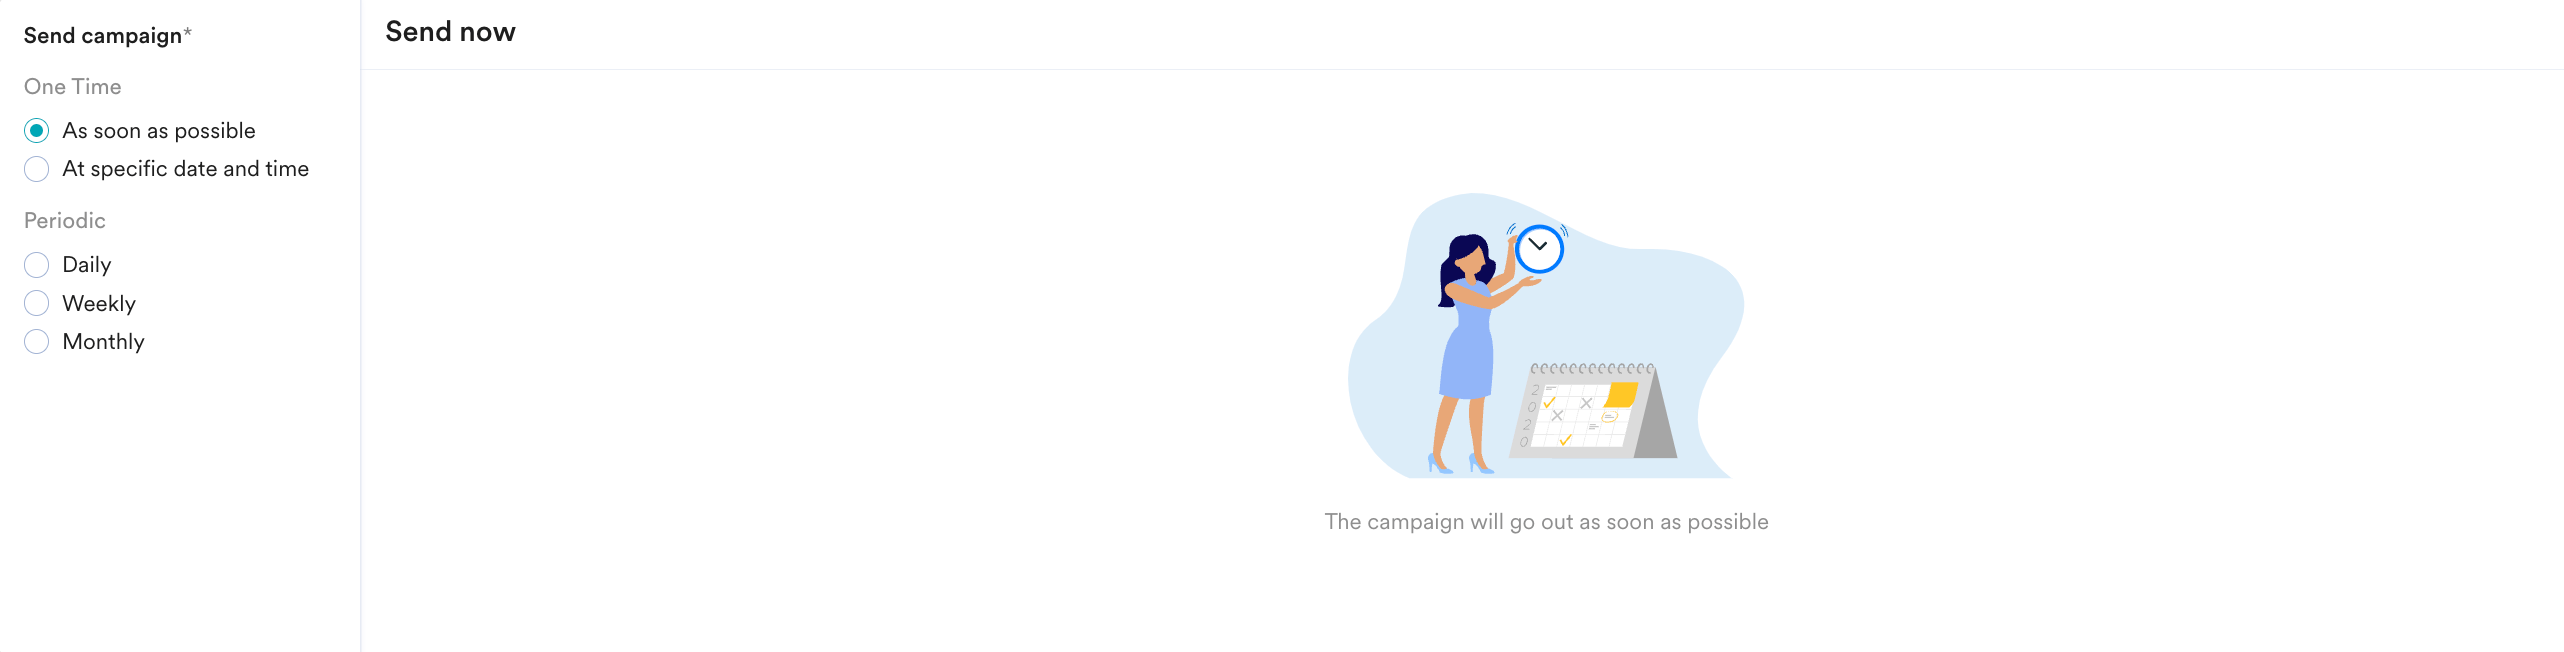 Choose this option to send the campaign at the specified time, time zone, or predicted time.
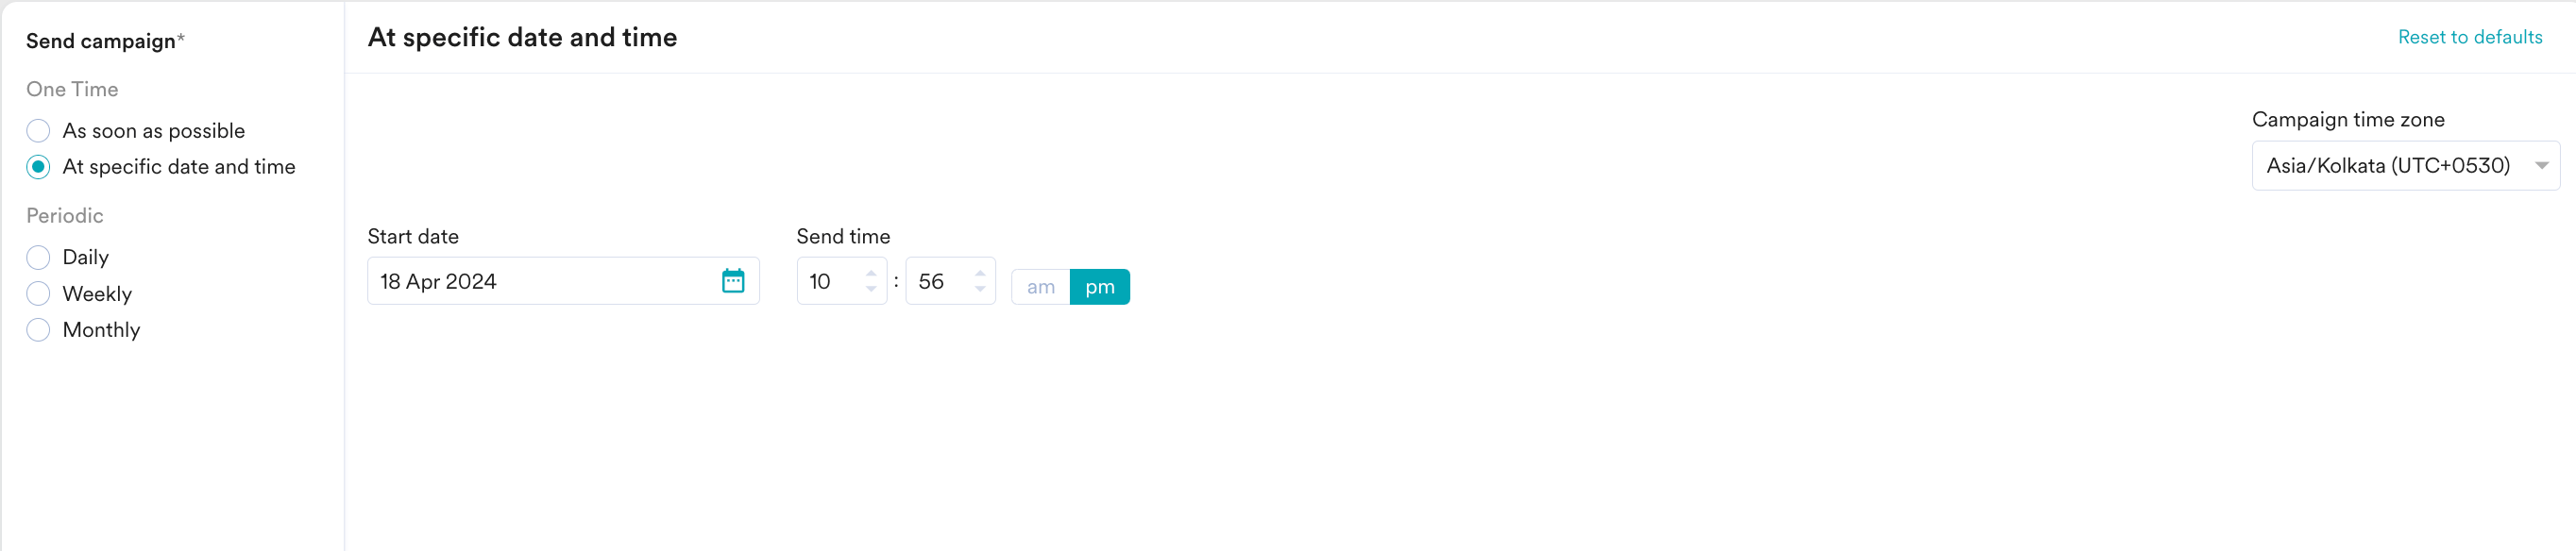
This section helps you send the campaign on a specific date and time, and it contains the following fields:
* **Campaign time zone**: the timezone in which the campaign should be sent.
* **Start date**: the date on which the campaign should be sent.
* **Send time**: the time at which the campaign should be sent. Select am or pm depending on when the time of day at which the campaign should be sent.
Choose this option to send the campaign at the specified time, time zone, or predicted time.
This section helps you send the campaign on a specific date and time, and it contains the following fields:
* **Campaign time zone**: the timezone in which the campaign should be sent.
* **Start date**: the date on which the campaign should be sent.
* **Send time**: the time at which the campaign should be sent. Select am or pm depending on when the time of day at which the campaign should be sent.
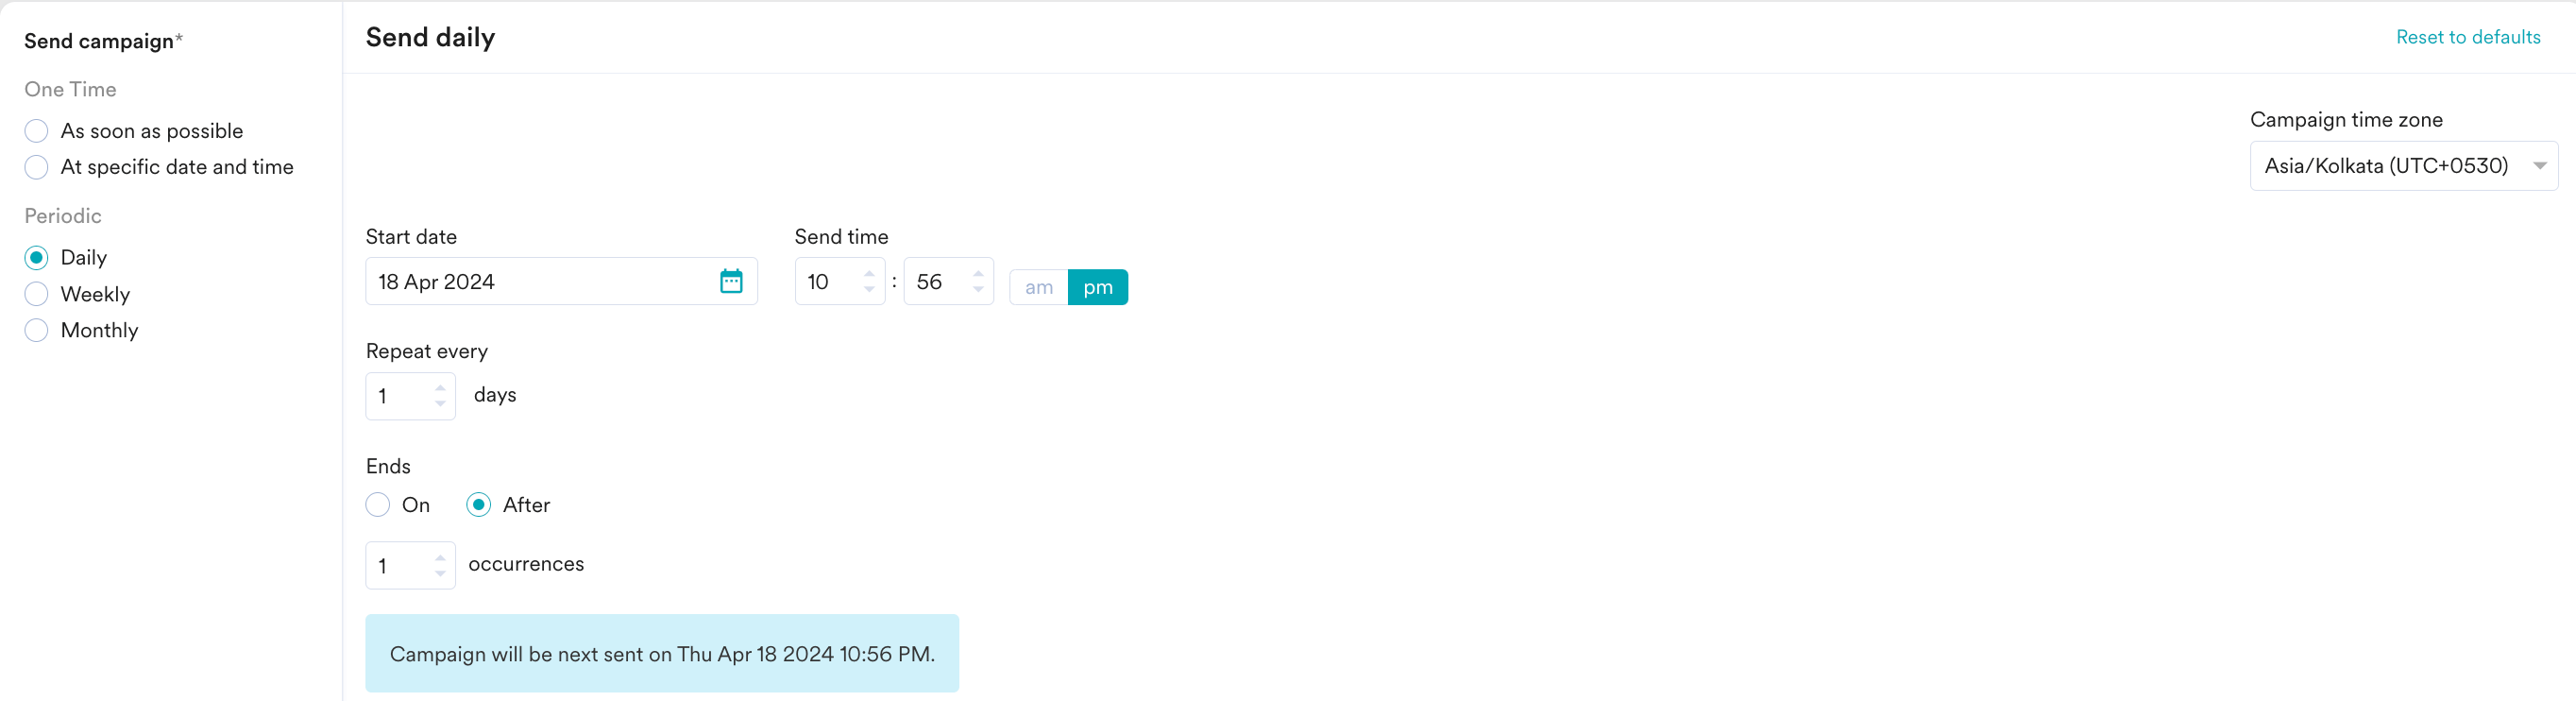
 Choose this option to send the campaign periodically on a specified date and time. The following fields are available in this section:
* **Campaign time zone**: the timezone in which the campaign should be sent.
* **Start date**: the date on which the campaign should be sent.
* **Send time**: the time at which the campaign should be sent. Select am or pm depending on when the time of day at which the campaign should be sent.
* **Periodic**: the periodicity of the campaign. You can choose from the following options available:
| Periodicity | Description |
| ----------- | ------------------------------------------------------------------------------------------------------------------------------------------------------------------------------------------------------------------------------------------------------------------------------------------------------------------------------------------------------------------------------------------------------------------------------------------------------------------------------------------------------------------------------------------------------------------------------------------------------------------------------------------------------------------------------------------------------------------------------------------------------------------------------------------------------------------------------------------------------------------------------------------------------------------------------------------------------------------------------------------------------------------------------------------------------------------------------------------------------------------------------------------------------------------------------------------------------------------------------------ |
| Daily | **Repeat every**: This option allows you to specify the number of days after which the campaign should be repeated. |
| Weekly | **Repeat every**: This option allows you to specify the number of weeks for which the campaign should be repeated.
Choose this option to send the campaign periodically on a specified date and time. The following fields are available in this section:
* **Campaign time zone**: the timezone in which the campaign should be sent.
* **Start date**: the date on which the campaign should be sent.
* **Send time**: the time at which the campaign should be sent. Select am or pm depending on when the time of day at which the campaign should be sent.
* **Periodic**: the periodicity of the campaign. You can choose from the following options available:
| Periodicity | Description |
| ----------- | ------------------------------------------------------------------------------------------------------------------------------------------------------------------------------------------------------------------------------------------------------------------------------------------------------------------------------------------------------------------------------------------------------------------------------------------------------------------------------------------------------------------------------------------------------------------------------------------------------------------------------------------------------------------------------------------------------------------------------------------------------------------------------------------------------------------------------------------------------------------------------------------------------------------------------------------------------------------------------------------------------------------------------------------------------------------------------------------------------------------------------------------------------------------------------------------------------------------------------------ |
| Daily | **Repeat every**: This option allows you to specify the number of days after which the campaign should be repeated. |
| Weekly | **Repeat every**: This option allows you to specify the number of weeks for which the campaign should be repeated.
**Repeat on**: This option allows you to specify the day(s) of the week on which the campaign should be sent (For example, if you wish to send the campaign every Monday, Wednesday, and Friday, select these days in this option). |
| Monthly | **Repeat every**: This option allows you to specify the number of months for which the campaign should be repeated.
**Repeat on**: This option allows you do the following: - Days of month: Choose this option for repeating campaigns that are date specific. Select the date(s) of the month the campaign should be sent (For example, to send the campaign on the 5th and the 25th of a month, select the 5th and 25th in the calendar widget.). **Note**: If the selected date(s) do not exist in the month specified (as it is a shorter month), a campaign will be sent on the last date. (For example, if the 30th and 31st are selected and the month is February, one campaign would be sent on the 28th).
- Days of week: Choose this option to specify the day(s) of the week on which the campaign should be sent (For example, if you wish to send the campaign every Monday, Wednesday, and Friday, select these days in this option). **Note**: In case of a day of the week not existing in a month (for example, fifth Saturday), the campaign would be skipped for that instance. And in case of overlap (for example, 4th Monday and last Monday), only one instance would be sent.
|
* **Ends:** the date on which the campaign should end. The following options are available:
* **On**: the campaign ends on the end date specified in the **End Date** field.
* **After:** the campaign ends after the number of occurrences specified in the **occurrences** field.
 ### Conversion Goals
Conversion goals are optional. So, if you want to add a conversion goal, click **+ New goal** to add a conversion goal.
You can add conversion goals to track the business metrics for your campaigns. You can track a maximum of five conversion goals. You can choose any app event as a conversion goal activity and set more than one conversion goal. The first goal will be treated as a primary goal.
For example, if you want to track the number of customers who have purchased an iPhone after your campaign was sent. (Event: Purchase event, Product: iPhone). Your conversion goal setup might be similar to the following image:
With multiple conversion goals, you can track more than one business metric or visualize a funnel for your user actions. For example, if you want to check the following, you can do so with multiple conversion goals.
* How many users have viewed the product page?
* How many of them added that product to the cart?
* How many of them made a successful order?
| | |
| --------------------------------------------------------------------------------------------------------------------------------------------------------------------------------------------------------------------------------------------------------------------------------------------------------------------------------------------------------------------------------------------------------------------------------------- | -------------------------------------------------------------------------------------------------------------------------------------------------------------------------------------------------------------------------------------------------------------------------------------------------------------------------------------------------------------------------------------------------------------------------------------------------------------------------------------------------------------------------------------------------------------------------------------------------------------------------------------------------------------------------------------------------------------------------------------------------------------------------------------------------------------------------------------------------------------------------------------------------------------------------------------------------------------------------------------------------------------------------------------------------------------------------------------------------------------------------------------------------------------------------------------------------------------------------------------------------------------------------------------------------------------------------------------------------------------------------------------------------------------------------------------------------------------------------------------------------------------------------------------------------------------------------------------------------------------------- |
| With MoEngage, you can track the revenue generated by your campaigns. For example, you can track the revenue generated by your product after sending a communication. To track revenue performance, enable the **Revenue performance** toggle for the conversion goal for which you want to track the revenue. In the example here, to track revenue for *orderSuccessful* events, you must enable the **Revenue performance** toggle. |
### Conversion Goals
Conversion goals are optional. So, if you want to add a conversion goal, click **+ New goal** to add a conversion goal.
You can add conversion goals to track the business metrics for your campaigns. You can track a maximum of five conversion goals. You can choose any app event as a conversion goal activity and set more than one conversion goal. The first goal will be treated as a primary goal.
For example, if you want to track the number of customers who have purchased an iPhone after your campaign was sent. (Event: Purchase event, Product: iPhone). Your conversion goal setup might be similar to the following image:
With multiple conversion goals, you can track more than one business metric or visualize a funnel for your user actions. For example, if you want to check the following, you can do so with multiple conversion goals.
* How many users have viewed the product page?
* How many of them added that product to the cart?
* How many of them made a successful order?
| | |
| --------------------------------------------------------------------------------------------------------------------------------------------------------------------------------------------------------------------------------------------------------------------------------------------------------------------------------------------------------------------------------------------------------------------------------------- | -------------------------------------------------------------------------------------------------------------------------------------------------------------------------------------------------------------------------------------------------------------------------------------------------------------------------------------------------------------------------------------------------------------------------------------------------------------------------------------------------------------------------------------------------------------------------------------------------------------------------------------------------------------------------------------------------------------------------------------------------------------------------------------------------------------------------------------------------------------------------------------------------------------------------------------------------------------------------------------------------------------------------------------------------------------------------------------------------------------------------------------------------------------------------------------------------------------------------------------------------------------------------------------------------------------------------------------------------------------------------------------------------------------------------------------------------------------------------------------------------------------------------------------------------------------------------------------------------------------------- |
| With MoEngage, you can track the revenue generated by your campaigns. For example, you can track the revenue generated by your product after sending a communication. To track revenue performance, enable the **Revenue performance** toggle for the conversion goal for which you want to track the revenue. In the example here, to track revenue for *orderSuccessful* events, you must enable the **Revenue performance** toggle. | 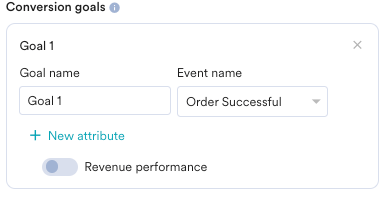 |
| | |
| ------------------------------------------------------------------------------------------------------------------------------------------------------------------------------------------------------------------------------------------------------ | ---------------------------------------------------------------------------------------------------------------------------------------------------------------------------------------------------------------------------------------------------------------------------------------------------------------------------------------------------------------------------------------------------------------------------------------------------------------------------------------------------------------------------------------------------------------------------------------------------------------------------------------------------------------------------------------------------------------------------------------------------------------------------------------------------------------------------------------------------------------------------------------------------------------------------------------------------------------------------------------------------------------------------------------------------------------------------------------------------------------------------------------------------------------------------------------------------------------------------------------------------------------------------------------------------------------------------------------------------------------------------------------------------------------------------------------------------------------------------------------------------------------------------------------------------------------------------------------------------------- |
| After choosing the goal, you can select the numeric attribute that captures the order's total monetary value. In this example, *cartValue* contains the total order value. You can choose the currency in which your monetary value is being reported. |
|
| | |
| ------------------------------------------------------------------------------------------------------------------------------------------------------------------------------------------------------------------------------------------------------ | ---------------------------------------------------------------------------------------------------------------------------------------------------------------------------------------------------------------------------------------------------------------------------------------------------------------------------------------------------------------------------------------------------------------------------------------------------------------------------------------------------------------------------------------------------------------------------------------------------------------------------------------------------------------------------------------------------------------------------------------------------------------------------------------------------------------------------------------------------------------------------------------------------------------------------------------------------------------------------------------------------------------------------------------------------------------------------------------------------------------------------------------------------------------------------------------------------------------------------------------------------------------------------------------------------------------------------------------------------------------------------------------------------------------------------------------------------------------------------------------------------------------------------------------------------------------------------------------------------------- |
| After choosing the goal, you can select the numeric attribute that captures the order's total monetary value. In this example, *cartValue* contains the total order value. You can choose the currency in which your monetary value is being reported. | 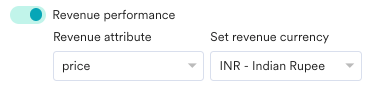 |
| | |
| ----------------------------------------------------------------------------------------------------------------------------------------------------------------------------------------------------------------------------------------------------------------------------------------------------------------------------------------------------------------------------------------------------------- | -------------------------------------------------------------------------------------------------------------------------------------------------------------------------------------------------------------------------------------------------------------------------------------------------------------------------------------------------------------------------------------------------------------------------------------------------------------------------------------------------------------------------------------------------------------------------------------------------------------------------------------------------------------------------------------------------------------------------------------------------------------------------------------------------------------------------------------------------------------------------------------------------------------------------------------------------------------------------------------------------------------------------------------------------------------------------------------------------------------------------------------------------------------------------------------------------------------------------------------------------------------------------------------------------------------------------------------------------------------------------------------------------------------------------------------------------------------------------------------------------------------------------------------------------------------------------------------------- |
| **Set Attribution window**: You can set an attribution window (a time period or window that is calculated since the user has received/clicked the campaign, for which you want to attribute the conversion goals to a specific campaign.) By default, it is set for 36 hours while the maximum attribution window can be set up to 10 days. In the example below, the attribution window is set to 5 hours. |
|
| | |
| ----------------------------------------------------------------------------------------------------------------------------------------------------------------------------------------------------------------------------------------------------------------------------------------------------------------------------------------------------------------------------------------------------------- | -------------------------------------------------------------------------------------------------------------------------------------------------------------------------------------------------------------------------------------------------------------------------------------------------------------------------------------------------------------------------------------------------------------------------------------------------------------------------------------------------------------------------------------------------------------------------------------------------------------------------------------------------------------------------------------------------------------------------------------------------------------------------------------------------------------------------------------------------------------------------------------------------------------------------------------------------------------------------------------------------------------------------------------------------------------------------------------------------------------------------------------------------------------------------------------------------------------------------------------------------------------------------------------------------------------------------------------------------------------------------------------------------------------------------------------------------------------------------------------------------------------------------------------------------------------------------------------------- |
| **Set Attribution window**: You can set an attribution window (a time period or window that is calculated since the user has received/clicked the campaign, for which you want to attribute the conversion goals to a specific campaign.) By default, it is set for 36 hours while the maximum attribution window can be set up to 10 days. In the example below, the attribution window is set to 5 hours. |  |
Your campaign is now ready to be sent. Click **Publish** and confirm in the dialog box and your campaign is created.
**Note**
* For the Google Ads Audience campaign, we will track conversions for a user once we send a user's details to Google Ads Audience for matching successfully. Since Google doesn't give any status about whether a user was synced successfully (added/deleted) or not, we assume a successful response from Google Ads Audience as a proxy for successfully synced.
* The sync is done asynchronously and can take anywhere between 6 to 48 hrs to complete.
|
Your campaign is now ready to be sent. Click **Publish** and confirm in the dialog box and your campaign is created.
**Note**
* For the Google Ads Audience campaign, we will track conversions for a user once we send a user's details to Google Ads Audience for matching successfully. Since Google doesn't give any status about whether a user was synced successfully (added/deleted) or not, we assume a successful response from Google Ads Audience as a proxy for successfully synced.
* The sync is done asynchronously and can take anywhere between 6 to 48 hrs to complete.