> ## Documentation Index
> Fetch the complete documentation index at: https://moengage-unity-sdk-initialization-split.mintlify.site/llms.txt
> Use this file to discover all available pages before exploring further.
# Personalize WhatsApp Campaign
> Add dynamic personalization to your MoEngage WhatsApp campaigns using user attributes, event data, and business events for more relevant messaging.
[Personalization](/user-guide/campaigns-and-channels/getting-started/message-personalization/overview) makes your marketing messages feel more relevant to users. By tailoring your WhatsApp campaigns, you can build a stronger connection with your audience and improve how well your messages are received.
This article explains how to use personalization in MoEngage WhatsApp campaigns, including one-time, periodic, and event-triggered messages.
When you create a personalization condition or logic, it appears as a chip. To know more about Chip Actions, refer [here](/user-guide/campaigns-and-channels/getting-started/message-personalization/dynamic-content-personalization).
To add personalized content to your WhatsApp campaign messages:
1. In the campaign creation process, navigate to [Step 2: Content](/user-guide/campaigns-and-channels/whatsapp/create/create-a-whatsapp-campaign#step-2-content).
2. The WhatsApp content field that can be personalized contain the placeholder text **Type @ to personalize**.
3. In the content field, type the **@** symbol where you want to insert personalized content. The **WhatsApp Personalization** editor appears.
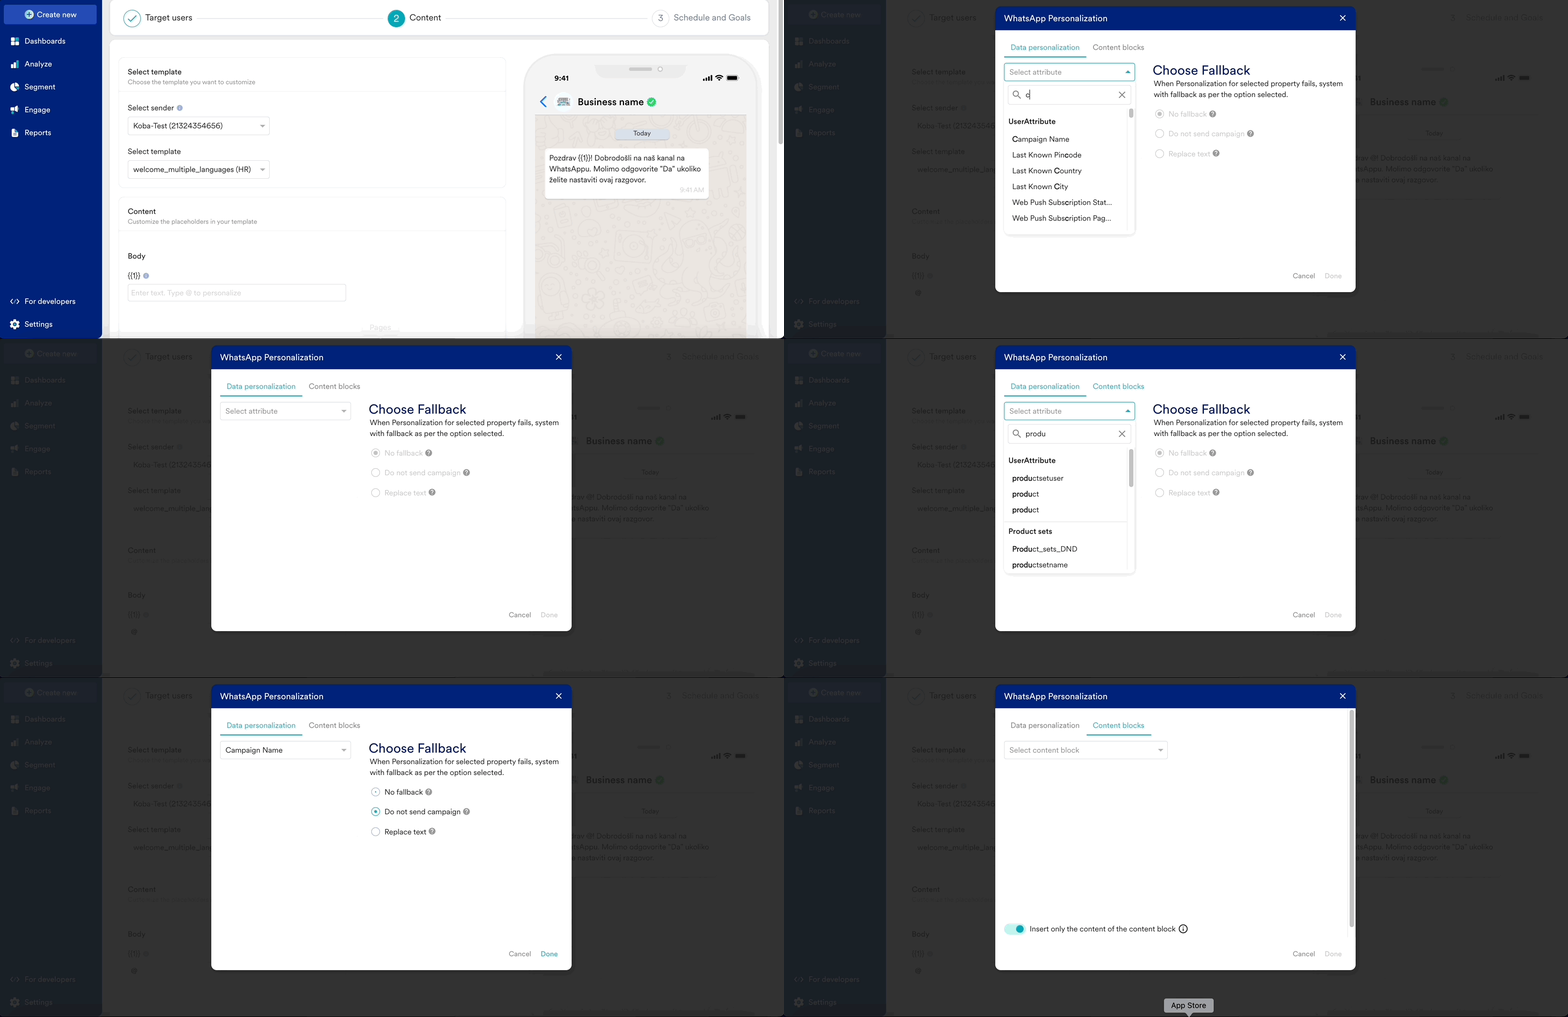 In the **WhatsApp Personalization** editor, you can perform the following:
* [Data Personalization](/user-guide/campaigns-and-channels/whatsapp/create/personalize-whatsapp-campaign#data-personalization)
* [Personalize using Content blocks](/user-guide/campaigns-and-channels/whatsapp/create/personalize-whatsapp-campaign#personalize-using-content-blocks)
* [Personalize using Auxillary data](/user-guide/campaigns-and-channels/whatsapp/create/personalize-whatsapp-campaign#personalize-using-auxiliary-data)
# Data Personalization
You can [personalize your messages](/user-guide/campaigns-and-channels/getting-started/message-personalization/overview) using user attributes, Product Sets (Recommendations), and Content APIs. To insert personalization into a message field, type @. The personalization menu opens, as shown in the following image:
In the **WhatsApp Personalization** editor, you can perform the following:
* [Data Personalization](/user-guide/campaigns-and-channels/whatsapp/create/personalize-whatsapp-campaign#data-personalization)
* [Personalize using Content blocks](/user-guide/campaigns-and-channels/whatsapp/create/personalize-whatsapp-campaign#personalize-using-content-blocks)
* [Personalize using Auxillary data](/user-guide/campaigns-and-channels/whatsapp/create/personalize-whatsapp-campaign#personalize-using-auxiliary-data)
# Data Personalization
You can [personalize your messages](/user-guide/campaigns-and-channels/getting-started/message-personalization/overview) using user attributes, Product Sets (Recommendations), and Content APIs. To insert personalization into a message field, type @. The personalization menu opens, as shown in the following image:
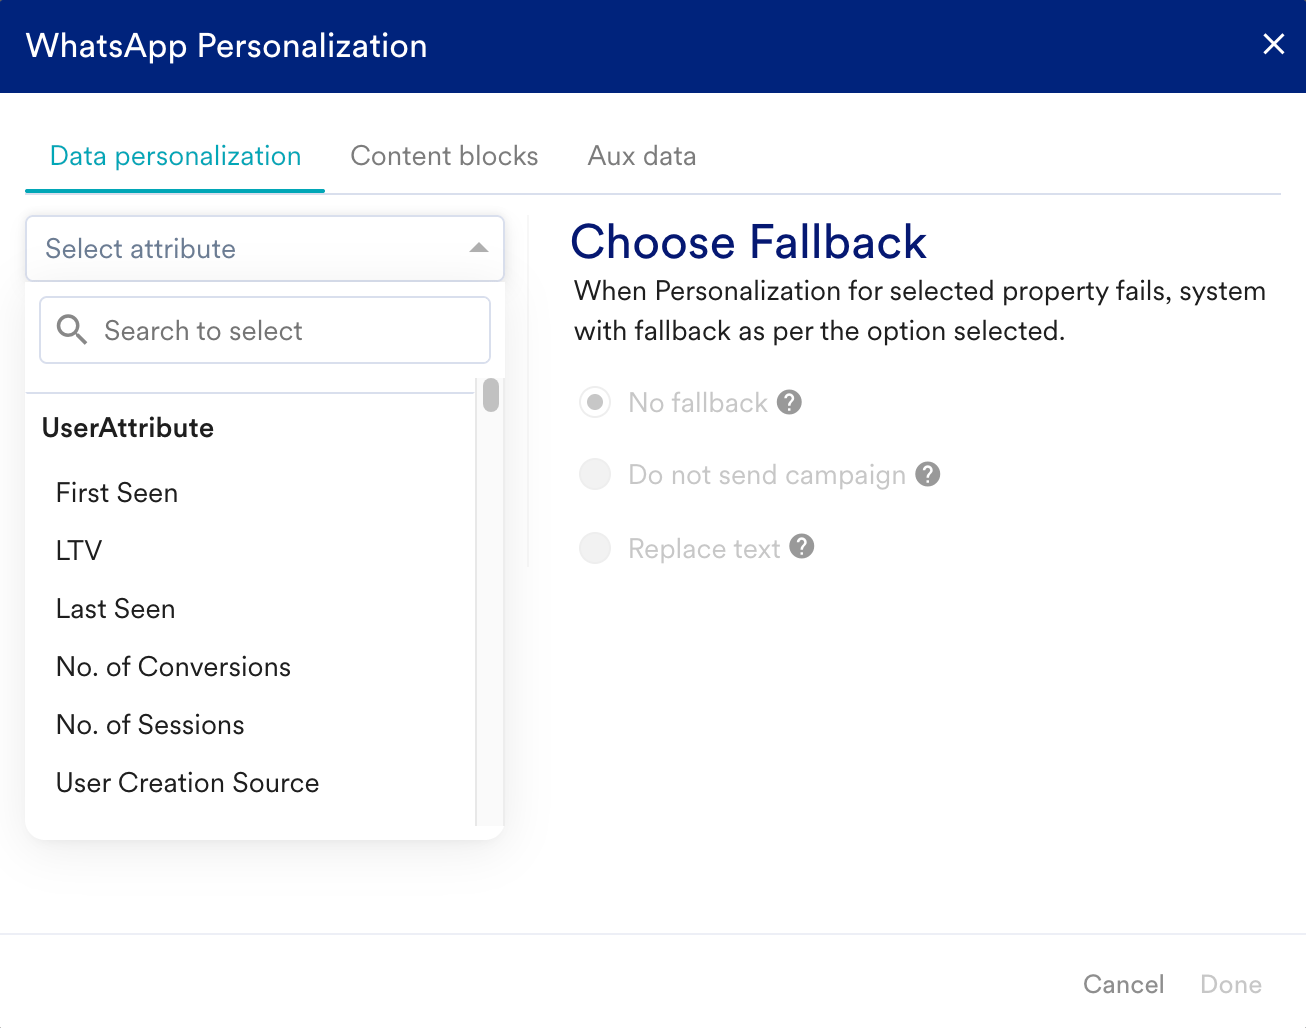 ### Choose Fallback
When you personalize a message, a fallback option helps ensure content is always displayed, even if the chosen attribute is unavailable for a user or fails to display correctly.
You can select from these fallback options:
* Select **No Fallback** in case there is no alternative to the failed attribute. The personalized attribute will be substituted with an empty string in case of personalization failure.
* Select **Do not send SMS & RCS** when you choose not to send the WhatsApp messages in case of personalization failure.
* Select **Replace text** in case you choose to replace the failed attribute with a text of your choice. The personalized attribute will be replaced with the text you provide in the **Fallback text** field in case of personalization failure
Ensure that custom attributes do not have the same names as MoEngage's standard attributes. If a custom attribute and a standard attribute having the same name are used for personalization, it could result in incorrect personalization.
## Personalize Using Recommendations (Product Sets)
Recommendations (Product sets) help you communicate real-time and contextual product recommendations to customers. For more information, refer to [Recommendations](/user-guide/content/recommendations/personalize-campaign-with-recommendations).
**Prerequisites**
* A Recommendation (Product sets) that is set up and mapped to a user action.
* Have a pre-approved WhatsApp template with placeholders to accommodate the data from the Recommendations (Product sets). For example, if you wish to personalize the user name from the user attributes and add the recommended product's title and link from the Recommendation (Product sets), get a template approved with three placeholders, as explained in the example below.
To send a dynamic product recommendation using WhatsApp, perform the following:
1. In step 2 of the campaign creation process, select the Sender with whom the Recommendations template has been approved.
2. Select the approved template.
3. Fill in the placeholders by typing @. In the personalization screen that appears, choose the user attribute and product set attributes.
1. For product sets, choose the desired product set and click ok. This will add the product set to the placeholder. A product set typically contains a list of items, each with specific attributes such as name, title, id, image link, and so on. Adding a product set as such with display all the contents of the product set in the message.
2. To add only one item to the Recommendations set, loop through the product set as explained below and fetch the desired item. For this item, fetch the desired attribute by typing @ inside the for loop and select the desired property from the product set in the personalization window.
4. Click on the personalized preview to see the message for a specific user.
### Choose Fallback
When you personalize a message, a fallback option helps ensure content is always displayed, even if the chosen attribute is unavailable for a user or fails to display correctly.
You can select from these fallback options:
* Select **No Fallback** in case there is no alternative to the failed attribute. The personalized attribute will be substituted with an empty string in case of personalization failure.
* Select **Do not send SMS & RCS** when you choose not to send the WhatsApp messages in case of personalization failure.
* Select **Replace text** in case you choose to replace the failed attribute with a text of your choice. The personalized attribute will be replaced with the text you provide in the **Fallback text** field in case of personalization failure
Ensure that custom attributes do not have the same names as MoEngage's standard attributes. If a custom attribute and a standard attribute having the same name are used for personalization, it could result in incorrect personalization.
## Personalize Using Recommendations (Product Sets)
Recommendations (Product sets) help you communicate real-time and contextual product recommendations to customers. For more information, refer to [Recommendations](/user-guide/content/recommendations/personalize-campaign-with-recommendations).
**Prerequisites**
* A Recommendation (Product sets) that is set up and mapped to a user action.
* Have a pre-approved WhatsApp template with placeholders to accommodate the data from the Recommendations (Product sets). For example, if you wish to personalize the user name from the user attributes and add the recommended product's title and link from the Recommendation (Product sets), get a template approved with three placeholders, as explained in the example below.
To send a dynamic product recommendation using WhatsApp, perform the following:
1. In step 2 of the campaign creation process, select the Sender with whom the Recommendations template has been approved.
2. Select the approved template.
3. Fill in the placeholders by typing @. In the personalization screen that appears, choose the user attribute and product set attributes.
1. For product sets, choose the desired product set and click ok. This will add the product set to the placeholder. A product set typically contains a list of items, each with specific attributes such as name, title, id, image link, and so on. Adding a product set as such with display all the contents of the product set in the message.
2. To add only one item to the Recommendations set, loop through the product set as explained below and fetch the desired item. For this item, fetch the desired attribute by typing @ inside the for loop and select the desired property from the product set in the personalization window.
4. Click on the personalized preview to see the message for a specific user.
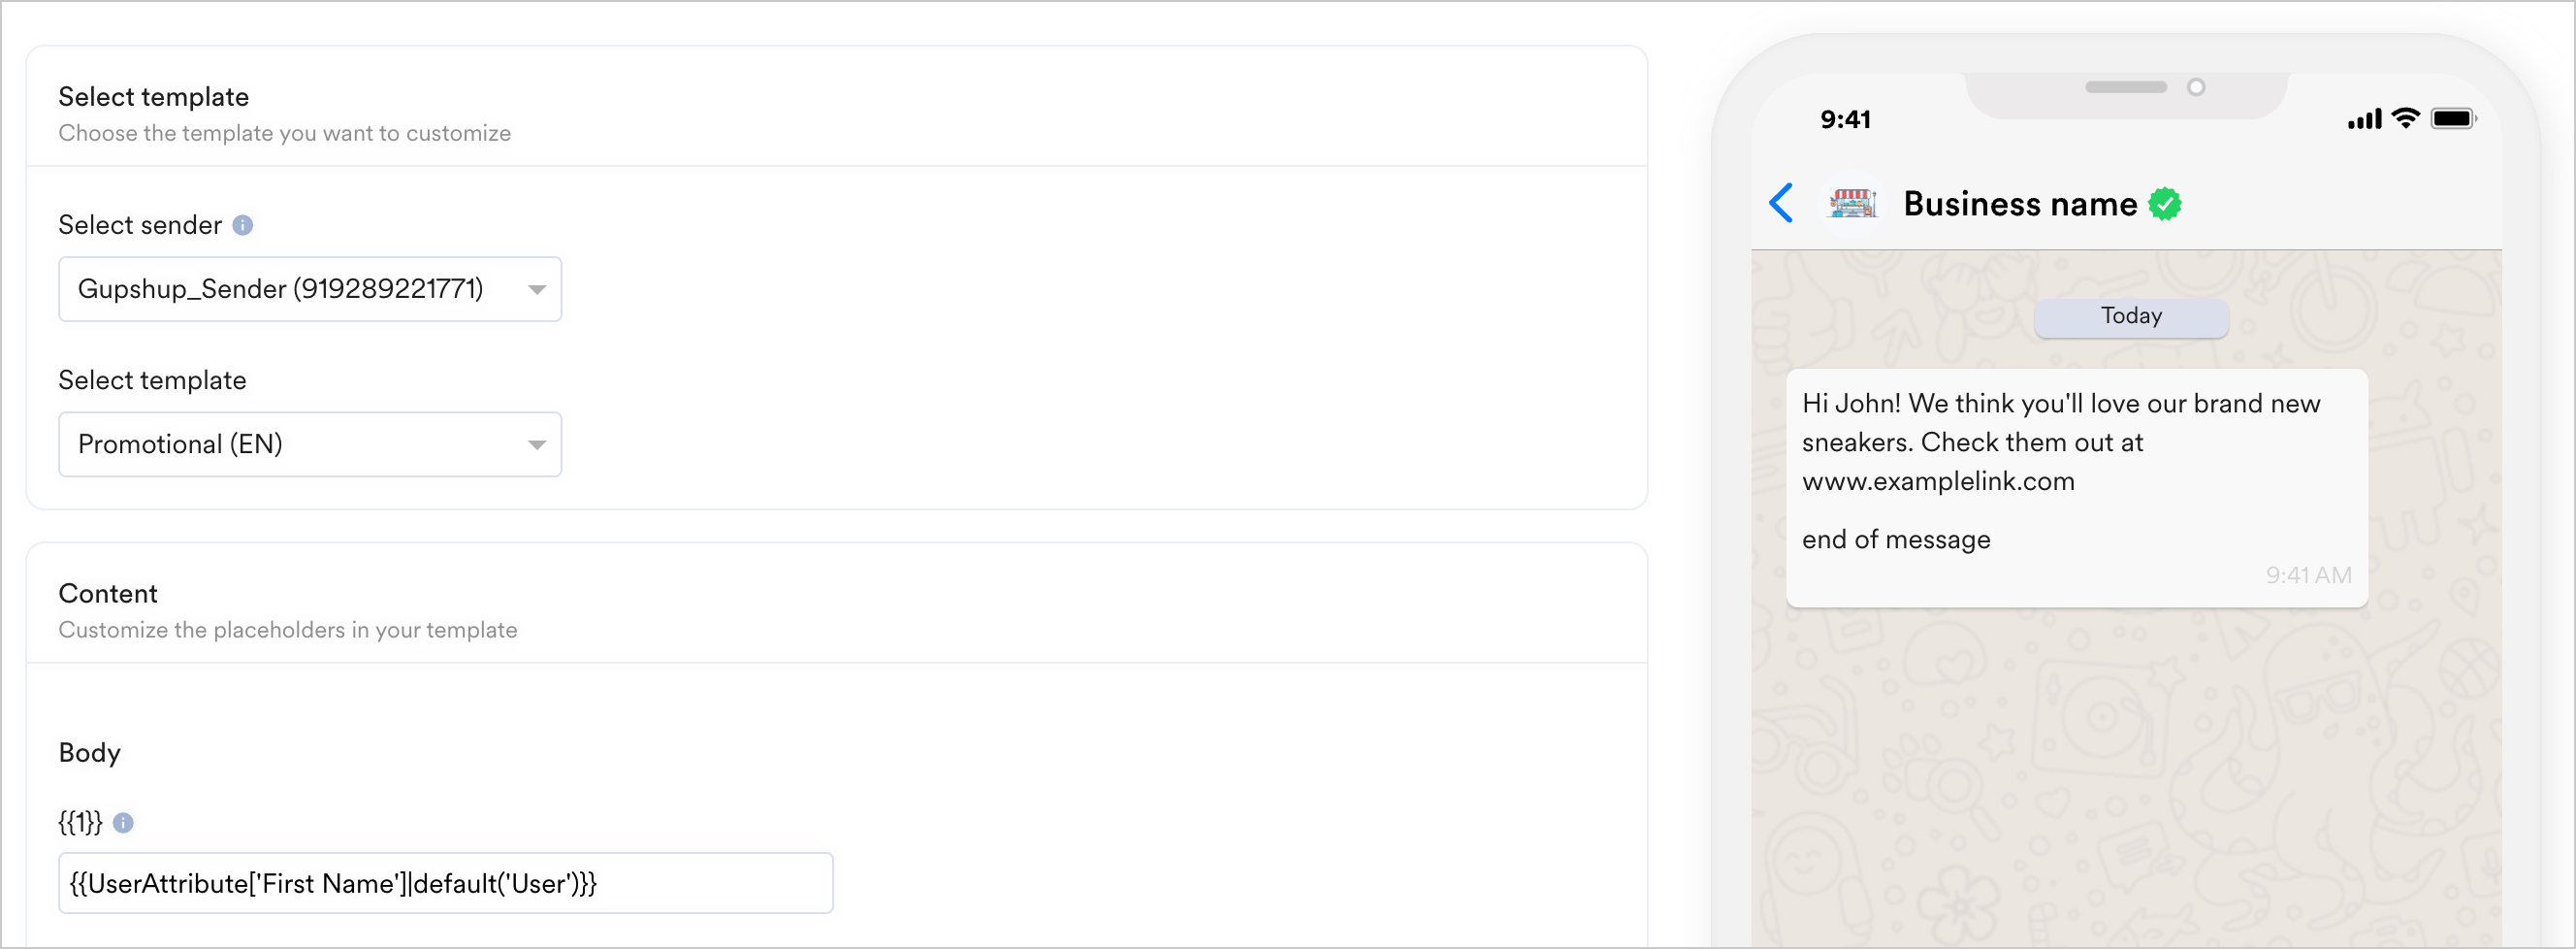 In the example shown below, the template has three placeholders:
1. The first placeholder is used for personalization and is fetched using the *firstname* user attribute.
2. The second placeholder loops through a product set called `ProductSet` to fetch the first item in the product set and display its title using the following JINJA code. In this example, the Recommended product is **Sneakers**.
```text JINJA theme={null}
{% if ProductSet.product_recommendations%}
{% for product in ProductSet.Recommendations[0:1]%}
{{product.title}}
{% endfor %}
{% else %}
MOE_NOT_SEND
{% endif %}
```
3. The third placeholder loops through the Recommendations product set to fetch the link for the recommended product using the following JINJA code:
```text JINJA theme={null}
{% if ProductSet.Recommendations%}
{% for product in ProductSet.Recommendations[0:1]%}
{{product.link}}
{% endfor %}
{% else %}
MOE_NOT_SEND
{% endif %}
```
For more information about JINJA, refer to [MoEngage Templating Language](/user-guide/campaigns-and-channels/getting-started/message-personalization/jinja-templating-language).
## Personalize Using Content APIs
WhatsApp campaigns can be personalized using Content APIs to deliver relevant and timely information to users.
### Add Content APIs
Content APIs can be added to the MoEngage dashboard. Using the following navigation to access Content API: **Settings** > **APIs** > **Content API,** and click **Add** to add the Content API. For more information, refer to [Personalize Content Using Content APIs](/user-guide/campaigns-and-channels/getting-started/message-personalization/personalize-content-using-content-apis).
### Create a Personalized Campaign using Content API
1. Type **@** in the content creation step to invoke the personalization editor.
2. In the **SMS and RCS personalization** pop-up, navigate to the **Data Personalization** tab.
3. Search for Content API and select the API from the list.
4. Click **Done**.
In the example shown below, the template has three placeholders:
1. The first placeholder is used for personalization and is fetched using the *firstname* user attribute.
2. The second placeholder loops through a product set called `ProductSet` to fetch the first item in the product set and display its title using the following JINJA code. In this example, the Recommended product is **Sneakers**.
```text JINJA theme={null}
{% if ProductSet.product_recommendations%}
{% for product in ProductSet.Recommendations[0:1]%}
{{product.title}}
{% endfor %}
{% else %}
MOE_NOT_SEND
{% endif %}
```
3. The third placeholder loops through the Recommendations product set to fetch the link for the recommended product using the following JINJA code:
```text JINJA theme={null}
{% if ProductSet.Recommendations%}
{% for product in ProductSet.Recommendations[0:1]%}
{{product.link}}
{% endfor %}
{% else %}
MOE_NOT_SEND
{% endif %}
```
For more information about JINJA, refer to [MoEngage Templating Language](/user-guide/campaigns-and-channels/getting-started/message-personalization/jinja-templating-language).
## Personalize Using Content APIs
WhatsApp campaigns can be personalized using Content APIs to deliver relevant and timely information to users.
### Add Content APIs
Content APIs can be added to the MoEngage dashboard. Using the following navigation to access Content API: **Settings** > **APIs** > **Content API,** and click **Add** to add the Content API. For more information, refer to [Personalize Content Using Content APIs](/user-guide/campaigns-and-channels/getting-started/message-personalization/personalize-content-using-content-apis).
### Create a Personalized Campaign using Content API
1. Type **@** in the content creation step to invoke the personalization editor.
2. In the **SMS and RCS personalization** pop-up, navigate to the **Data Personalization** tab.
3. Search for Content API and select the API from the list.
4. Click **Done**. 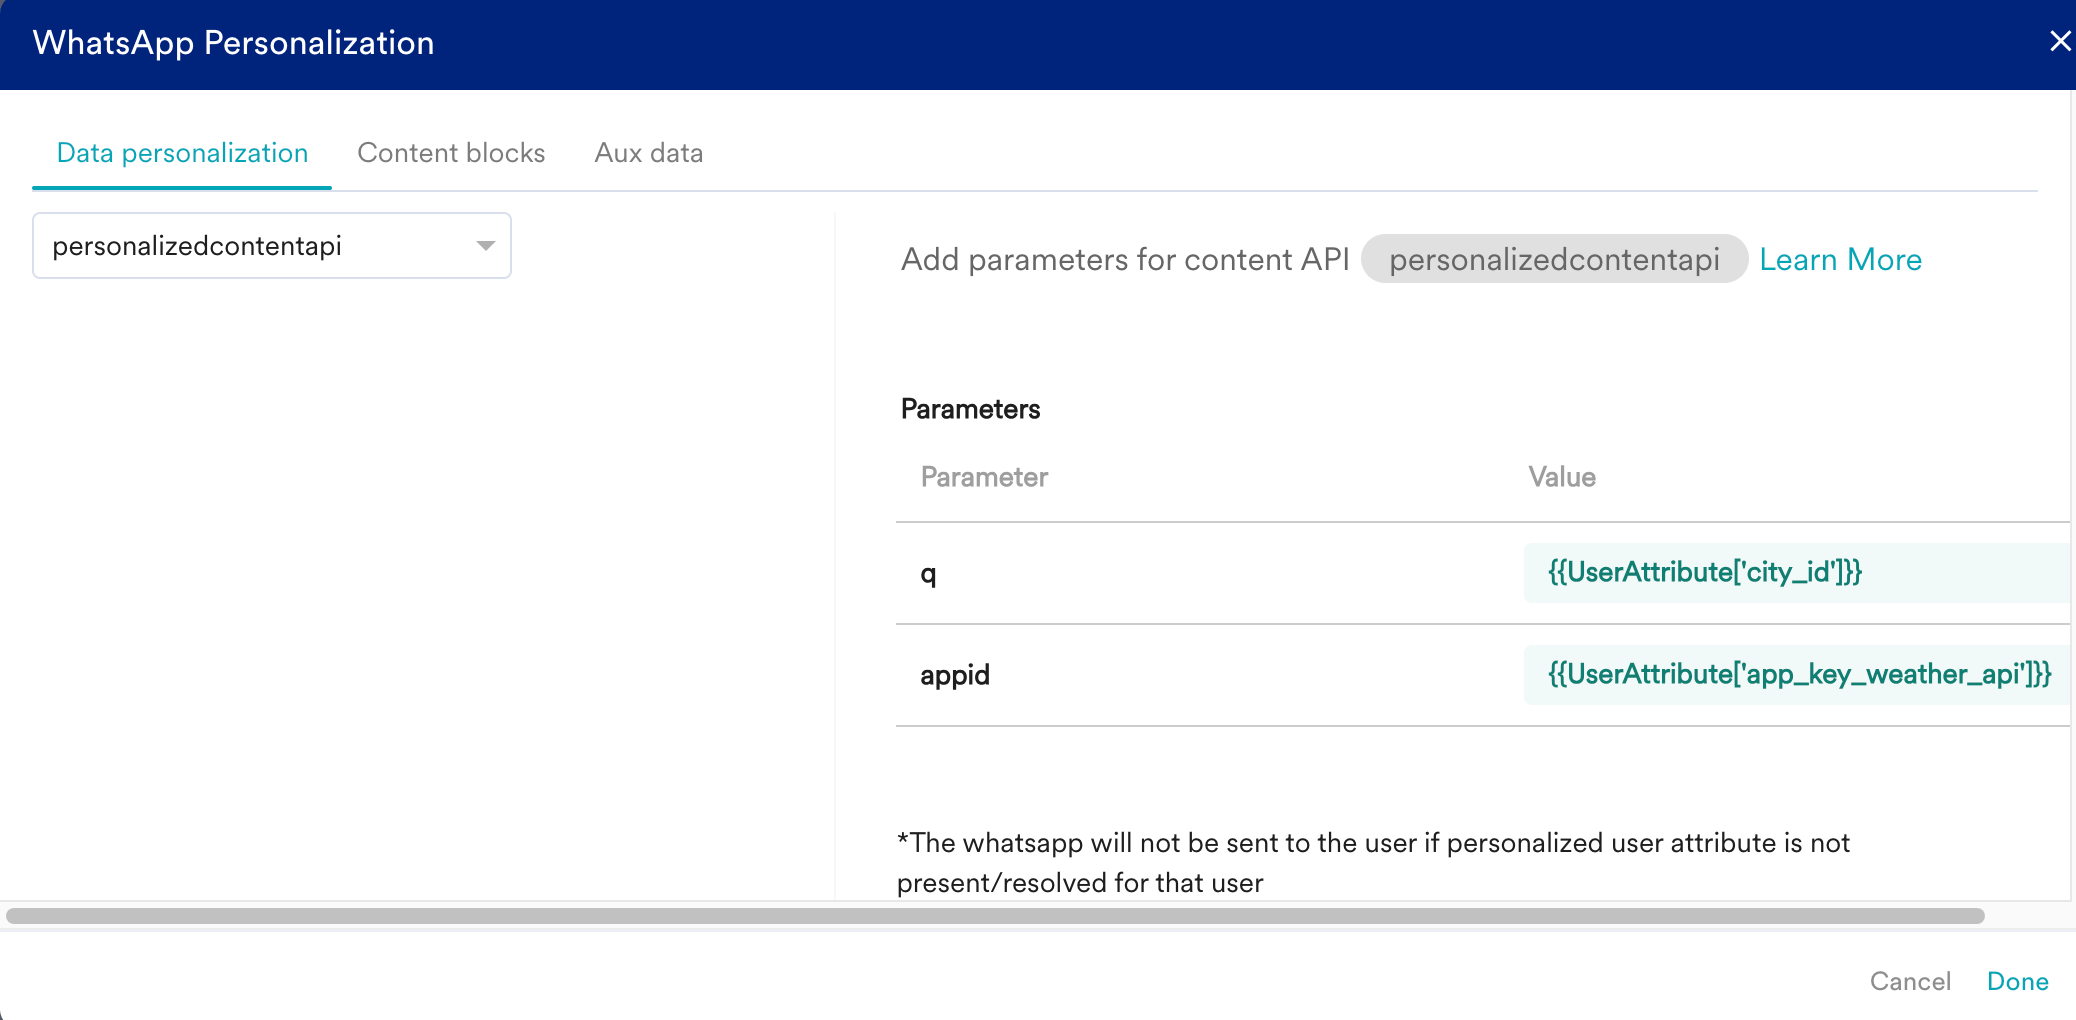 # Personalize Using Content Blocks
Content Blocks are reusable content snippets you can use across various campaigns. These are especially helpful for standard elements like headers, footers, signature blocks, or terms and conditions.
To personalize your messages using a content block:
1. Type @ in the content section.
2. In the personalization menu that appears, click the **Content blocks** tab.
3. Select the content block to be inserted.
4. Click **Done** to add the selected Content Block, and it gets added to the message as shown below.
5. Turn on the **Insert only the content of the content block** toggle to disconnect the content from the existing content block, and any future updates to the content block will not be reflected in the campaign. This step is optional. For more information, refer to [Content Blocks](/user-guide/content/content-blocks/content-blocks).
# Personalize Using Auxiliary Data
You can personalize your WhatsApp content using auxiliary data by selecting the auxiliary data attributes in the personalization editor.
To personalize content using Auxiliary Data attributes:
1. Enter @ in the fields wherever personalization is supported to invoke the personalization editor.
2. Select the **Aux Data** tab.
3. In the **Aux data** drop-down list, select the Auxiliary Data file whose attribute you wish to use for personalization.
4. In the **Lookup value** drop-down list, select the primary key specified for the Auxiliary Data during import. This will identify the user for whom the Auxiliary Data is being fetched.
5. In the **Attribute** drop-down list, specify the attribute to be personalized using Auxiliary Data.
6. Click **Done**. The Auxiliary Data JINJA will get added to the field or the editor.
# Personalize Using Content Blocks
Content Blocks are reusable content snippets you can use across various campaigns. These are especially helpful for standard elements like headers, footers, signature blocks, or terms and conditions.
To personalize your messages using a content block:
1. Type @ in the content section.
2. In the personalization menu that appears, click the **Content blocks** tab.
3. Select the content block to be inserted.
4. Click **Done** to add the selected Content Block, and it gets added to the message as shown below.
5. Turn on the **Insert only the content of the content block** toggle to disconnect the content from the existing content block, and any future updates to the content block will not be reflected in the campaign. This step is optional. For more information, refer to [Content Blocks](/user-guide/content/content-blocks/content-blocks).
# Personalize Using Auxiliary Data
You can personalize your WhatsApp content using auxiliary data by selecting the auxiliary data attributes in the personalization editor.
To personalize content using Auxiliary Data attributes:
1. Enter @ in the fields wherever personalization is supported to invoke the personalization editor.
2. Select the **Aux Data** tab.
3. In the **Aux data** drop-down list, select the Auxiliary Data file whose attribute you wish to use for personalization.
4. In the **Lookup value** drop-down list, select the primary key specified for the Auxiliary Data during import. This will identify the user for whom the Auxiliary Data is being fetched.
5. In the **Attribute** drop-down list, specify the attribute to be personalized using Auxiliary Data.
6. Click **Done**. The Auxiliary Data JINJA will get added to the field or the editor. 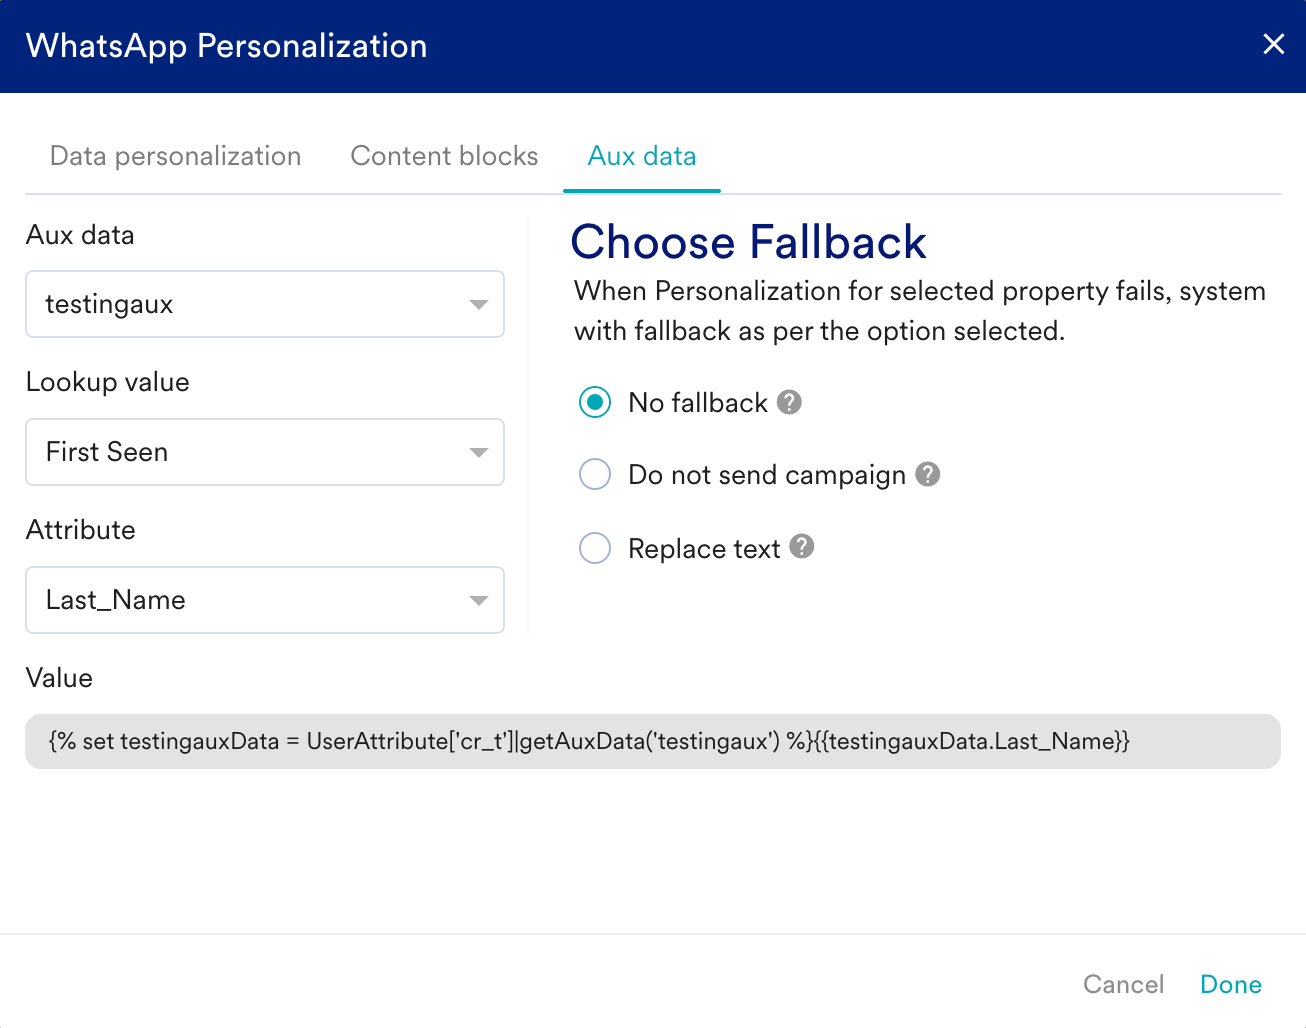 For more information, refer to [Personalize Campaign Content Using Auxiliary Data](/user-guide/campaigns-and-channels/getting-started/message-personalization/personalize-content-using-auxiliary-data).
# Personalized Preview
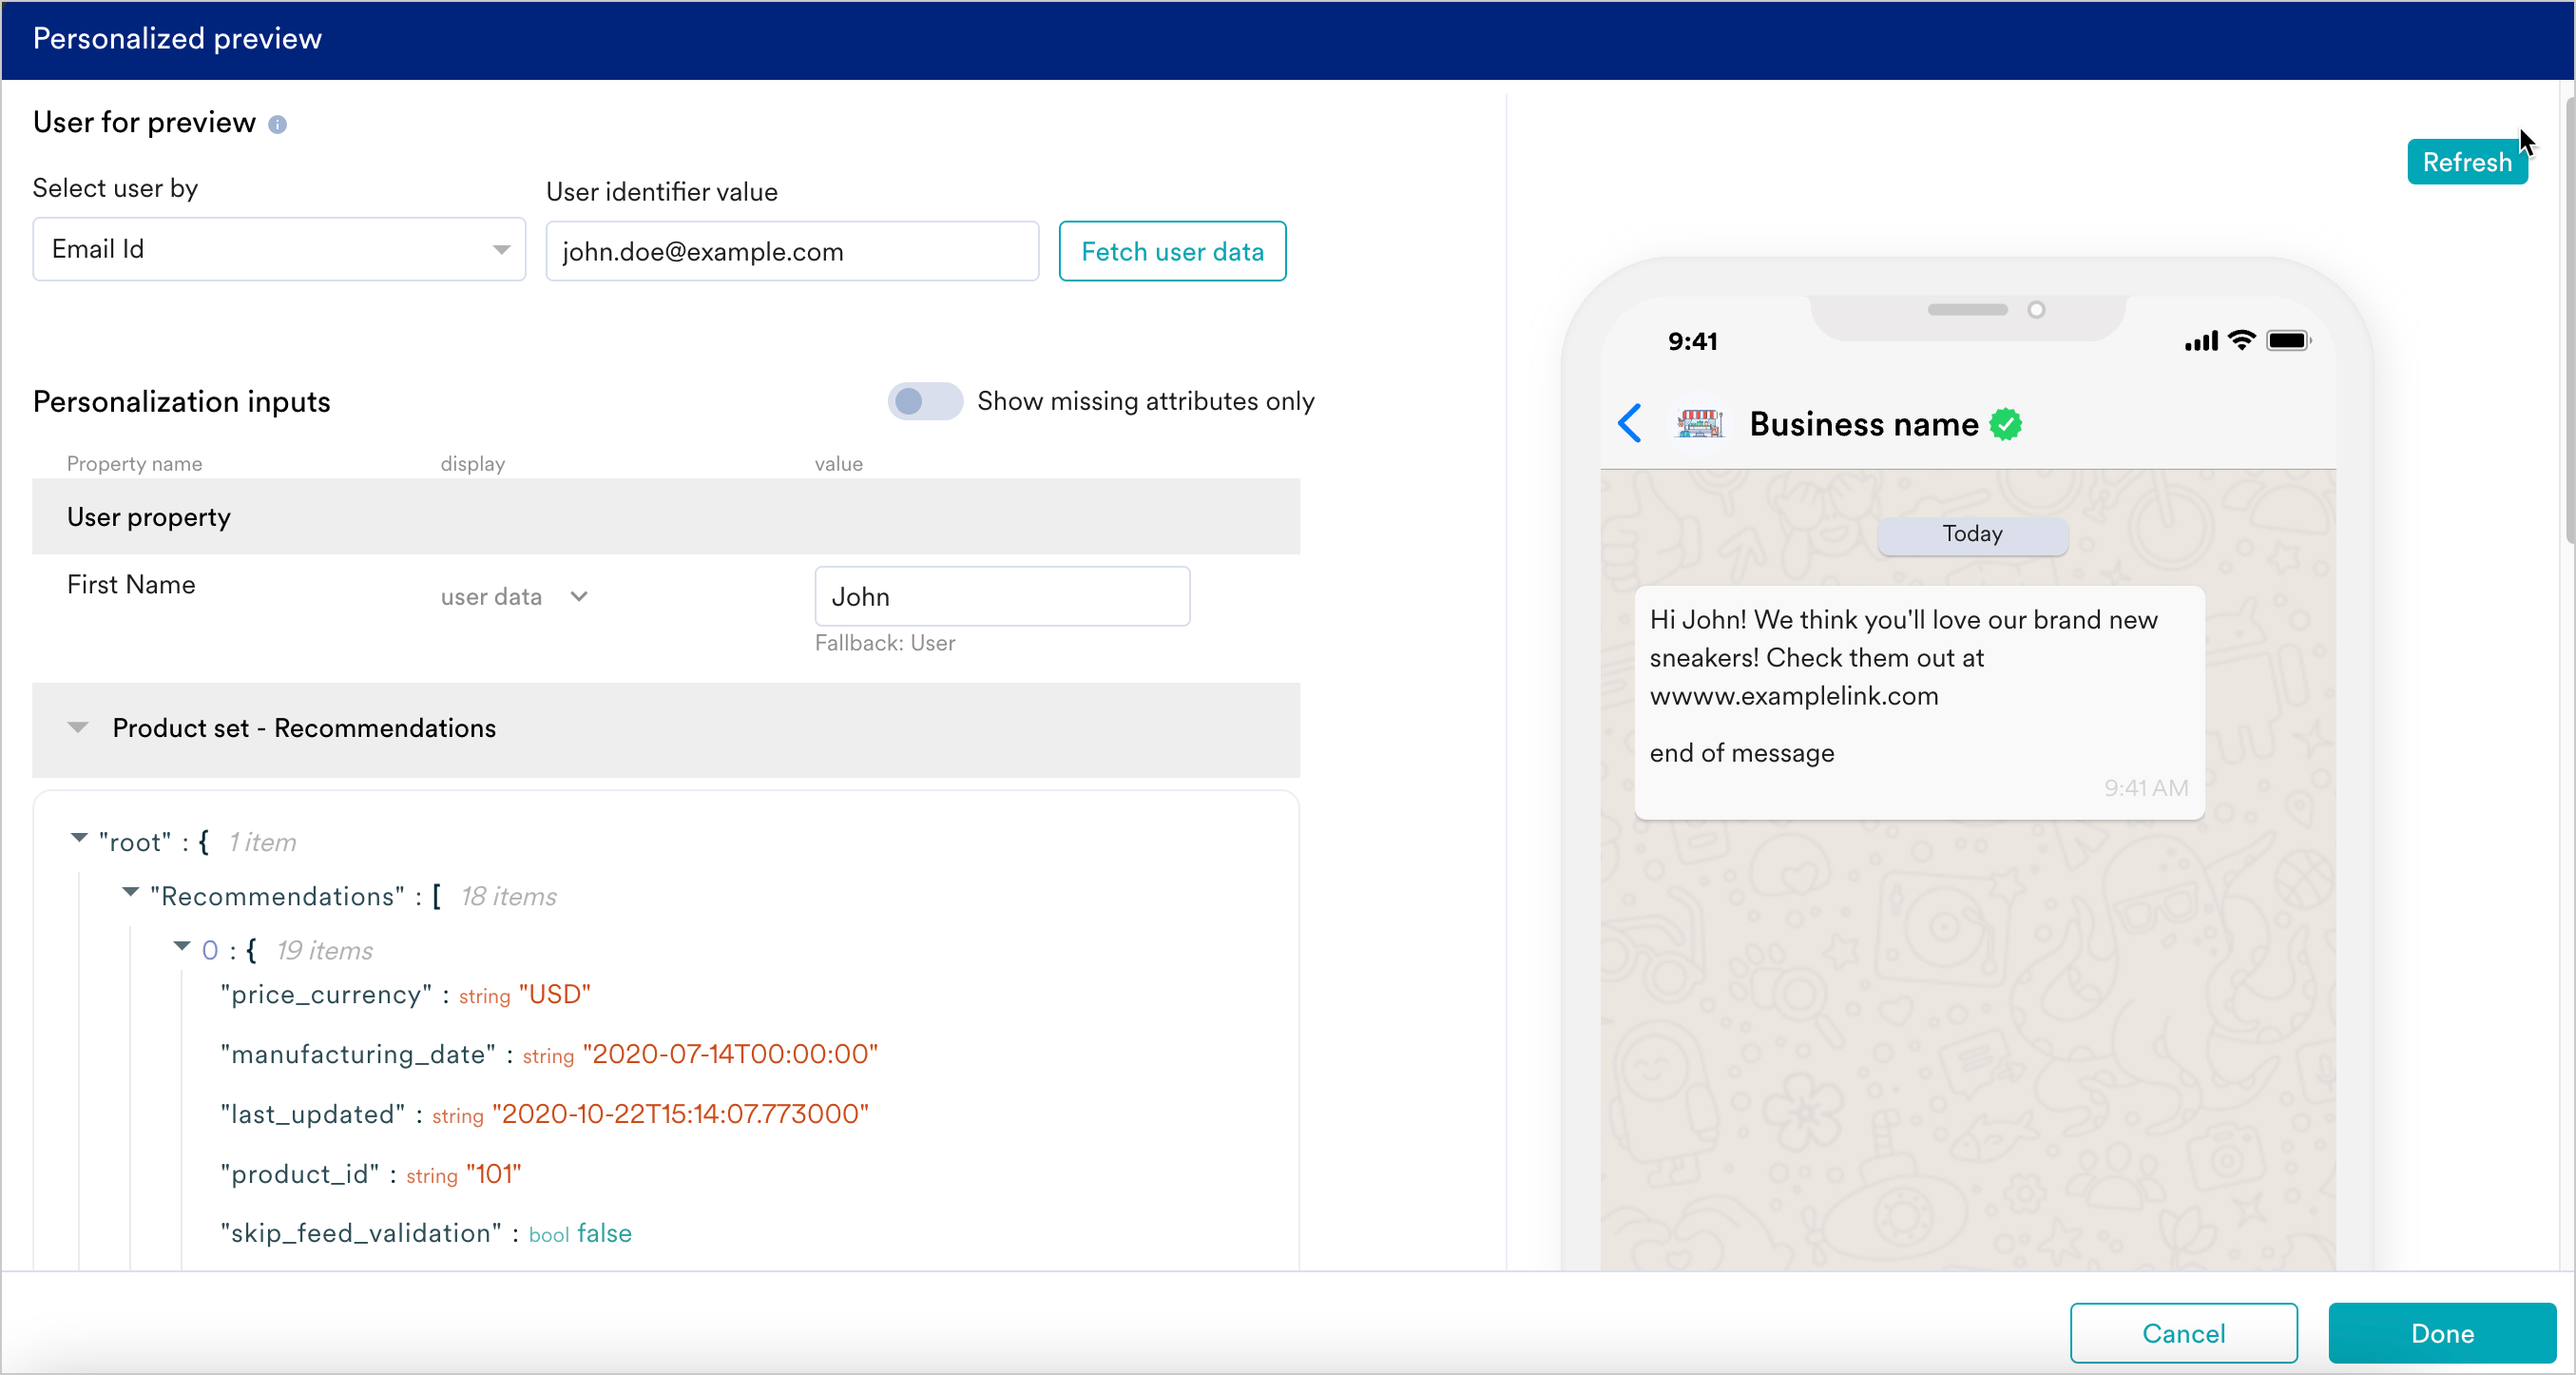
The Personalization Preview feature enables you to tailor content effectively, ensuring it meets the needs of your target audience. For more information, refer to [Personalized Preview](/user-guide/campaigns-and-channels/getting-started/message-personalization/personalized-preview).
For more information, refer to [Personalize Campaign Content Using Auxiliary Data](/user-guide/campaigns-and-channels/getting-started/message-personalization/personalize-content-using-auxiliary-data).
# Personalized Preview
The Personalization Preview feature enables you to tailor content effectively, ensuring it meets the needs of your target audience. For more information, refer to [Personalized Preview](/user-guide/campaigns-and-channels/getting-started/message-personalization/personalized-preview).
 For more information on personalization errors, refer to [Common Personalization Errors and FAQs](/user-guide/campaigns-and-channels/getting-started/message-personalization/common-personalization-errors-and-faqs).